LA125 Overhaul

   / LA125 Overhaul
  • Thread Starter
#41  
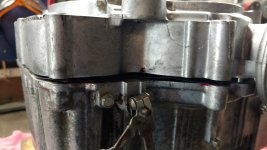
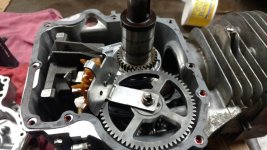
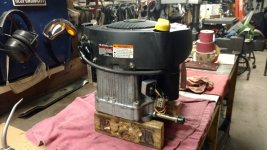
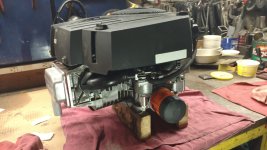
Started putting the engine back together today. Put new seals in the crankcase and cover, put the crank in, installed the rod and piston with new rings, and torqued the rod bolts up. Then I put in the lifters, cam, and governor assembly. Installed the case gasket, made sure everything was in place and dropped the cover on. Had to use a small screwdriver to get the seal lip over the crank PTO end running surface and the cover dropped on, almost all the way. Lacked about 1/8" of going on all the way. Tapped on it with a soft hammer, but something was hanging up near the middle of the cover. Took it back off and put it back on at least a dozen times and it still stopped an 1/8" of seating.
Got interrupted by a friend with a problem with some blind nuts on the firewall of his model airplane. Seems he got some epoxy in the threads when he fuel-proofed the engine compartment. I was able to use a 6-32 tap, a Lisle tap adapter and a 1/4" drive handle to get in and clean them out.
Back to the engine, I was showing him how the cover was giving me a problem, but when I put it back on, it dropped right into place, tight against the crankcase. I have no idea was was hanging up, but it is on and bolted up now, and everything is free and working.
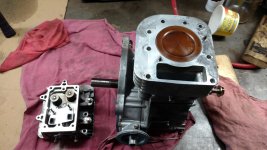
I used a block of granite I have with a piece of 150 grit sandpaper and got the sealing surface looking pretty good. Then I pulled the valves, cleaned them up and lapped them in, put on a new intake stem seal and put it all back together.
By then it was 6:00 and my daughter and grandkids were going to The Hacienda in town for some good Mexican food, so I closed up shop and headed to the house to get cleaned up.
 

Attachments

  • IMG_20220713_164234662_TOP (Medium).jpg
    IMG_20220713_164234662_TOP (Medium).jpg
    573.8 KB · Views: 137
  • IMG_20220713_164343608 (Medium).jpg
    IMG_20220713_164343608 (Medium).jpg
    563.1 KB · Views: 151
  • IMG_20220713_174941362 (Medium).jpg
    IMG_20220713_174941362 (Medium).jpg
    622.3 KB · Views: 139
   / LA125 Overhaul
  • Thread Starter
#42  
Got the engine completely assembled this afternoon. Went pretty smooth except for forgetting to put a baffle on the top of the crankcase before I put the flywheel on, so I had to pull it again. No big deal, I know exactly which puller parts to use now, was a 15 minute job. Also had the external governor lever on backwards, but that was easy to correct. I have to get an oil filter and oil, as I forgot to get them when I picked up the other parts.
A friend is coming over tomorrow to give me a hand setting it on the tractor, so I should have it all done in the afternoon, again.
 

Attachments

  • IMG_20220715_174542895 (Medium).jpg
    IMG_20220715_174542895 (Medium).jpg
    670 KB · Views: 138
  • IMG_20220715_174552304 (Medium).jpg
    IMG_20220715_174552304 (Medium).jpg
    681.1 KB · Views: 134
  • IMG_20220715_174856752 (Medium).jpg
    IMG_20220715_174856752 (Medium).jpg
    653.5 KB · Views: 159
   / LA125 Overhaul #43  
OK we are sitting on the edge of our seats wondering if you used some sort of gasket sealer on the head gasket.
 
   / LA125 Overhaul
  • Thread Starter
#44  
OK we are sitting on the edge of our seats wondering if you used some sort of gasket sealer on the head gasket.

After a lot of thought and rumination, yes I did. I gave it a good coat of Permatex Copper Coat gasket sealer on each side of the gasket. I figured that if it doesn't hold, it's not a big job to pull it off and replace it again, now that I know how to do it without removing the engine.
And I did get then engine installed and started up today. It runs like a top, no blow-by to speak of and only one oil leak.
Apparently the because problem I had with the bottom cover going on, and taking it on and off about a dozen times ruined the lower crank oil seal. So, I think I can raise the front of the tractor, remove the drive pulley and replace the seal without too much difficulty. I hope. We'll see.
But it does really run nice and smoothly.

Since I wasn't able to take it back to my niece's house, I loaded the BX up and went over and mowed her lawn, it was getting pretty shaggy. The BX with the new Oregon Gator blades make short work of it.

IMG_20220716_142246237 (Medium).jpg
 
   / LA125 Overhaul
  • Thread Starter
#45  
Picked up a new seal and some oil at the JD dealer today, got the new crank seal installed and everything put back together. Ran it for 15 minutes, and no leaks!
It's going back home tomorrow, finally.
 
   / LA125 Overhaul #46  
Great dedication and kudos for doing it right! A few pics or video of the 125 running would be great!
 
   / LA125 Overhaul
  • Thread Starter
#47  
Here's a picture of it finished up, before I had to pull the engine. A friend buffed out the hood, and it looked as good as new.

IMG_20220703_154315523_HDR (Medium).jpg


IMG_20220703_154325133_HDR (Medium).jpg
 
   / LA125 Overhaul #48  
Nice job! I sold my 125 to a friend in need. It had zero issues in 225 hours.
 
   / LA125 Overhaul #49  
Thanks Bravo for taking me along on your project,I'm sure your niece will make good use of it. I'm throwing my name in the hat in case you decide to adopt a nephew.
For the sake of debate about gasket sealer and missing head bolt what is the consensus on this? The head bolts appear about 2" apart so we will call them 2". Install gasket dry if that's what is reccomended,,,except,,,, apply one 1.5" long coat on gasket between bolt holes on both sides followed with 1" on bottom, 3/4" on top and finnaly 1/2" on bottom. Torque as specked. Intended effect being to create a girdling effect across space between bolts. Trial testing on flat plate might suggest fewer or additional coats depending on thickness of dry layer.
 
   / LA125 Overhaul
  • Thread Starter
#50  
Interesting idea on applying sealer.
The span between head bolts in that area is more like 4 inches, from one side of the block to the other.
We'll see how it holds up. If it blows again, I'll have the block decked and o-ringed, but with the increased head bolt torque from 220 in.lbs. to 250 in.lbs. and the sealer, I think it'll hold now.
 

Tractor & Equipment Auctions

2003 Ford E-350 16ft Box Truck (A50323)
2003 Ford E-350...
2014 Ford F-550 Altec AT37G 37ft Bucket Truck (A50323)
2014 Ford F-550...
Montreal ST225/75R15 Trailer Tires (A50322)
Montreal...
STORAGE FEES (A52577)
NEW 36'' Skid Steer Grapple Bucket (A53002)
NEW 36'' Skid...
2018 Chevrolet Traverse LT SUV (A50324)
2018 Chevrolet...
 
Top