Flail Mower Lawn Genie Flail Mower Parts Question

   / Lawn Genie Flail Mower Parts Question #12  
I also have a Lawn Genie so I'll subscribe.


Hello pmsmechanic,


If have not already done so I want to welcome you as the newest Resident Member of the Flail Mower Nations from the Province of Alberta, Canada.
 
   / Lawn Genie Flail Mower Parts Question
  • Thread Starter
#13  
Hello jolderdude,

<snip>
do you have the winch or is your basket set up to dump it using hydraulics?
<snip>

The tapered knives that Mathews made are a beautiful side slicer knife and the standard knives do not work as well simply because the cutting edge is shorter and does not overlap as well.

Its a real shame that flail mower builders do not use the Mathews tool less flail mower knife attaching system as it saves hours of work and fussing as all you need is hot water and a wire brush if the flail mower rotor is really dirty.
<snip>

Hi Leonz,
I don't have a basket on mine. It's just the mower. It started life as an orchard mower in southern Oregon. I use it now to tend 5 acres of pasture. My spouse likes well tended pastures and a bush hog just knocks the grass down instead of cutting it up as nicely as the Lawn Genie. I've got to mow early and often because the LG doesn't fare too well in three foot high grass. We're so wet here that you can almost see the grass grow. There have been times that I had to have my neighbor run his bush hog through the tall stuff to knock it down before I can clean it up with the LG.

The Mathews Company angle knives are real nice. They are double sided so you can turn them around when one side gets worn. As you say, the attaching system is nice, too. Occasionally I'll get a fir limb hiding in the grass that blew off a tree beside the pasture. They can bend the hooks the blades sit on and sometimes knock off a knife. But it's not to hard to use the air wrench to pull off the hook and put on a new one. Mathews still sells me the hooks and knives. I flip the knives every two or three years and get a new set when both sides are worn. I keep spares on hand for when a hidden limb takes out a knife.

The other part I keep on hand is the idler spring for the belt tension. The ends get worn and either stretches or breaks every two or three years.
 
   / Lawn Genie Flail Mower Parts Question #14  
Thanks for the reply, Spanner.
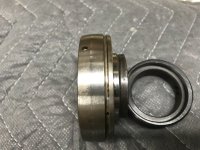
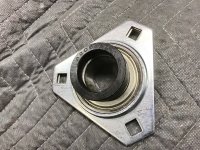
1. I don't have the old gauge roller. It went to metal recycling a few years ago. I do have the brackets. They weren't really only brackets. They were the bearing housing too. It was a cast metal piece with a ball bearing race, and a ring on the inside. Real old timey. They're all rusted up now. I've attached a picture of them. I doubt I could reassemble those as working bearings. Yes you can. The outer race of the old bearings are still in there. They are removed by twisting 90 degrees into the two slots visible in Pic 1 to be pulled out.
2. As you might guess from above, the bearing housings were the brackets. Yes
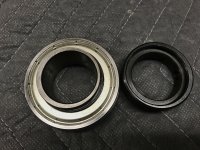
3. The locking collars are a separate ring that is machined to fit snugly over an edge of the bearing set. The collars are round and not offset. I've attached a couple of pictures of them, too. Yes they are offset. (Eccentric) I can see the edge of the bearing in Pic 3 and the offset is visible. If you try and rotate the collar on the bearing it will 'bind' and not turn 360 degrees??
I wasn't quite sure what to call the 'axle shaft' but let's go with your term.
I think that you've given me a good idea on how to approach this. Drill my own depression into the shaft for the grub screw on the locking collar. There is only one screw on each collar, but let's go with what we've got. I agree, it will keep the collars out of the line of fire from the grass. Hopefully the one screw with the countersunk depression will hold when the body of the roller pushes on the bearing and collar.
I have a friend working with me because I'm way too old and out of shape to wrassle that gauge roller around. He's smarter than me, too. He is sure that we did something wrong the last time we did the assembly because there's got to be other people with this mower that aren't having these problems. Either that or the Matthews Company is making a killing on bearing and collar sets.
Thanks for taking the time to make the thoughtful reply.

There is only 1 grub screw? And I can see the hole in the collar in Pics 2 & 3 is 'blind' i.e it doesn't go all the way through the collar edge??

That hole is for the tool to grip the collar and twist it against the bearing to lock onto the roller shaft shaft. (Like the Chinese Burn you did as kids to each others arm. Twist the skin in opposite diredtions. It hurts.)

The single grub screw then secures the collar from loosening. You can drill the recess into the shaft at this point of the assembly. Use of 'green' Loctite on the grub screw is recommended. The grub screw will bite firmly into the countersunk recess you make. It does not need to be over-tightened. I see people wreck hex-keys by trying to over-tighten these little grub screws. The twist of the locking collar is the securing effect. The grub screw is just a retainer.

Your smart friend is correct and you did do something wrong. The 'fail' was not to twist the collar to lock it.

Hold the bearing with two fingers in the centre where the shaft would go. Place the collar over the bearing. Twist slowly... the collar wil grip the bearings inner race and turn it on your fingers. No matter how hard you jam your fingers in - the collar will... grip. This is the 'eccentric' locking effect.

I hope this can help you understand but feel free to ask if I can help clarify the procedure further.

If you don't have a small 'pin-wrench' to use to lock the collar - Most people don't - use a small punch and hammer to drive the collar around to lock it.
 
   / Lawn Genie Flail Mower Parts Question #15  
Lubrication - Grease

Further to my long-winded post above I wonder about lubrication as I don't see any grease fittings on either your old cast housings or your new pressed steel housings in that drawing.

Bearings need lubrication when carrying rollers of the size you find on these types of flail mowers. They run in the worst place - down in the grass among the dirt and debris.

I would be inclined to re-use those nice old cast bearing housings and install grease fittings (zerks?) - We call them 'Grease Nipples' - to prolong the life of your new bearings.

In your pics 2 &3 the new bearings have a groove in the outer race. (Bearings have an inner & outer 'race' with the balls running in-between). Do those grooves have a small hole somewhere to allow grease into the ball-race or are they for a big circlip (snap-ring) ?
 
   / Lawn Genie Flail Mower Parts Question #16  
Offset - Eccentric

I lost part of my Post #14 when going back to look at your pics. So, to help you understand what I'm trying to describe:

I want dwell on the terms 'offset' & 'eccentric'.

Place the bearings collar on a flat surface with the recessed side facing up.

Look down the centre as if you were looking at the end of the rollers shaft...

The hole for the shaft is in the centre.
The outer edge of the collar is co-axial with the hole...

The recess for the bearing to sit in is not co-axial - It is offset - only by a small amount, 2mm?

Can you see what I'm trying (poorly) to describe?

Now, the bearing normally would have two flat sides but these bearings have a protrusion on the one side which the collar sits on. Call this the 'nose' of the bearing.
So, if you sit the bearing itself on the bench with the 'nose' facing up - you will see how the inner race has a thicker edge and a thinner edge where the roller shaft would pass through.
The hole is co-axial with the bearing - just the 'nose' of the inner race is machined with an in-built offset (Or 'Eccentric').


It's called an 'eccentric' because when rotating slowly it would look like it was wobbling, eccentrically.

The locking collar has a corresponding eccentric machined into the recessed edge.

Twisting the two eccentrics in opposite directions 'locks' them to the shaft. Then install that grub-screw. :thumbsup:

Sorry for the digression.
 
   / Lawn Genie Flail Mower Parts Question
  • Thread Starter
#17  
Your smart friend is correct and you did do something wrong. The 'fail' was not to twist the collar to lock it.

He was also smart to tell me to post on this forum to get some help. I am amazed at what I didn't know that I didn't know. It's great to find a place to be schooled on this stuff. I have my field of expertise but it's not in machinery. You have opened my eyes to things that would have been obvious if I had any clue what I was looking at.

Indeed, the bearings and locking collar are offset. I just didn't know what I was looking at or observant enough to notice it. While the locking collar will spin 360 when put on the bearing without being on the shaft, once it's on the shaft I can see that it will definitely lock when twisted. One picture attached definitely shows the offset.

There is one hole in the collar that is for the tool to twist the collar. The other hole is for the set screw (grub screw). There is also a hole on the bearing that doesn't go through so it's not for lubrication but it's probably for a tool to hold the bearing while twisting the collar. There is another, smaller hole in the groove on the bearing. I can't tell if it goes into the bearing but even if it does, after assembly in the bearing stampings there won't be access to the hole without a complete disassembly. There is a picture with the holes in the bearing showing and one with the bearing assembled in the stamping.

Thank you for your invaluable lessons here, Spanner.
 

Attachments

  • 2017-07-28 14.11.53.jpg
    2017-07-28 14.11.53.jpg
    1.5 MB · Views: 113
  • 2017-07-28 14.14.37.jpg
    2017-07-28 14.14.37.jpg
    2.8 MB · Views: 111
  • 2017-07-28 14.50.01a.jpg
    2017-07-28 14.50.01a.jpg
    4.1 MB · Views: 97
   / Lawn Genie Flail Mower Parts Question #18  
Phew. I'm glad I got to you before you reassembled and ran it to destroy more bearings. Stay on the line caller. I have more info for you.

Your pics are good, no... great. That's helped your cause.

I'll now refer you to my post #15 above regarding Lubrication AND your Pic #1 in your latest post #17.

There are two holes in the outer race of your new bearing. (As I suspected.)

The smaller hole in the groove is the one that lets grease enter the ball-race to lubricate the bearing.

That GROOVE is to allow the grease to run from the grease gun, through the 'zerk'/Grease Nipple fitting (which you don't have - read on...) into the Housing and run around the groove and into the ball-race. This follows the "Path-of-least-resistance" principle. (POLR)

It doesn't matter where the bearing is in relation to the Grease Fitting (which you don't have - read on...) because when grease is pumped into the housing there is a hollow groove directly under the GF which directs the grease around the circumference until it can pass into the inside and lube those nice shiny balls.

But you don't have a Grease Fitting!

Which is why I would restore those old cast housings and install a GF (Drill & Tap a hole) IMPORTANT that the GF hole is installed so it lines up with the groove when the bearing is installed. Following?

You could probably do this to the new pressed steel housings but the POLR principle means most grease would squish out between the plates.

Now. The other hole...
It is a blank hole. It is there to hold a pin (which you don't have). The pin inserted in this hole is a press-fit, about 2mm proud of the surface and is called the "Anti-Rotation Pin".

Why?
When you are using those cast-type housings I mentioned that the bearing is inserted in the slots and twisted 90 degrees.

The bearing outer race is curved on the outside. Those cast housings are curved on the inside. That's how come you can twist them to install and they remain snug afterwards.
Those pressed steel plates are slightly shaped but rely on being bolted tightly to retain the bearing.

To stop the bearing rotating within the cast housing a pin is installed which sits in the slot after installation and prevents the rotating bearing from using the cast housing as a bearing itself. It's the inner race which is supposed to be rotating.

The pressed plates don't have a slot as they don't need the bearings to turn 90 degrees for install so your supplier supplies bearings with no pins fitted.

The ability to grease the bearing is invaluable and ensures longer bearing life. Especially, as I mentioned before, given the extreme conditions in which these bearings operate with dirt, grass, water etc.

Hoping some/all of this is making sense. Happy to help from down here. :)
 
Last edited:
   / Lawn Genie Flail Mower Parts Question #19  
...

Now. The other hole...
It is a blank hole. It is there to hold a pin (which you don't have). The pin inserted in this hole is a press-fit, about 2mm proud of the surface and is called the "Anti-Rotation Pin".

Why?
When you are using those cast-type housings I mentioned that the bearing is inserted in the slots and twisted 90 degrees.

The bearing outer race is curved on the outside. Those cast housings are curved on the inside. That's how come you can twist them to install and they remain snug afterwards.
Those pressed steel plates are slightly shaped but rely on being bolted tightly to retain the bearing.

...

A little more on this:

The curve on the outside of the bearing is actually a section of a perfect sphere.

These types of bearings are referred to as "Self-Aligning" because the ability of the bearing to move in 360 degrees (Anti-rotation pin excepted) means that the brackets can be slightly out of line and the bearing will not bind the shaft and destroy either the roller shaft, the bearing, the housing or the side-plate of the mower. Mis-alignment is automatically accounted for because the bearing is a sphere inside another sphere (The inside curve of the cast housing).

Bearing fun facts.
 
   / Lawn Genie Flail Mower Parts Question #20  
The bearing shown in post 17 is designed to go into the cast iron housings not the stamped steel housing as Spanner has mentioned. Stamped steel housing usually use sealed bearings that require no added grease. The bearing you have may "fit" the stamped steel housing but its not the correct way. The bearing you have pictured requires adding grease and you have no way to do it. If you have to use the stamped steel housing for some reason you need a pre-lubricated sealed bearing. Spanner has mentioned everything I say here (I might have missed it) but I didn't see mention about a sealed bearing.


Tractor & Equipment Auctions

2021 Ver-Mac PCMS-3812 Solar S/A Towable Trailer Message Board (A49461)
2021 Ver-Mac...
2007 JOHN DEERE 310SJ BACKHOE (A50458)
2007 JOHN DEERE...
2023 Case IH 4412F 12 Row 30 In. Row Spacing Folding Corn Head (A50657)
2023 Case IH 4412F...
2015 PETERBILT 367 HOT OIL (A50854)
2015 PETERBILT 367...
2019-2024 Dodge Ram Front Bumper (A49461)
2019-2024 Dodge...
TMA (A49461)
TMA (A49461)
 
Top