Log cabin construction

   / Log cabin construction #21  
Eddie, that house does indeed have problems. But for whatever reason I just haven't seen that around here.

My logs are completely square. The only place water can get in is the ends, and like I said, mine are dovetailed and the top of each dovetail slopes downward. Where each dovetail fits you apply this thick black pitch-like glue and then you caulk at all the join lines.

Only time will tell of course. But so far so good. And the house that is 20 years old is a Southland like mine. The older house was imported from Canada and I have no idea who made it.

And while brick, vinyl and Hardi-plank (that's what my home is covered in) would surely be more rot resistant, I just don't see it being an issue with cabin. Only time will tell.

Although, I know that there are tobacco barns in eastern NC that are built of logs and are over a 100 years old and they are solid as a rock.

I think a lot has to do with the design, construction and proper treatment. Just like anything else.
 
   / Log cabin construction #22  
Eddie is right, that flat logs exposed to water=rot. Satterwhite uses souther yellow pine, which is what my house was built of. Second to water rot, i think termites are the #1 cause of problems. I have seen them build mud tunnels up the side of a 4.5' cresote pole to get to the tender "underbelly" of a house. Pine, fur, oak are a constant maintenance issue. Cedar, cypress, hemlock are much more termite resistant.
For me, proper wood selection & a good water shedding design, & a proper foundation will make a log home last for generations. Settling issues are part of the log process & must be expected.
RD
 
   / Log cabin construction #23  
I honestly don't know anything about log homes outside of my area. I love them and might even own one if we retire and move to the moutains some place. We have some original Civil War log structures still standing at Camp Ford, which is between my place and Tyler. Some of those logs are still in perfect condition!!!!!!

I'm not putting down log homes. They are awesome. I just like to caution those who are building them that there are some very serious issues with maintenance that must be done. Here in my area, rot is a huge issue. The log home companies and builders tend to gloss over these things and then years down the road, the homeowner discovers some very fatal flaws to the home.

Selling a log home in my area is also very dificult. Most home buyers get a home inspector and they find all sorts of issues. I'm called to give a bid on what it will cost to repair and then never hear from them again. They don't want the headache.

Eddie
 
   / Log cabin construction #24  
Eddie,

We are in the final stages of completing our Satterwhite log home here in Henderson. The home has an 8 foot porch on the front and back os the house with 6 foot porces on both sides, all these porches are covered. So the log walls should only get wet in a blowing rain. Not in a normal rain shower (maybe a little wet). I noticed in the pictures that you shared in an earlier post that the "D" log were exposed with either no porches or a little overhang.

My question is what has been your experience with repairs on Satterwhite homes with a complete wrap around porch to aid in protecting the home from the sun and rain?
 
   / Log cabin construction #25  
Satterwhite is the only log home that I've evern worked on. They really have the market cornered here without any real compition. I've been to their place North of Longview a few times, and they are very helpful if they think you are buying, but terrible if you are looking for informtion on repairing their homes.

The biggest problem and the first place that I look is those logs that stick out the ends. On several homes, they have a roof that changes pitch for the porch. These are not wrap around porchs, as I don't remember seeing one of those on a log home. The water comes off the roof at that transistion and soaks the logs. Due to the humidity and moisture that we have here, the logs really have to be sealed up better then they are. I've done it with bondo, and I've done it with silicone along the wood ridges at top so water will shed off of the logs.

Another area is at the base of the building. The bottom row of logs. If you don not have gutters, then water coming off of the roof will splash back up onto the logs. Again, this takes time to hapen, but I've had to patch and replace a few logs because of this.

I haven't seen termite damage, but won't say it's not there. Just not something that I've dealt with. I really don't do much work on log homes, it's just something that's come up from time to time, and it's always the same thing.

If you pay attention to it and do a realy good inspection after it rains, you should have an idea of where your problem spots are. There is no such thing as the perfect house, every house built either has problems, or will have them. Log homes just have some specific ones that more traditional, stick built homes, don't have.

Eddie
 
   / Log cabin construction #26  
MotorSeven said:
For me, proper wood selection & a good water shedding design, & a proper foundation will make a log home last for generations. Settling issues are part of the log process & must be expected.
RD

The problem with cedar and cypress is the expense. Have not compared prices lately but cedar was roughyl twice what yellow pine was (my logs are yellow pine) and cypress is like gold. Great stuff, no doubt. But still, there is no reason that yellow pine done right won't last for centuries. The vast majority of homes in the country are stick built of various white and yellow wood conifers and they do just fine. There is pine lap siding on buildings in historic areas of this state that are over 200 years old. (Of course they are 1" thick and coated with good old lead based paint.)

Yellow pine is also very easy to work with, which is a benefit for the DIY crowd.

So personally (having been through this decision process in the past and being well pleased with the results) I don't see any downside to yellow pine as long as it is done right. I mean after all, as far as i know you can't get a lifetime warranty on many building materials, even brick.

Edit: I would also add that the staining process is extremely important, I'm not exaggerating at all when I say that water beads up on the stain I used (I don't remember what it was but it was included with the kit, I do still have the cans it came in.) It is starting to fade on the east side of the cabin but that is due to sun, not rain. We'll stain again early next spring. But my logs look as pristine as the day we put them up.
 
Last edited:
   / Log cabin construction #27  
I'll be cutting,skidding & milling my own cedar.

Man do i have alot of work to do..............

RD
 
   / Log cabin construction #28  
MotorSeven said:
I'll be cutting,skidding & milling my own cedar.

Man do i have alot of work to do..............

RD

Yep!! When is the move in date?
 
   / Log cabin construction #29  
N80 said:
Edit: I would also add that the staining process is extremely important, I'm not exaggerating at all when I say that water beads up on the stain I used (I don't remember what it was but it was included with the kit, I do still have the cans it came in.) It is starting to fade on the east side of the cabin but that is due to sun, not rain. We'll stain again early next spring. But my logs look as pristine as the day we put them up.

George; My experience has been that the east and west side of my cabin (especially the west side) starts to fade first. The south would probably fall into that category as well, but since I have a porch across the entire front (south) side of my cabin, it doesn't get much sun.

I stained orginally with a product called Woodguard. It is an oil based stain that has worked well so far. Their directions said to to stain one year after the original coat and then every 3-5 years after that. I have done the original and 1 year coat. It appears that the east and west sides need to fall within the 3 year plan. The north and south ends could probably last 5 years but I'll probably just do it all at one time. Its not as big a job as it sounds. I just spray on the stain with a garden sprayer and back brush it. My wife and I did it in about 5-6 hrs.

Post pics of your cabin. I would like to see it.
 
   / Log cabin construction #30  
A crew of 4 from Satterwhite had mine dried in in just 14 total days.
All logs, roof decking (minus shingles) porches, windows, exterior doors, and stud walls were completed in this time frame. Shingles were added 3 days later.
 

Attachments

  • 005.jpeg
    005.jpeg
    147.1 KB · Views: 300
  • 008.jpeg
    008.jpeg
    133.1 KB · Views: 330
  • 012.jpeg
    012.jpeg
    154.1 KB · Views: 328
  • 015.jpeg
    015.jpeg
    150.6 KB · Views: 311
   / Log cabin construction #31  
TNhobbyfarmer said:
I stained orginally with a product called Woodguard.

Yes, I think that is what I used as well.......and here I am talking about proper staining and I forgot all about the one year re-stain. :eek: I now remember that it said specifically to do that. Maybe I'l restain prior to next spring.:rolleyes:

The east side of mine gets a lot of sun. We have some trees on the west that block the sun pretty well. South (porch side) the stain looks like new. North side still looks very good. West side still in good shape but east side is fading and not beading water as well as it used to.


Post pics of your cabin. I would like to see it.

I'll try to remember to do that when I get home.

MPrewitt, that is a fine looking house. And hey, I had mine dried in in 5 months!
 
   / Log cabin construction #32  
Here are a few pics of mine. Nothing to look at, but like a momma with an ugly baby...it still looks pretty to me. I think the interior looks alright. Everything in it, including the stove, fridge and all the furniture was stuff people were giving or throwing away. Of course my garage and attic looked like a yard sale until the cabin was done....we'd been hoarding stuff for years.

20984DSC0408-med.jpg


20984DSC0973-med.jpg


20984DSC0967-med.jpg


By the way, how do you guys post your photos as clickable thumbnails?
 
   / Log cabin construction
  • Thread Starter
#33  
Guys all I can say is I am proud to be part of this board, your information so far is invaluable to me.

Let me start from the beginning. We now stay at an old trailer, every weekend we go up to the property (past 4 years) so this tin can has gotten old for both my wife and I!! I want this to be our retreat from the hustle and grind of my work, and the city, so view this as my escape from civilization. I do a fair bit of target shooting and hunting, and being 53 I can see me partly retiring there in a few years.

And now for the cabin deal. These logs are on liquidation and I am able to buy, for $6,600 delivered, a 1,157 sq ft 2 story cabin (120 some logs pre-cut, square, with dovetail ends. They fit together by gluing a 2x4 in between the logs the seller says (supposedly a 30 year experienced contractor). He told me that I will have to purchase $1,800 worth of material i.e. plywood and shingles, to put the shell up, and that this cabin comes with 50 pages worth of directions as to how it should be put up, in every detail, and that two men can put it up in a week. Upon completion of the shell I would have to buy the parts necessary to complete the inside of the cabin (I am thinking of wrapping, insulating, and ****rocking the interior, or use cedar planks for the down stairs at least. Think of the down stairs as a 576 sq ft room, all open except for the bathroom and wash room. The upstairs I've not decided on yet but it'll probably end up being a one bedroom, bathroom, walk-in closet with a loft open to the down stairs, and a circular stir case.

Seller says that the logs are located near Springfield Missouri and they are stored at his construction site under a tarp so I'll only be able to inspect upon delivery. He'll deliver the logs to me for $1,800 so the logs essentially end up costing $4,800.

Tomorrow morning I am going up to make land measurements, and talk to a few people on labor cost plus for pouring a slab which I plan to stain/stamp and use as the cabin's first floor. I'll need to establish the proper cabin location so I can pour the slab, instead of 24x24 it'll probably be 30x40, or instead build a wrap around porch to protect the logs as some of you have mentioned. The rotting and termites worry me but I though I'd ought to be able to find a good sealant/stain as prevention.

Well, now you pretty much know my thoughts so please feel free to give me your inputs, and possible pitfalls I should watch out for. Lets keep talking because I've not purchased anything yet so now's the time to make the critical decisions. I don't want to spend a mint on a house up there because I'll never be able to re-coupe the expenditure so, at a total cost of around 25K-30K I think it's worth my efforts and labor.

Thanks a bunch!!
 
   / Log cabin construction #34  
Here are some random thoughts:

1) The two man/one week thing is not just hogwash, it is utterly ridiculous. Maybe two men, with lots of experience, scaffolding and some heavy equipment, perfect weather, perfect kit with perfect plans. I think every cabin newbie, including myself, assumes that the log stacking will be easy. It isn't. Square logs are heavy. Oak will be killer heavy. Once you get past waist high it gets hard. Head high and you really need scaffolding and/or lifting equipment. Keeping the walls perfectly plumb is tough because logs are not uniform. With your proposed connecting system it will be tough.

2) The fastening method sounds suspect to me. Pine 2x4 sandwiched between oak logs sounds like a disaster. It doesn't sound secure enough to prevent lateral bowing, which is a big issue. Once glue dries, you're stuck. If it isn't straight, you're in a real mess. The Oly-log fasteners mentioned above are best. If the logs aren't straight, you back them out and go again. You can also pull a log into place with a properly place Oly-log. I doubt that they will bore through oak very well.

3) Remember windows and doors in both your pricing and when you consider how hard stacking logs will be.

4) I would want blue prints, not just instructions.

5) Are your bottom logs grooved around the base for running electricity?

6) I personally would not spend $6K on logs I couldn't look at before buying.

7) Have you looked into building permits, septic perk tests and permits, electrical service? If not, you must. They are often tied together. Where I live, you don't get electricity until you got permits, inspections, pay taxes, etc etc etc etc. If you can't get a septic permit, you can't get a building permit. This process is mind numbing, time consuming, frustrating and in some cases expensive. If you have to meet code, and I did, even in one of the poorest most backward counties in one of the poorest most backward states. To meet code means that you can't cut a lot of corners the way you might expect you could with a simple hunting cabin. This means you have to spend a lot of money. Even simple plumbing and electricity gets pricey fast. Doing the interior with stud walls, dry wall, etc is expensive.

Personally, I wouldn't touch those logs with a ten foot pole. But let me make it clear that this is largely a personality thing. Even with an extremely well designed kit from an excellent company just 40 minutes away and expert help from friends and family this was a huge, difficult job for a beginner. It was much harder than I expected and had I not had constant expert help and advice, not to mention the free use of a boom truck, I'd have messed my cabin up pretty bad.

BUT! If you are adventuresome, confident, creative, easy going, good at adapting and solving problems, have tons of time, etc etc. (none of which I am) then it might be okay. I would have been to scared to do what you are planning to do BEFORE I built my cabin. There is NO way I would do it after knowing what it takes to build one.

But, stay tuned, there are guys here who have built from scratch, they will likely have a totally different opinion.
 
   / Log cabin construction #35  
I guess i am more "adventuresome". I've seen this method using the 2x4 as a spline & it does work. You could still use the log screws in oak, just pre-drill them. I did a week long class in NC on timberframes. There was a guy there cutting out his house pattern in solid oak. He had been working on it 6 months & had a long time to go. Anyway, oak will work, but i would hate to see that 18wheeler pull up with a load of old twisted weathered oak logs on it. $6600 is a very good deal, if the guy is shooting straight.
N80 is right, that is not a 2 man job. Just humping the logs into place will take that long. If you only have a week to get it dryed in, you need 6-8 guys and one of them needs to have basic building skills. Solid rafters are heavy and dangerous(i hired a crane).
I would put it on a basement. Minimal investement & double your sq footage + plumbing & elec is much easier. All elec on the outside walls have to be drilled(down), boxes cut when you are at the third or so log. Wiring to switches near doors is done by cutting a groove 2" from the rough opening with a chainsaw, then covering with the door frame. This will be hard to do on a slab.
My experience in woodworking before built my first log house was a set of speakers in HS......what a learning experience:eek: ! Live on the edge:D
Just my .02.
RD
 
   / Log cabin construction #36  
N80 said:
BUT! If you are adventuresome, confident, creative, easy going, good at adapting and solving problems, have tons of time, etc etc. (none of which I am) then it might be okay. I would have been to scared to do what you are planning to do BEFORE I built my cabin. There is NO way I would do it after knowing what it takes to build one.

QUOTE]

Adventuresome - yes
Confident - Somewhat
Creative - Somewhat
Easy Going - Nope, Type A
Good at adapting and solving problems - Somewhat
Tons of time - Only weekends
As I mentioned in my previous post, I was a mere rookie when I started my cabin project. All I had was an idea, almost no building experience and a set of cahonas. Down the road I went and everything turned out OK. Would I attempt this on a permanent residence? Nope, leave that to the pros. Would I ever do it again? Not on your life, I'm 59 years old. Would I do some things differently if I were to do it again? Absolutely! Like I said, I am/was a rookie and you learn by doing. Was it hard work? OMG! Did I make mistakes? Many. Was it a very satisfying experience? 100 times yes.

GCP....I think you are way underestimating the cost of this project. One suggestion you might want to consider. You can buy just logs, no plans, no nothing, just logs. If I were to start again I'd buy some rectangular logs in random lengths, maybe 10' thru 14'. Get a log home book and look thru the ads. There are several companies that specialize in selling just logs. You can get a better deal if you buy random lengths and you're going to have to cut a lot of them various lengths anyway.

I must concur that I am not too thrilled about your log "deal". Not trying to kill the dream, just my $0.02.

I could go on and on about this subject. It's near and dear to my heart, but I'm a slow typer so I'll stop here. GCP, if you have any questions, I'll be more that happy to chip in. As I said, I'm far from an expert. Take anything I say as just an opinion. I'm like most people, I have lots of them.
 
   / Log cabin construction #37  
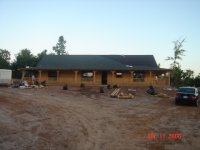
I live in a 2800 ft2 log home that I designed and contracted myself 15 years ago. It came as a custom CAD/CAM kit from Model Log Homes (no longer in business). The logs are Doug Fir from Montana, 10" dia., cut live, check groove cut to heart, air dried in pole barn for 19 months to a moisture content also of 19%, tripple tongue and groove milled top and bottom, with saddle notches. The thermal mass is equivalent to R19 insulation. Butts in the same course were toenailed with large nails (I think about 4 penny). We put 3/4" dia. 4' long steel drift pins throughout the walls as the courses were stacked. Threaded rod goes from foundation to roof through the saddle notches on the corners.

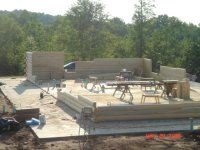
Though I contracted it, I hired a contractor who had built about a dozen houses from the same manufacturer to be my building foreman. He and his partner did most of the construction themselves, working time and material. My wife and I did some of the work (cleanup, staining, and I put on 85% of the roof) and we subbed out excavation, drywall, insulation, gutters, cabinet manufacture, manufacture and installation of custom cultured marble bathroom lavs and shower, and masonry on the fireplaces (cultured stone). The only time we had more than the two main workers was when the logs arrived in 2 semi trucks. We hired a dozen guys from an employment agency to work half a day and unload the trucks, and about 3 who stayed the rest of the first and also for a second day. The log dealer was there with a blueprint and called out specs for logs of specific code numbers to go to specific locations. The logs were up and in place in two days. The reason I was the contractor and the other guy the foreman was that he had gone bankrupt during the recession in the early 90s. I had the startup capital and he didn't. I proved to the bank that I was an outstanding financial manager (long story) and they agreed for me to handle all the money while he did the construction. I secured all bids for all the materials, did the ordering and payments, got bids from, hired and paid the subs, and made the payments to the two main builders.

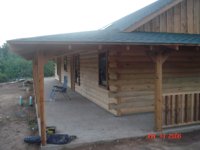
Logs do take a lot of maintenance. I have to restain the southern and western exposures almost every year. As others have said, big overhangs are highly recommended. If you can orient the house to the south, I'd put a covered porch on the south side and at least 3' overhangs everywhere else. If you don't take care of the logs, they will turn into the compost that Eddie talks about. You absolutely should familiarize yourself with the product line of a company called Perm-A-Chink. Some logs have a propensity to develop numerous or sizeable "checks" or cracks which need to be filled. Due to expansion and contraction, a flexible filler is needed. Placing a foam backer is necessary because if the latex caulk fills the full depth of the check, it can extrude too much when it expands from summer heat. On the other hand, log homes properly maintained can last a long time. I have been to a village in Switzerland where several log houses over 500 y.o. have been relocated to a log house museum. Such houses in Switzerland can have an astounding rustic beauty. The variety of rooves is amazing, from slate, to thatch, to sod filled with alpine wildflowers.

There are lots of Log Home magazines, but many deal with furnishings; you can think about that later. One that used to deal with design and construction considerations was Muir's Original Log Home Guide for Builders and Buyers. Log Homes Magazine did an annual Construction and Finance Guidebook as well as Buyer's Guide. The Construction and Finance Guidebook was most helpful to me.

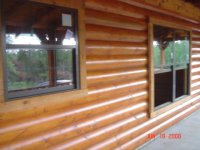
Log homes can be uniquely custom crafted or milled. Custom crafted are built on a lot, disassembled, shipped, and reassembled. The trees can be cut dead or harvested live. If the tree is already dead, something killed it-fire, insects, something, but it may have had years while standing to air dry well. If harvested live, you know it was likely healthy wood (do you prefer to eat food that was found already dead or food that was slaughtered healthy and processed immediately?) but the downside is that it is wet and needs to either air dry for awhile or be kiln dried (better but more $). Swedish coped logs can be latex caulked and tongue and groove logs can be weatherstripped. Custom crafted logs need to have the gaps filled. The terminology has changed since the pioneer days. Frequently, back then, many logs were not coped or butted at the joints; they just passed over each other. Large gaps would be left between the courses. These were filled with long wedges from split rails. This was called the "chinking" and the mud which filled the spaces between the logs and chinks was called "daubing". Today, the caulk that is used in the small gaps between courses is referred to as the "chinking". Logs can be milled round, D-shaped, or square, though square should actually have the outer surface angled like clapboards are done so a drip edge takes rain away from the joint between courses. Log siding does not have the visual 3-dimensional depth of full logs, however they have the advantages of drying with fewer checks and of the ability to be placed on the sides of insulated walls. Artificial sculptured cultured concrete log walls are becoming more popular. The Wilderness Lodge at DisneyWorld uses this material. Courses that alternate at joints may end with a saddle notch or dovetail. Perpendicular courses built at the same level usually end in butt and pass joints, but can simply butt or miter.

Cabins or houses built from logs must take settling into account. Our logs settled 4.5" after being stacked. The logs still rise about 1/8" every winter (cold, wet, and humid here) and fall that much in summer (very hot and very arid). To deal with this, cabinets were screwed to plywood backerboard. Vertical slots were routered into the plywood, and lagbolts used to lag through the slots into the walls. We used exterior wall to exterior wall trusses, so the interior stud walls are non-loadbearing. The caps of these walls stop 3" shy of the trusses. A parallel 2x4 is nailed to the trusses and then 1x4 trim tacked to that. The trim is secured to the trusses and overlaps the interior wall. As the exterior log walls rise and fall, so do the roof trusses and the trim. That trim, which is attached to the trusses, sildes up and down against the top of the interior stud wall. Windows are secured with an extra frame with slots and lags into the end of log sections. Half-log headers have gaps between the top of the window and the header. The gap is stuffed with fiberglass batting and covered by wide trim. In places where log trusses sit above the headers to a doorway, we routered a big slot and inserted very beefy steel T-bar inside the half log header.

Placing Romex also takes pre-planning. We stacked two courses, stopped and drilled vertically through the 2 logs and sill plate into the joist cavity, then chipped out the top inner edge of the log. When wiring later, we snaked the Romex through this hole and the foreman built nice little pine boxes that scribed into the cope between the logs with the outlets. I have also seen a technique on other houses with round logs in which the Romex is simply run in the cope between the first and second courses and covered with a long piece of trim.

I love my log home. It is decorated with a lot of southwest and native American art. Our 1100 ft2 great room has big log trusses and 2x6 tongue and groove ceiling, and solid oak flooring. My wife calls it our temple to wood. I have a cedar canoe in those trusses and wrought iron chandeliers with hand hammered copper trees, elk, moose, bear, etc. A totem pole tells the story of our daughter's adoption. We have paintings of mountains and mountain men, an Indian war shirt, wooden skis, a wooden snow sled, snowshoes, Indian bow and arrow, spears, tomahawk, peace pipe, papoose, and all other kinds of rustic decor on the walls. It is really a dream home for us, but it also really does take endless maintenance. Besides the staining, dust settles on the log copes and the tops of all the members of the log trusses. Still, I wouldn't trade it for anything, or won't until I am too old to take care of it. (We also work endlessly in the almost 2 acre woodland garden we have developed-got to keep that Kubota busy somehow). We call the house Woodhaven and the woodland garden The Haven Wood. When I can't take care of it all anymore, I guess I'll move to the Oregon coast where I think I'll contract a nice little cottage built out of rocks, something like the kind of thing you see in a Thomas Kinkade painting, surrounded by big trees and lots of blooming Rhododendron. No maintenance on those rocks in my old age retirement. Hmmm, got to find the time to start some sketches; also got to plan a modest but big enough woodland garden to justify talking the wife into letting me take the "Bota with us when we move. :D :D :D
 
Last edited:
   / Log cabin construction
  • Thread Starter
#38  
To all of you thanks again very much, you've provided more great info for us to ponder on! Forgot to mention that the seller has put up, supposedly, a number of these cabins so he speaks from personal experience. He also recommended drilling and installing steel poles/rebar every 24" to securely fasten the logs into place.

I am fully aware that a job like this will take months to complete, especially when working it only on weekends. I've already priced out the major parts needed so underestimating the price is not an issue, I pretty well know what the project should cost. And I'll probably end up driving/ride the 8 hours, one way, to personally inspect these logs before purchase. So all it should initially cost me is the $500 down payment for the plans and assembly directions of the logs prior to inspection (I even thought of renting the needed dually and goos-neck two axle trailer to pick up the product my self, to forgo the $1800 delivery price, but it probably won't be worth the effort after figuring all expenses).

My buddy that'll help me with the project is a master carpenter, I mean art type furniture and not only, so the wood working knowledge will be there in spades and so will be the tools. Also this cabin will be built in the county so I don't need permits and I do have a septic tank, water, and electricity already connected to the trailer so simple connectivity will be all that'll take.

I am not known for my patience but I am an engineer so problem solving is an inherent part of my character. All three of us (buddy, wife, and me) are hard workers and still relatively strong, but the aches and pains on shoulders and lower back do exist so there's limitations there (where have the vital years gone!!). To compensate I plan to hire a couple of locals to help when necessary, for the heavy lifting, but a crane is a great idea, it ought to make things a bit easier I suppose, if it's not prohibitively expensive to rent one. I want to take my time and create a solid foundation and structure, for long term use, which is something I've not done before. While the interior will come later, and will be much easier as we all have a bit of experience with that part, my wife and I practically gutted our house and remodeled it 8 years ago. Electrical and plumbing won't be a problem either so it's only the stacking and structural aspects that truly worry me.

Today we'll drive out to determine where we can locate the cabin, to take advantage of the existing infrastructure, so please keep your good ideas coming!!
 
   / Log cabin construction
  • Thread Starter
#39  
   / Log cabin construction #40  
GCP,

I live in a 3400 sq. ft. log home that we built in 2001. I learned a TON about log homes that I never new until we were building. As a result, I would have to agree with N80 on this one. I wouldn't be too thrilled with the 2x4 sandwiched in between the logs. Blueprints would have to be manditory for sure.
You didn't mention if these logs are kiln dried or not. but either way, I would want to give them a VERY good " Look See " and maybe even take a moisture meter with me before handing over the cash. They could be laying smack on the ground sucking up rainwater right now.
Have you contacted any log home manufacturers? form the size home you are talking about, I bet you could find these logs with some kind of warranty for about the same price if you look around a bit.
Whatever you decide to do, good luck and enjoy your log home...
 

Tractor & Equipment Auctions

2015 CATERPILLAR 259D SKID STEER (A60429)
2015 CATERPILLAR...
Crown Stand-On Electric Forklift (A59228)
Crown Stand-On...
2008 Ford Fusion SE Sedan (A59231)
2008 Ford Fusion...
2019 Land Rover Range Rover Sport AWD SUV (A55853)
2019 Land Rover...
Pallet of Miscellaneous Duplex Polyester Webbing Slings (A56858)
Pallet of...
2016 Ford F-150 4x4 Crew Cab Pickup Truck (A56858)
2016 Ford F-150...
 
Top