M7060 Skid plate build

   / M7060 Skid plate build #1  

Merca

New member
Joined
Sep 2, 2017
Messages
11
Location
Shreveport, LA
Tractor
M7060
After a lot of searching and compiling ideas for my skid plate design I have hit a small roadblock. I am trying to determine what size and type of bolt I will need for these particular areas of my tractor so I can begin to measure with precision the subframe I will be building for the skid plate.


I tried the bolts shown in the pictures but they do not thread in after 1/4-1/2 turn so Im thinking maybe 1.75, 1.5, 1.25 M14 and M16?
 

Attachments

  • IMG_2289.JPG
    IMG_2289.JPG
    229.9 KB · Views: 640
  • IMG_2310.JPG
    IMG_2310.JPG
    443.8 KB · Views: 590
  • IMG_2312.JPG
    IMG_2312.JPG
    453.2 KB · Views: 677
   / M7060 Skid plate build #3  
May need a thread chaser to clean up the holes once you find the proper size.
 
   / M7060 Skid plate build #4  
Merca here are some of the pics, I couldn't figure out how to post them in a pm.
The 3 main "frame" supports of the skid pan.
DSCN1720.jpg
DSCN1722.jpg


the front of the tractor is to the left on both pics. The 2nd pic shows the side protection of the fuel tank (cut up plastic bed liner) and a big step. Working away from the step is (the angle pc.) that protects the loader q/c's, then a tool box and saw carrier that is a part of the side banel protection from sticks entering around the delicate hydraulic components, filters, etc. The rear tire begins directly behind the step and box and so far, nothing has got past it from the side, the bottom is of course the steel pan.

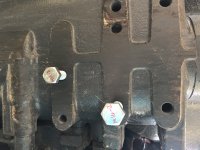
Here you can see the back & mid "frame" (looking towards the rear)
DSCN1736.jpg

The big holes (in pairs) is where I mount it to the tractor. The larger hole is big enough to allow a socket to tighten the now recessed bolt.

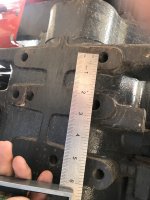
This is the front "frame" and is where I estimated would need to be the sturdiest as it cantilever's out well beyond the support's to catch the step/ tank protection and the tool box.
DSCN1747.jpg

Those pairs of tabs receive a 2"x3/8" bar (I do this in several places) to help the pan where other support is not available. I used 1/4" pan feeling it was a happy medium between practical removal for cleaning & strength.

This shows those "bars", all 4.
DSCN8379.JPG

and another from the left side.
DSCN8381.JPG


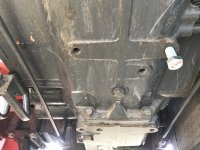
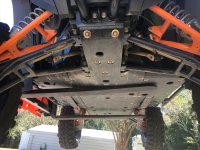
These show how I carry the front (see the oil pan) pan. The back of the pan mounts (4 bolts) to the first "frame" and then basicaly supports working off the loader frame again using 2"x3/8 bar on edge.
DSCN1792.jpg


DSCN8382.JPG

the support in the center of the pic simply sit's against a heavy spacer that's also part of the loader frame. The front mounts (small channel's) I built. It's surprising how big the "notches" for tire clearance was required at full steering cut. I cut them at least 3 times, each time loosing some protection in this area.

That's most of it:eek: other than a few details like I had to cut a small section out of the factory fuel tank reinforcing angle (what a joke), weld on a little washer to catch a spring, PTO lever iirc, and there are a few other reinforcements to some of the 3 actual pans, like this rear one, it also has a 90* bebd at the rear.
DSCN8370.JPG


I have prolly as many rocks & stumps as anyone, and find them all while bush hogging mid summer:eek: So far I have not had any trespassers on my tractors soft "belly". It has seen some action on the lower trans/rear elevation, the front oil pan area is about 3" higher than the back and basically doesn't have a scratch on it.
DSCN8383.JPG
DSCN8385.JPG


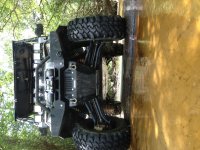
FWIW I also built a massive front grill guard/bumper, and you can see (again) my love of using plastic truck bed liner:laughing:
DSCN1770.jpg


DSCN1791.jpg

Not real attractive, but very effective. It fits tightly between the loader arms, and the 4"x6" "bumper is a good place for chains.

Phew, it was before 7am when I started this:laughing:
 
   / M7060 Skid plate build
  • Thread Starter
#5  
A small update, bolts and parts needed to start fabricating the subframe are ordered and just waiting for them to come in. I am still surprised in a large city as mine we do not have what I would consider common bolt sizes available without ordering 1-2 week turnaround.

From measurements so far it looks like I need to drop 3.5" at mid tractor from the mounts to protect the hydraulics and only 2-2.5" up front for the oil pan. Im considering tying in a front plate that will go under the pivoting axle to assist in protecting the steering hydraulics and something puncturing the front radiator area when in reverse.

Still deciding if i want to invest in a Tungsten Carbide dry cut saw, stick with a cheap bandsaw or upgrade to a cold cut saw or ellis 1600 band saw.

Rustyiron, thank you for the excellent write up it helps immensely.
 
   / M7060 Skid plate build #7  
After a lot of searching and compiling ideas for my skid plate design I have hit a small roadblock. I am trying to determine what size and type of bolt I will need for these particular areas of my tractor so I can begin to measure with precision the subframe I will be building for the skid plate.


I tried the bolts shown in the pictures but they do not thread in after 1/4-1/2 turn so Im thinking maybe 1.75, 1.5, 1.25 M14 and M16?

Get it touch with your local Kubota dealer....they should be able to get you the exact bolts to fit whatever your mount point.
 
   / M7060 Skid plate build #8  
Great work there Rusty! I will be following this thread to steal ideas. Presently I am thinking about just making a support structure for installing UHMW panels instead of steel ones. While steel would handle rougher abuse than UHMW on heavy tractors I am not very concerned about having the entire weight of the tractor dragging across something. I think, for my needs, the lighter weight and still extremely strong UHMW will provide all the protection needed for brush and limbs dragging under and it will require far less support structure and weigh much less, therefore being easy to remove for cleaning etc. UHMW is the standard for UTVs and has performed amazing well ones the ones I have. On my UTVs I have abused the UHMW skids with countless drags over big rocks and they have not been hurt. Like I said before, I don't think you can beat steel for heavy forestry work but for brush cutting and limbs I think it will more than suffice. Here are some pictures of the under side of my UTVs.
 

Attachments

  • IMG_0583.JPG
    IMG_0583.JPG
    2.6 MB · Views: 407
  • IMG_1646.JPG
    IMG_1646.JPG
    2.6 MB · Views: 626
   / M7060 Skid plate build #9  
Looks awesome! You could always cut some pipe in 1/4" lengths and weld around the bolt head to help protect them.
 
   / M7060 Skid plate build #10  
We are getting to the final stages with the assembly for my m7040. Once we get everything tacked together we will be taking it apart to clean up and paint before final assembly. This is a good representation of the various components and material we used. Everything but the bolts came from scrap from the shooting range jobs.

We took in all of the examples we could find, here and in other threads and combined some of the design features from all of them. We had AR500 1/4” plate but decided to go with something lighter. This “skin” is bolted to the frame.

IMG_1206.JPG

If it proves to be too light we can go back with the pattern and make something heavier. We had a lot of mesh and we are using it to as enclosure around the hydraulic junctions and the fuel tank and anything else that needs protecting.

IMG_1208.JPG

Here you can see the frame section at the filter. We used a modular design for cross members using the flat angles down as the mounting surfaces for the bottom plate and inverted for the mesh.

IMG_1214.JPG

We will get some better pics once we get everything apart and painted.

It’s great having this forum as a place to exchange ideas. But any forum is only as good as those who contribute. And as I find on other ‘boards’ there are usually a few that form the heart and soul.

Special thanks to Richard and Eric who’s designs formed the base for what we ended up building and especially to Josh who is not the board, yet.....I’m working on it....but who is doing all the work to bring this project to life.

I worked on this post overnight so apologies if are hard to follow.
 
 
Top