Mini-Barn

   / Mini-Barn
  • Thread Starter
#11  
2277561269_6bbf9bcc00.jpg


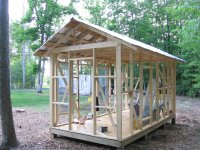
As you can see in the picture above, I've made a little progress. I got my air compressor figured out. My solution was to run a 12 gauge 80' cord from an outlet right next to the breaker box, and plug the compressor into that. Then I had another 50' of regular hose, and 25' of coiled hose off the compressor.

Using the compressor and the roofing nailer made the roof go a *lot* faster. Using the framing nailer was nice for the sheathing and for the siding. In fact, for the siding, it is almost a requirement, because it is so hard to start a nail in that hardiplank.

I made the door using some 1/2" AC plywood. The back side is 2x4s, covered by the plywood, and then the front side has some decorative strips stapled on (1/2" x 2" staples). I used 3 3" hinges, and mortised them into the door and into the door jamb. I added a nice big handle, and a latch to finish it off.

As I mentioned before, the siding is hardiplank 8", and it comes in 12' strips. I used this because it has a 50 year warranty on it, and at just under $7 a strip, it was fairly cheap. The sides of the shed are 8' wide, and the main portion in the front is 4' wide, and yes, I planned it that way. You can cut the siding with a regular carbide blade (just don't breath the dust). I was sorely tempted to buy a sliding compound miter saw for this project, but I made do with my little circular saw, and it worked out fine, albeit a little slower.

Once again, using my little 8 gallon compressor, I hooked up my Critter spray gun ( http://wood.bigelowsite.com/reviews/critter.htm ) and sprayed the exposed pieces with primer. It was getting dark at this point....

Still left to do:
1.) Paint
2.) Run electricity to the mini-barn (shed). Technically, this will be an "extension cord" run underground in conduit, but the end at the house will have a pigtail that plugs into a GFI protected outlet.
3.) Add lights, outlet, light switch
4.) Put up divider wall between the bedding area and the hay/grain storage.
5.) Add half door inside to provide access between bedding area and hay/grain storage
6.) Put up electric fence
7.) Other stuff I forgot. :)
 
   / Mini-Barn #12  
I didn't realize you were gonna make it so fancy!!! I love James Hardi products and use them quite a bit myself. For the money, it's about the best deal out there.

One time I had to cut a few pieces without my diamond blade in my 7 1/4 inch saw, so I did it like you did with the regular blade in backwards. It will get the job done, but it's painfully slow. If you do any more Hardi work, buy a diamond blade for under $40. One blade will easily do two houses worth of siding!!!! It might do more, but I tend to ruin them cutting concrete or pavers from time to time, and don't honestly know how long one will last if not abused.

Eddie
 
   / Mini-Barn #13  
Eddie, you're just tough on tools (just joking)
 
   / Mini-Barn
  • Thread Starter
#14  
Fancy? LOL. You can see the shed from the three big picture windows in the living room, so I didn't want to make it an eye sore.

EddieWalker said:
One time I had to cut a few pieces without my diamond blade in my 7 1/4 inch saw, so I did it like you did with the regular blade in backwards. It will get the job done, but it's painfully slow.
Eddie

No need to put the blade in backwards. They recommend using shears for cutting the siding, and barring that, they recommend using a carbide tipped blade in the saw. That's what I used and it cut like butter, and this was a cheap 3 for $10 blade I picked up at Ace Hardware on sale last Thanksgiving.

I'm sure a diamond blade would last a lot longer, but I don't cut this stuff very often -- 20-30 feet worth every 3-4 years, or so it seems.
 
   / Mini-Barn
  • Thread Starter
#16  
Yes, the back side is open. It is a mirror of the front, except that it has no door.
 
   / Mini-Barn #17  
Cool. I have goats and have built "run-in" sheds for them with three sides closed and one open. Just curious.

BTW somebody mentioned a shearing area. This type of sheep (Katahdin) doesn't have wool to be sheared like traditional sheep. They are raised for meat. No shearing needed.

Chris
 
   / Mini-Barn #18  

Attachments

  • IMG_4353.JPG
    IMG_4353.JPG
    162.3 KB · Views: 1,105
  • IMG_4354.JPG
    IMG_4354.JPG
    162.4 KB · Views: 1,166
  • IMG_5959.JPG
    IMG_5959.JPG
    168.2 KB · Views: 1,231
   / Mini-Barn
  • Thread Starter
#19  
Slackdaddy, if you're going to do it, do it right, right?

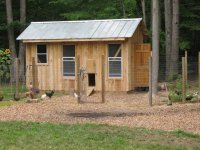
I've been somewhat AWOL on my project. Other projects got in the way. I did manage to put the drip edges on, and get the gutter up. Last minute change in that the wife wanted the gutter to empty into the water trough (not in place yet), so the downspout looks a little funky.

2290304754_595db51850.jpg


Still left to do:
1.) Paint (Now have the paint chips picked out)
2.) Run electricity to the mini-barn (shed). Technically, this will be an "extension cord" run underground in conduit, but the end at the house will have a pigtail that plugs into a GFI protected outlet.
3.) Add lights, outlet, light switch
4.) Put up divider wall between the bedding area and the hay/grain storage.
5.) Add half door inside to provide access between bedding area and hay/grain storage
6.) Put up electric fence
 
   / Mini-Barn #20  
I suppose the sheep will grow names as well and become pets? Personally butcher mine out at about 14 months. Very tasty, no lanolin yet.

Will consume anything green sounds like rotational pastures with their house at the center point so do not overgraze?
 

Tractor & Equipment Auctions

2013 Volkswagen Passat Sedan (A48082)
2013 Volkswagen...
2016 Ford Explorer AWD SUV (A48082)
2016 Ford Explorer...
2012 Ford Fiesta SE Sedan (A48082)
2012 Ford Fiesta...
2019 Allmand Light tower (A49461)
2019 Allmand Light...
2012 Tiger 130BBL Vacuum Trailer (A50860)
2012 Tiger 130BBL...
2015 FORD F-250XL SUPER DUTY SERVICE TRUCK (A51406)
2015 FORD F-250XL...
 
Top