MikeS_in_GA
Bronze Member
After watching the "take if off" thread I was intrigued to give it a try myself.
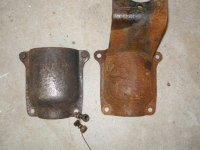
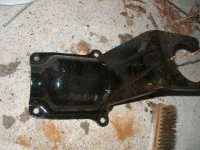
I was given a phd from my Uncle Tom (thanks UT!!) He had a barn burn down and the phd was near the barn. Paint was burned off and all the plastic was gone. Insurance bought him a new one and they didn't wan't the old one. The gears still turn and it was full of oil. It was outside for about 6 months before I got it, so the rusting was in full swing. I was in the market for a phd anyhow, so here's my chance to get one for low cost. I considered taking it in to get it bead blasted, but thought I would give electrolysis a shot first. It's a Danuser btw.
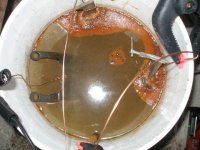
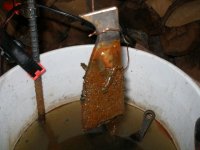
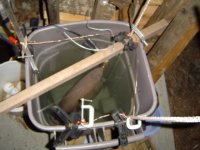
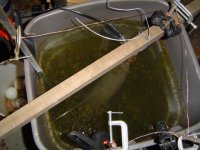
Got it home and started tearing it down for a rebuild. Here's a look at the progress after a week in the tank. I used a 5 gallon bucket and a small battery charger. Nice stream of bubbles comes off the part when it is on the 10 amp charge or the 55 amp start assist mode. So far I am using one pice of 1/2 rebar. Every other day I would wire brush the part and the rebar and turn it so both sides get even exposure.
For the bigger parts I will use a trash can and give the welder a try.
So far my impression is... this will take forever! Hopefully the welder will greatly speed things up as the battery charger will take forever when I put the big parts in the tank.
I'll try to keep this thread updated, but so far, so slow.
btw you can see the rust still on one nut. I guess there wasn't good enought contact to the bolt. It's been tightened up so it should come clean now. Both parts were equally rusted.
I was given a phd from my Uncle Tom (thanks UT!!) He had a barn burn down and the phd was near the barn. Paint was burned off and all the plastic was gone. Insurance bought him a new one and they didn't wan't the old one. The gears still turn and it was full of oil. It was outside for about 6 months before I got it, so the rusting was in full swing. I was in the market for a phd anyhow, so here's my chance to get one for low cost. I considered taking it in to get it bead blasted, but thought I would give electrolysis a shot first. It's a Danuser btw.
Got it home and started tearing it down for a rebuild. Here's a look at the progress after a week in the tank. I used a 5 gallon bucket and a small battery charger. Nice stream of bubbles comes off the part when it is on the 10 amp charge or the 55 amp start assist mode. So far I am using one pice of 1/2 rebar. Every other day I would wire brush the part and the rebar and turn it so both sides get even exposure.
For the bigger parts I will use a trash can and give the welder a try.
So far my impression is... this will take forever! Hopefully the welder will greatly speed things up as the battery charger will take forever when I put the big parts in the tank.
I'll try to keep this thread updated, but so far, so slow.
btw you can see the rust still on one nut. I guess there wasn't good enought contact to the bolt. It's been tightened up so it should come clean now. Both parts were equally rusted.