dave1949
Super Star Member
From the pics Robert, it looks like your house is straight and true, it must have good 'bones' and foundation. It's a keeper. ")
Dave.
Dave.
From the pics Robert, it looks like your house is straight and true, it must have good 'bones' and foundation. It's a keeper.
Dave.
CONGRATULATIONS Robert,....great project!! Lovely helper you have there and she will recall these beautiful memories working with dad,..the rest of her life and they will become treasured memories as she gets much older!
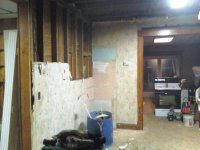
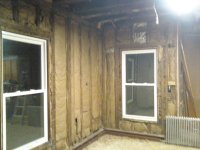
My stone farm house built in 1856 has been my long term project for the past 35 years. I did it all as well. Tore out lath and plaster,.. pardged the stone with a mortar mix as close to the original recipe as possible so it would continue to age, contract/expand etc as the rest. Scabbed the studs to take lots of insulation (bats) and plumbed as much as 6 inches but now my walls are fairly plumb even though the rooms are now smaller.
My electrical was like yours so re-wired and replaced a lot of the plumbing. My walls are two feet thick so have some beautiful "window-seats". Re-did the upstairs bathroom and installed a wet-sink and vanity in my youngest daughter's room, (to encourage her to stay home a while longer,..she did),.. but it now makes a very nice guest room.
Big mistake listening to my wife: ...I worked like the devil the first few years. My wife finally said, what's the hurry? Slow down, we have lots of time, we're young and healthy so lets take it easy.
So I did and that's why its taken 35 years and I still have one room left, (my office/studio/den), . . . and guess what,..I'm old and tired and really do not actually "feel" like doing it any more, . . even though I intend to finish the job.
My main goal all along has been to keep the house as close to its Victorian Heritage, (1856) as possible. I "had" to replace all the windows with modern as the frames were rotted too far to save and I installed a beautiful steel roof and a mostly glass (all season) sunroom overlooking my lake.
Sorry to be so lengthy Robert, (brought back memories),...but just wanted to tell you to go ahead and finish the job while you and Ava,..."feel" like it !!!
I sincerely wish you both, the very best of good things on this huge project,.. and . . . in life !!!!
CHEERS!
. . tug
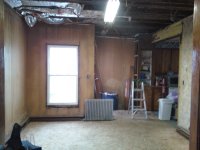
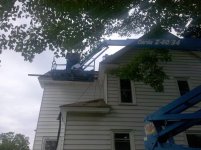
One of the most important things I look at with any house is the foundation and roof line. Any problems will show in those two areas and be noticeable at a glance. The foundation on this house is the old stone foundation that is about 18" thick. She is solid but I have water coming through on the front driveway side and that is why I am going to put drainage in and seal the wall at the same time.
) so the cement alone accomplished quite a bit.Robert,
I am not sure if you do you're own wiring, but was curious how you get wiring to the second floor etc. when you do not remove all plaster and lath. It always seems like there is a tradeoff in time wire pulling vs. stripping the walls to the studs.
Hey Robert,
Great thread. I'm looking forward to following your progress. It's a much more ambitous project than I was expcecting, which makes it even better!!!!
One trick for running electrical wires through the walls is to shove a length of Pex though the wall first, then slide the romex through the Pex. I do it all the time to get wire from an attic to the place in the wall were I want it.
Eddie
Those are GREAT for taking a 16"x3' piece of insulation and winding it up around the bitHow long do you think it will take all together Robert?
Have you tried these?
Greenlee 12278 D'VersiBIT Starter Kit with 9/16" Drill Bit, Placement Tool & Grip (DBITKIT) | ToolBarn.com
I suppose it would get hung up on plaster spooge also
Robert_in_NY; said:That is a good trick Eddie. I have had good luck using the regular fish tape but also when dealing with lath and plaster walls a couple brass nuts tied to a loop on a string work great. You can put them through the outlet or switch box hole and as one of the brass weights catches on the plaster sticking through the lath the other weight bounces past pulling the other with it and it will walk right down the wall. It is one of the simplest and most effective tools we have. Once you get the string to the other end of where you want it you just tie the wire to the string and pull it through.
How long do you think it will take all together Robert?
Have you tried these?
Greenlee 12278 D'VersiBIT Starter Kit with 9/16" Drill Bit, Placement Tool & Grip (DBITKIT) | ToolBarn.com
I suppose it would get hung up on plaster spooge also
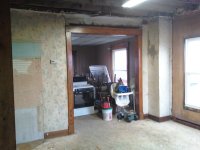
I do all my own work. The wiring is not that hard. There will be area where I need to run plumbing lines up to the second floor bathroom. I will run the main lines for the upstairs in this area. From there there are two ways to redo all the wiring in the second floor. The way I am going to do most of it is to run the wires from under the floor after I tear the 1st floor ceilings down. This is how I am updating all the outlets at least. The lights and switches will be done by running the wires up the same spot through the second floor bathroom and to the attic. From there I can pull floor boards in the attic to access the walls below and can fish the wires to the switch boxes from above.
I am also going to hardwire the combination smoke/CO detectors the same way to be able to connect all the floors to a single circuit. I have been wiring houses like this since I was 16 (a little earlier while helping my dad on our own home). I am not concerned one bit with the wiring aspect of this project as it sounds harder then it really is.
And there is no tradeoff between the time it takes to pull wires compared to stripping walls and then having to drywall and finish them. That is a long, hard project and pulling wires is easy.
Reminds me of some of the projects in my past.
Funny/Scary story for you:
Was rehabbing a six unit building in Chicago, total gut job
Building probably dated from late 1800s. Total of 1 bathroom in entire building!
Anyway we are stripping the walls and I come across what appears to be a piece of conduit, Grab the trusty Sawzall and begin to cut------Luckily I heard the hiss before I went any farther, Yep your right, it was an old gas line for lighting!! Hope you have as much fun as I did rehabbing stuff!! The things you learn!