Off-Grid Living

/ Off-Grid Living #1  

MadJack

Silver Member
Joined
Jun 28, 2007
Messages
230
Location
Litchfield, Maine
Tractor
86 Ford 2110 4x4
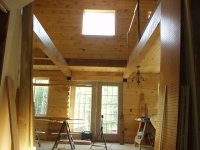
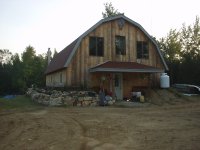
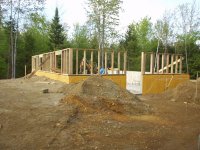
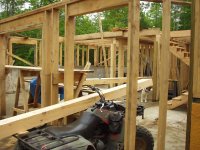
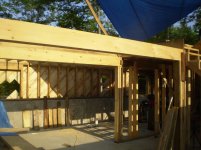
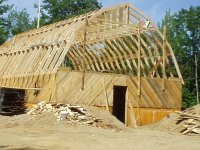
This is the new house I started building in May 2008. It is 28 x 36 one and two-thirds floors. It was designed and revised over the last ten years, still isn't perfect but it was all "out-of-pocket" and sweat!

No power lines, only a phone wire until a new [more] local cell tower goes up. Sat TV (Dish is the best deal $$$-wise here) and internet by dsl/phone line.

I spent 8 months (days off and weekends) cutting over 18,000bf of logs off the 125 acre woodlot. A local guy came and picked them up on his pulp-truck, sawed them and delivered the boards back on site for .25bf. Some of the boards made the trip back to him for T&G, which now cover most of the interior walls.

Power=115v Honda EU3000 (started with an EB3000), big triple baot charger and two Trojan 475aH 6v batteries. We should be installing 10- 235watt solar panels and the Outback inverter/charge controller in early Spring along with 6 more of the same batteries.
 

Attachments

  • P8310046.JPG
    P8310046.JPG
    286.8 KB · Views: 1,399
  • P2240038.jpg
    P2240038.jpg
    381.7 KB · Views: 594
/ Off-Grid Living #2  
Awesome job on the house :thumbsup: Something to be very proud of. Do you have photos during the build?
 
/ Off-Grid Living #3  
:thumbsup:Nice looking home and home site. Did you do all the construction yourself, or did you have help on anything?
 
/ Off-Grid Living #4  
It looks very good! :thumbsup:
 
/ Off-Grid Living #5  
Beautiful! Is this a weekend place or full time residence?
 
/ Off-Grid Living
  • Thread Starter
#6  
This is our full time home. The woods were so thick you couldn't throw a cat through 'em. Now have 7 acres of pasture and food-plots.

I needed help twice while standing up the home-made roof trusses and once with the 18' 6 x 10" beams inside over the living room. Oh, and since I wanted the concrete perfect... I hired the best for that. The foundation has 2" of spray-on foam before backfilling.

I did take thousands of photo's during the build...
 

Attachments

  • P5190021.JPG
    P5190021.JPG
    290.7 KB · Views: 522
  • P6050037.JPG
    P6050037.JPG
    285.1 KB · Views: 504
  • P6090030.jpg
    P6090030.jpg
    416.5 KB · Views: 548
  • P7040035.JPG
    P7040035.JPG
    308.2 KB · Views: 533
/ Off-Grid Living #7  
Great job!!! I'm really impressed with people that build their homes themselves. Someday when I grow up I want to build myself a nice timberframe cabin in the woods.... until then I'll make do with my starter homestead (as I like to call it :thumbsup:)

I can't speak for others, but I would LOVE to see more of these thousands of photos of your build!
 
/ Off-Grid Living #8  
I spent 8 months (days off and weekends) cutting over 18,000bf of logs off the 125 acre woodlot. A local guy came and picked them up on his pulp-truck, sawed them and delivered the boards back on site for .25bf. Some of the boards made the trip back to him for T&G, which now cover most of the interior walls.

WOW!

You logged your own property and then used the lumber from the logs to build it?

Did the local guy Kiln dry them for you also!

I also see you did angled planks for the outer walls and then large verticle plank siding over those (I assume tyvek etc. between those layers?).

And the interior is all T&G! WOW... you da MAN!

Be well,

David,

PS, More pics please.
 
/ Off-Grid Living
  • Thread Starter
#10  
Good read by Bob Shearer there Doug. I get most of my learnin' from
Northern Arizona Wind and Sun .

Photo 1.
For the logging operation I used a 1970 PUG UTV, with a log arch my prospecting buddy made up for me. With only an 11hp Honda it could haul this 29" x 12' pine butt-log with relative ease.
Photo 2
Looking up and North, believe it or not. The open space and the small but well placed windows really light the place up.
Photo 3
I jigged the roof-lines out on the deck, then built each one on the jig and then had to move each to the stack. Only half the trusses could be built at a time. Due to limited manpower, each stack had to start going up at the ends so that I could slide the last ones up in the center of the house eliminating the need for a crane. Upstairs ceiling is 9'4" high so the pool-cues won't hit the sheet-rock ceiling.
 

Attachments

  • Logging with PUG 29 inch butt log.jpg
    Logging with PUG 29 inch butt log.jpg
    715.2 KB · Views: 504
  • P1010050.JPG
    P1010050.JPG
    275.8 KB · Views: 588
  • P7020033.JPG
    P7020033.JPG
    284.3 KB · Views: 986
/ Off-Grid Living
  • Thread Starter
#11  
No need to kiln-dry interior T&G lumber as it was kept dry and sticked for nearly a year before I started sanding and poly-ing late fall 2008.

Between sheathing boards and 16" wide siding is a cheap wind barrier. Here's a tip..... ONLY BUY AND USE TYPAR!!! unless you KNOW your siding will be done before the fall rains come.

I have friends who did the Tongue and groove inside but didn't sand them or only sanded with 100grit. Every inch of every board in this place was sanded with 100 grit, then 220. Home depot water based poly [satin]... first [heavy] coat then sand within an hour. Second & third coat pretty much back to back. The drying racks made this task go fairly fast with as much as I had to do.
 
/ Off-Grid Living #12  
Very nice! That is a fantastic effort and being off-grid is the way to go as electrical prices are only going to go up and away. We did something similar but didn't go the off-grid rout unfortunately and also our house was made from straw bales. The T&G is very nice but a lot of work to sand and stain, especially on the ceilings!
 
/ Off-Grid Living #13  
I love to see off the grid houses. My ideal world is everybody living as indepently as possible and helping each other while doing it.
 
/ Off-Grid Living #15  
Looking forward to this thread! ... We only have to wait for you to upload pics & describe them rather than actually doing the work :D :thumbsup:
 
/ Off-Grid Living
  • Thread Starter
#17  
Thanks Robert N, for the info., just checked their site and bookmarked it.
I'm currently into the 'backwoods solar' planning guide and catalog. Backwoods Solar Electric Systems has taught me more than most companies as they explain things in layman's terms. [that means even I can understand it:laughing:]

All in-house lighting is with 11w CFL's and we found a smokin' deal at home depot as they were deemed "not enough light" by their 'regular' customers. Most of the lower wattage found now is around 22watts each.

At the front door [actually attached to the porch post] we have a super-brite 5-led solar light we got at TSC for $39.99, which lights up the yard and driveway to over 100 feet. Not like the sun but better than a full moon which keeps me from stubbing a toe or worse yet, driving my shin into something the kids left in the yard.

For the time being, our phone/answering machine, internet box and driveway alarm runs off a 500w power inverter attached to the battery bank. I don't think the three units use more than a few watts together but a $5 inverter at a lawn sale (NIB) made it worthwhile so that is what I use.
Also my CB radio runs off the battery directly. Great thing about the CB is it is instant, unlike trying to text on a cell phone and I have great reception around town if I ever need help. It's a good idea to have/build a network on the radio, in case the grid goes down during a storm.

Got a smokin' deal on a new propane stove (cooking) on black-friday or the day after Christmas at Sears and talked them down on an energy-star rated fridge. (electric... for now)

More later...
 
/ Off-Grid Living #18  
Nice work mad jack.How rough were the trusses to put up they look like they were hernia material.
I hope you post more pics!!!!
 
/ Off-Grid Living
  • Thread Starter
#20  
Actually Paul, they weren't that bad. one man on each end and I used a 12' 2 x 4 with 16d box nails protruding to 'stick' and push the top of the truss up. The last two were a pain, we had to slide them up under and between the last ones coming from either end of the house.

Kind of like the beam-on-the-wheeler picture.... I had to get it from the trailer to the back and then inside. I put one end on the back rack, one end on the front rack and drove it around the house and into a window opening. Then one end up on staging ... then the other. I could only lift one end at a time so I had to find a way!
 
 
Top