Okay... electrolysis. It's an electrochemical reaction that converts ferric oxide (red rust) to ferrous oxide, which can be simply washed away with a little water and scrubbing. It's the only process generally used by museums and conservators, for stabilizing and reversing the corrosion of iron and steel artifacts.
Basic idea, you fill a bucket, trash can, rubbermaid tote, swimming pool.... whatever bath size you require, with an electrolytic solution, most often washing soda in water. Then you provide a sacrificial anode, most often rebar or any other scrap steel, insert your part into the bath, and create a positive current flow from the sacrificial anode to your part. A typical 10A battery charger operating near 14 volts just happens to be an ideal current source for most small parts like this, which makes it all very cheap and easy.
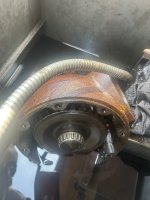
For a part the size of that gearbox, I'd use the following materials:
1. Old RubberMaid trash can or similar, approx 30 gallons of water. Can must be plastic or rubber, not metal.
2. Arm and Hammer Washing Soda, 1 cup per 5 gallons water
3. Copper pipe or rebar to act as hanger rod for gearbox. You'll be placing this across top of trash can and connecting NEGATIVE lead from battery charger to this, as shown in my photos.
4. Steel or copper wire to suspend gearbox from copper pipe or rebar. You can just wrap wire around any part of gearbox, but the better the connection, the better the initial current flow.
5. Four pieces of rebar, as your sacrificial anodes, at least 6" longer than depth of trash can. Bend a "U" in them so they hang on rim of can, down into the water, similar to the scrap steel flat stock plates I show in my photo.
6. Four ground rod clamps and a srap of wire, to string ground rods together. It is absolutely critical that all wiring connections to sacrificial anodes (rebar) be made above the water line, as any wiring on anode/positive side of circuit will dissolve in the water. It's not called "sacrificial" for nothing.
7. An old "dumb" 10A battery charger. Connect positive lead to sacrificial anode, being sure all connections and wiring to anode are above water line, and negative lead to the part you want to clean (gearbox).
I usually set this up one weekend, and let it run all week, with the plan to remove the parts the following weekend. As it runs, the anodes will get fouled and require cleaning, which is most easily done with a 24-grit sanding disc or one of those knotty nasty wire wheels on an angle grinder. I'll usually clean the anodes a few evenings during the week (every ~2 days), as it runs, just trying to keep the current up so the chemistry can doing it's thing.
When you pull the finished parts out, scrub them under some hot water, either in a bucket or a slop sink, and they'll look nearly new, minus whatever pitting exists from age and weather. I use hot water because it helps them dry quicker after, and avoid any flash rust. I'll usually blow them dry with a blow nozzle on my air compressor... or the leaf blower if it's something real big.
I've seen guys use this for entire pickup truck frames, but more often I'm doing things like table saws, band saws, drill presses, etc. My standard process is to put the whole thing in the tank first, to remove all paint and loosen all rusted hardware, before disassembly. After disassembling, I'll either put individual parts back into the tank for final cleaning, or just sandblast to prep for paint.

")