Patio/Outdoor Kitchen Project

   / Patio/Outdoor Kitchen Project
  • Thread Starter
#51  
That looks great. This is better than any episode of HGTV.

Thanks tlbuser stop in again tomorrow, same time, same channel:D

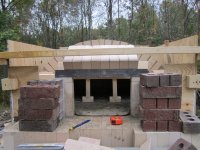
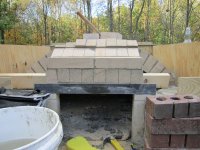
Good looking job, went heavy with the fire brick, that can't hurt.

Questions:

1 Are you using a special high temperature mortar?

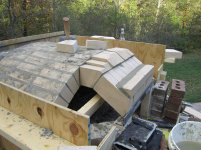
2 Traditionally there is a vent for the combustion products I was wondering where this will be but I am sure you have that planned out?

3 Also you live in a frost area, will you be using glazed exterior bricks?

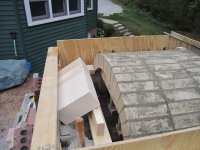
My uncle built an outside fieldstone fire pit oven and it did not weather well, the frost in the porous rock and mortar broke it up in a rather short period of time. Just curious, I love the project so far and am waiting for update pictures.

1. Mortar is a "home brew" of sand, portland cement, and fire clay. Good enough for casual weekend use. If you were to build one of these for daily use you would want to go to a refractory mortar.

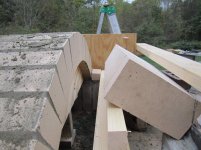
2. The vent will be out of the front of the oven, it will become mre clear as construction progresses.

3. No glazed bricks. The entire area will be under cover and protcted from the weather when it is done. You are correct though, this oven needs to be kept dry.
 
   / Patio/Outdoor Kitchen Project
  • Thread Starter
#52  
Nice project. I was thinking of doing something similar as currently we have an inside pizza oven in our masonry heater and would like something outside for the summer. We cook a lot of stuff in there as it gets up to 500+ degrees and heats the house at the same time!

Keep up the pics, you're doing a great job!

Like the mug...
http://www.tractorbynet.com/forums/...6514097-patio-outdoor-kitchen-project-442.jpg

Must be great to have an oven in the house to heat with and eat with:D

I've had this oven up to the 900 degree range and cooked pizzas in less than two minutes. This style oven is high mass and is geared more towards bread baking as it takes a lot of wood to fire it up to temperature and soak it through. If you cook pizzas late in the evening you can bake bread the next morning.

Stay tuned, further progress coming later this evening.
 
   / Patio/Outdoor Kitchen Project #53  
Only posting a few posts with pics each evening. I'm using a Sony notebook on wireless internet and it takes forever to upload photos.

You could reduce the size of the pix, but personally I like the larger pix.
 
   / Patio/Outdoor Kitchen Project #54  
Will the oven have doors? I've never actualy seen one in person, and I'm curious how it works. I don't even like pizza, but I like building things and I'm enjoying your project quite a bit!!!!

Eddie
 
   / Patio/Outdoor Kitchen Project
  • Thread Starter
#55  
Will the oven have doors? I've never actualy seen one in person, and I'm curious how it works. I don't even like pizza, but I like building things and I'm enjoying your project quite a bit!!!!

Eddie

It will have a removeable door. My first temporary door went up in flames after about six uses. My second temporary door is now being used:)
 
Last edited:
   / Patio/Outdoor Kitchen Project #56  
So much fun watching you build this. What a great thing to have to show and entertain friends and family.
 
   / Patio/Outdoor Kitchen Project
  • Thread Starter
#57  
So much fun watching you build this. What a great thing to have to show and entertain friends and family.

So far we have a had a ball learning how to manage the fire and temperatures. Oh and the pizza and bread is great.
 
   / Patio/Outdoor Kitchen Project
  • Thread Starter
#58  
OK, a few more installments.

After the arches were in place the transition to the oven's door had to be built. This is not so cut and dried and varies from oven to oven but the principle remains the same. The transition needs to take the arch shape down to the door. here are a few shots of the process.
 

Attachments

  • 485.jpg
    485.jpg
    1 MB · Views: 223
  • 486.jpg
    486.jpg
    1 MB · Views: 224
  • 487.jpg
    487.jpg
    1,017.6 KB · Views: 208
   / Patio/Outdoor Kitchen Project
  • Thread Starter
#59  
As you can see a 2X4 is laid across the front of the last arch and bricks are supported from the angle iron lintel to the 2X4. Once those bricks are in place and grouted measurements are taken and bricks are cut to fit into the reamining space.
 

Attachments

  • 490.jpg
    490.jpg
    1 MB · Views: 194
  • 489.jpg
    489.jpg
    1 MB · Views: 174
  • 488.jpg
    488.jpg
    1 MB · Views: 203
  • 487.jpg
    487.jpg
    1,017.6 KB · Views: 162
   / Patio/Outdoor Kitchen Project
  • Thread Starter
#60  
I know what your thinking, not very pretty. Understand that none of this will be visible when the oven is complete. It is strictly built for function at this point.

Once the top transition was installed the next step was to close up the openings on the two sides. This again is up to the installer to complete and the instructions are vague "Close it up" so I did.
 

Attachments

  • 494.jpg
    494.jpg
    1,008.3 KB · Views: 184
  • 495.jpg
    495.jpg
    1,019.1 KB · Views: 147
  • 493.jpg
    493.jpg
    1,012 KB · Views: 255

Tractor & Equipment Auctions

BUYER'S PREMIUM INFO (A53084)
BUYER'S PREMIUM...
2009 Volkswagen Jetta Passenger Car (A51694)
2009 Volkswagen...
2008 Chev Impala (A51694)
2008 Chev Impala...
2010 Ford Edge SE SUV (A51694)
2010 Ford Edge SE...
2007 Ford Taurus Passenger Car (A51694)
2007 Ford Taurus...
PREVIEW DATES AND TIMES (A51572)
PREVIEW DATES AND...
 
Top