Builder
Super Member
- Joined
- Feb 22, 2006
- Messages
- 6,155
- Tractor
- Kubota, AGCO, New Holland LB
One of my customers has a mid-80's vintage 25' x 50' 2 story barn with 8 stalls, hay rolls stored up in the loft. Doors weren't closing correctly and barn needed some electrical work & stalls cleaned. I adjusted the doors and did some checking around.
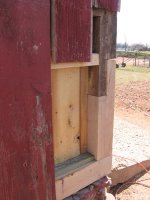
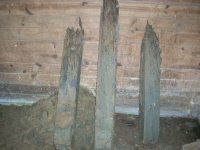
Upon closer inspection of the posts, I noticed significant rot. Out of the (28) 4x6 & 6x6 posts, 24 of them were rotted 50-80% through!!
Much to my surprise, the posts were made out of untreated hemlock or locust. She had no idea how bad it was because years of hay, dirt, etc were packed around them.
After reaching agreement with Customer on costs & how to proceed, I began to think about how this job would be done. How would a barn of this size support itself while posts were being repaired and how would I repair them?
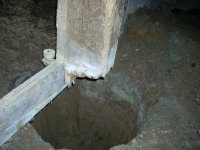
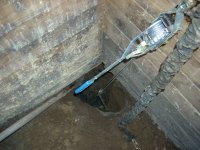
I decided to use post hole diggers and dig the rotted piece of the post out from under the healthy parts that remain above ground. The posts were approx 5' deep and wouldn't budge even after they were dug out wih PH diggers. Plus I had to contend with only being able to dig on 1 or 2 sides of each posts since they were trapped in corners.
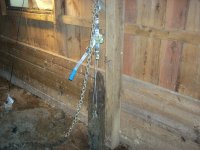
I used my "oooopsie" (RE: Drago) Milwaukee 28V cordless drill equipped with "$5 batteries" and a 5/8" auger bit and drilled a sideways hole about 2' down into healthy post. Then I inserted a 5/8" carriage bolt into the hole. I threw a heavy chain on the carriage beam above the post then used my trusty come-along (high torque !) to extract each post piece stuck in the ground. Since they had some remnants of concrete stuck to them, they were difficult to remove. It was difficult to pull them out in such a tight space.
Upon closer inspection of the posts, I noticed significant rot. Out of the (28) 4x6 & 6x6 posts, 24 of them were rotted 50-80% through!!
Much to my surprise, the posts were made out of untreated hemlock or locust. She had no idea how bad it was because years of hay, dirt, etc were packed around them.
After reaching agreement with Customer on costs & how to proceed, I began to think about how this job would be done. How would a barn of this size support itself while posts were being repaired and how would I repair them?
I decided to use post hole diggers and dig the rotted piece of the post out from under the healthy parts that remain above ground. The posts were approx 5' deep and wouldn't budge even after they were dug out wih PH diggers. Plus I had to contend with only being able to dig on 1 or 2 sides of each posts since they were trapped in corners.
I used my "oooopsie" (RE: Drago) Milwaukee 28V cordless drill equipped with "$5 batteries" and a 5/8" auger bit and drilled a sideways hole about 2' down into healthy post. Then I inserted a 5/8" carriage bolt into the hole. I threw a heavy chain on the carriage beam above the post then used my trusty come-along (high torque !) to extract each post piece stuck in the ground. Since they had some remnants of concrete stuck to them, they were difficult to remove. It was difficult to pull them out in such a tight space.
Attachments

Last edited:
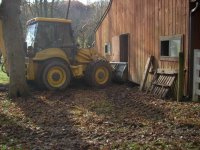
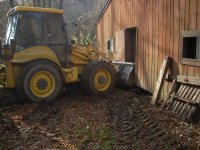
") (thanks 20/20)to lift the barn up a few inches in spots that had sagged. Try that with a mini ex!!! :laughing:
(thanks 20/20)to lift the barn up a few inches in spots that had sagged. Try that with a mini ex!!! :laughing: