Question on JCB swing cylinders

   / Question on JCB swing cylinders #71  
I wasn't impressed with myself but the cut looked like it would hurt more than it did. Picked up the grinder with my right hand pulled the trigger and the torch spun it sideways and got the side of my left hand. Large grinders have plenty of torch had a few small nips in the past but that was a good one.
The biggest challenge I've had with cylinders is the extendahoe one in the boom. Not to bad though once you know how Richard will find it's not as difficult as it appears just heavy.
 
   / Question on JCB swing cylinders
  • Thread Starter
#72  
Update part XIII....

Got the boom cylinder out alone and actually, pretty easy (once I got the physics thought out)

Loaded some lumber in the gap between the boom arm and the boom cylinder so it would have something to lay on. There is something like a six/eight inch gap and I didn't want the cylinder to clang to the boom.

Attached my grade 100 chain to the front loader, draped it over the TOP of the machine. Since it's got a good frame for the cab I figured that would hold the weight of the cylinder if need be, not to mention it would be spread out over an area.

Anyways, chain over the cab and to the back of the machine. Hooked a come-along to the chain and the other end to the kingpin end of the cylinder. (cylinder had already been retracted) Pulled the top pin out. Now the come along is pulling in a straight line to the machine, pulling it up and forward. I pulled until the bottom ram became visible and then I wrapped a strap around it and threaded the strap around an anchor point.

Pulled the ram end off the machine and it was now hanging by the come along (and a second strap up front). As the ram end dangled off the back of the machine, I then let the strap thread out of my hands and it simply pivoted down to the ground.

Now dangling, I let it touch the ground by undoing the come along and then the strap, leaving it simply standing vertical on its own.

PUt another strap around the upper eyelet and wrapped it around an anchor point and lowered it to the ground so now it's 100% safe and on the ground.

Pulled truck up, picked end of cylinder back up & put it into bed of truck. Picked up other end of cylinder and slid it in.

Tomorrow in shirt & tie, I'm going to drive this dilapidated old truck (not much nicer than the Beverly Hillbillies). I'm sure I"m going to be a sight to see!!!

Now it's looking like the interesting part is going to be hoisting it back up and sliding it back in the box.
 
   / Question on JCB swing cylinders #73  
"Now it's looking like the interesting part is going to be hoisting it back up and sliding it back in the box. "

Here's a thought - put the kingpin back in, cylinder retracted - attach the hoses, have some scrap lumber around and a pry bar - start the engine, slowly extend the cylinder, (rotate the rod pin hole as necessary) adjust cribbing (lumber) as necessary so it looks like it's going to line up with the upper pin hole - shim the body of the cylinder as necessary so it's at the right height, then REAL small increments til you have the holes lined up, add a BFH (or your air hammer), DONE... Steve
 
   / Question on JCB swing cylinders
  • Thread Starter
#74  
HA!

You are like 50 miles ahead of me....

The problem as I'm seeing it is simply hoisting this very heavy bugger 5' in the air. Two of us got tangled up trying to lift it until we simply laid one end of it on the truck bed and hoisted the other.

I'm guessing that hoisting it up to the height is going to be the hard (and potentially dangerous) part. Once I get it there, lining it up with the hole will just be patience....lots and lots of patience......
 
   / Question on JCB swing cylinders #75  
Sleep on it, I'm sure it will come to you.;)
 
   / Question on JCB swing cylinders #76  
Let's see if we can make it 100 miles :D

Dang file upload is broken AGAIN :mad: Shoulda known if I marked up your pic it'd be a waste of time...

Lay a 2x8 on top of your ROPS (on edge, front-to-back, front end hanging over about a foot, rear hanging over about 4 feet - toenail two blocks @ 90 degrees to keep it from tipping over - ratchet strap the front end around both front uprights TIGHTLY, rear will probably need it too- (if you have an 8' long piece of steel, either square tubing or C channel (NOT angle) you could use that instead)

If your new "Skyhook" :D isn't high enough over the boom, you could block the rear of it up some -

Tightly ratchet strap the come-along where you need it, or it may try to slide along the beam, especially if the beam isn't level..

If you need more, PM me your email and I'll send you the marked up pic... Steve
 
   / Question on JCB swing cylinders
  • Thread Starter
#77  
Dropped cylinder off at shop today. Said they thought they could possibly finish it tomorrow if the parts arrive. I'm not driving the truck in tomorrow so hopefully I can pick it up on Friday and put back together.

Steve, I think I'm getting your idea. Sort of creating a crane from above. Nice idea, don't think I would have thought of that. Am still thinking it through. (not sure I have enough parts on hand to make it happen either)

Right now, I'm thinking on connecting one end of the cylinder to the come along (while on truck). pull it out and then connect other end to other strap. Basically letting the truck keep it at bed height instead of taking it to the ground and raising it back up.

Then doing it similar to how I did the swing cylinders, raise one end up & tighten it. Go to other end and do same...

I did notice when I pulled it out that there was essentially no grease inside the ram. It has been greased but now that it's out in the open where I can see it, it looks like the grease goes in through the zerk fitting and then squishes out of the ram before making it past the bearing that is in there.

When I get it back, I'm going to try to remove the bearing in both ends, clean it out and put them back where the slit is closer to the zerk. Might even grease the pin as I put it back in. I was surprised to see so much grease around the outer edge of the ram where it got squeezed out....yet so little (essentially none) of it on the inside where the pin is.

Then again, maybe it's the outer part of the bearing that needs the grease and not the inner like I'm presuming.
 
   / Question on JCB swing cylinders #78  
Looks like they got the uploader working... Steve
 

Attachments

  • JCB 1550b2.JPG
    JCB 1550b2.JPG
    247.3 KB · Views: 143
   / Question on JCB swing cylinders
  • Thread Starter
#79  
Meandering update....

Cost for the cylinder is $550. I don't remember if that is before or after tax. I'm ok with that given that I paid something like $1,100 for the dipperstick cylinder (at the dealer). That was the last time I've ever taken anything to that dealer (they are a former JCB dealer and not one anymore)

Should be picking it up tomorrow.

Have taken seat off to have the seat bottom and seat back reupholstered. Talked to the dealer today and just the seat bottom is something like $450. I don't know if that is for the steel pan or for the finished pan/foam/covering.

Regardless.... I came home and took mine apart and will try the local upholster deal. I don't care if I don't have "JCB" on the seat.

Oh.... and the silly little screws? I had to get an impact screwdriver and drive a total of 10 screws out to get down to the seat pan. 10 stupid frozen screws. Then again, they are nearing 30 years old so some rust isn't a surprise.
 
   / Question on JCB swing cylinders
  • Thread Starter
#80  
Meandering update part II......

Got the cylinder home yesterday. Went out to start the process of how to reinstall it. Ultimately, the process took about 5 hours which included a couple breaks.

When greasing it, I noticed grease squirting out the sides.....fine & dandy. Upon having it off the machine, I discovered the pin was dry as a bone. The grease was squirting out between the spring bushing & the ram hole, never making it to the rod.

I decided when I got it home that I'd take the bushing out and see what's going on in there.

Long story short, there is a small indention (call it a "V" groove for simple conversation) in the outer circumference of the bushing. I'm guessing this is the channel that the grease will take to get to the hole or slit and then work its way to the pin.

These little channels were filled in with all I can describe, dried grease. Most of this stuff flaked out like drying paint.

I took a wire brush to the entire inside/outside of the bushing, brushed the entire pin and brushed the hole in each end of the cylinder where the bushing goes.

Got it all assembled last night at dark. Machine still sitting there waiting new grease. Might do it today if I can get to it, otherwise probably do it this weekend. This however, brings up a concern about all the other pins. I might take each one out (one at a time) and remove the bushing to clean the entire assembly. It was quite a surprise to think all this time, I've been greasing it but it might not be reaching the proper area.

Oh, and getting the cylinder back in? That was interesting.

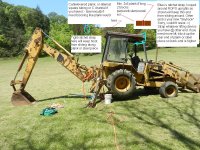
Ultimately, attached the come-along to pull it up. Attached two more ratchet straps to pull up and to give support. Had my wood under it to hold it. Still had to put another strap on the middle of the cylinder, anchored down the boom to provide some support that the wood didn't provide. Then, had to take the come along, remove it and put the 2-straps DOWN so that tightening them would pivot the cylinder on the wood that was supporting it and lift the far end (ram) up to better align the hole.

Of course, we then discovered that although I straightened both ram ends so they'd be on the same angle....the buried ram (inside the steel box frame of the boom) was cocked over at an angle so we had to redo some of the other end straps so we could rotate the cylinder, get the buried rod connected and then straighten out the opposite end prior to mounting it.

All in all, it was very educational. Somewhat impressive what you can do as a back yard mechanic with four to six 'one inch' ratchet straps and a come along. Used a 1 1/4" socket to pound out the bushings. Was climbing up/down and all over the machine to adjust things. Went to bed (and awoke) exhausted.

How nice it would have been to have had an overhead crane.
 

Tractor & Equipment Auctions

2013 Land Rover Range Rover Sport 4X4 SUV (A51694)
2013 Land Rover...
2008 CATERPILLAR 12M MOTOR GRADER (A51406)
2008 CATERPILLAR...
Miller Dimension 452 Welding Machine (A53117)
Miller Dimension...
MODERN AG PREDATOR 15 15' BATWING MOWER (A51406)
MODERN AG PREDATOR...
JOHN DEERE 608C (A53084)
JOHN DEERE 608C...
2016 Ford Explorer AWD SUV (A51694)
2016 Ford Explorer...
 
Top