Repairing sheared impeller shaft - JD 47 snowblower attachment

   / Repairing sheared impeller shaft - JD 47 snowblower attachment #41  
better off with locktite, leaving a taper at the bottom of the hole would be problematic, maybe bolt snapping time..
 
   / Repairing sheared impeller shaft - JD 47 snowblower attachment #42  
As stated, fully tap holes with a bottoming tap. Secure with red loctite, dress flush, and stake with a center punch to lock in place. If you choose to tack with TIG welder, do not use loctite.

In order to drill and tap, you can spotface at the holes with a 3/8" or 1/4" end mill. Just need a flat sutface for the drill diameter.

Looks really great now. And cost a lot less than a new gearbox. Congratulations, you are an accomplished machinist.
 
   / Repairing sheared impeller shaft - JD 47 snowblower attachment #43  
No offence to anyone as there are people on this thread with a lot more experience than I have, but here is what I would do. I would use an allan screw and only blue Loctite if any. A small center punch dimple near the edge of the threaded hole will keep the recessed allan screw from coming out.

Here's my reasoning: I like to make things so that I can take it apart if I need to. Like to replace the shaft again if it ever needs it. A die grinder will remove the dimple and the allan screw can be removed and the shaft pressed out of the gear. Now you will probably never have to do this but it's nice to know that you left it easy to take apart if you ever need to.
 
   / Repairing sheared impeller shaft - JD 47 snowblower attachment
  • Thread Starter
#44  
In preparation for drilling into this interface, I took a center punch to create a dimple to start drilling. It did nothing but flatten the tip of the punch. I sharpened the punch and tested in other places, and left nice dimples everywhere. I'm wondering if the compression in the interface has left a very hard material. I ordered a solid carbide #3 center drill and a couple solid carbide 3/16" drill bits. I'll have to drill these holes in the lathe with the 4 jaw chuck so I don't snap off the brittle carbide bit. It's likely that once I get through the hardened exterior of the gear, that I can then switch to an HSS drill that's less likely to snap off and be difficult/impossible to extract.
 
   / Repairing sheared impeller shaft - JD 47 snowblower attachment #45  
In preparation for drilling into this interface, I took a center punch to create a dimple to start drilling. It did nothing but flatten the tip of the punch. I sharpened the punch and tested in other places, and left nice dimples everywhere. I'm wondering if the compression in the interface has left a very hard material. I ordered a solid carbide #3 center drill and a couple solid carbide 3/16" drill bits. I'll have to drill these holes in the lathe with the 4 jaw chuck so I don't snap off the brittle carbide bit. It's likely that once I get through the hardened exterior of the gear, that I can then switch to an HSS drill that's less likely to snap off and be difficult/impossible to extract.

If the drill bit snapped off in the hole I would just pour it full of JB weld and call it good.

I'm sure enjoying this project. I'm learning lots!
 
   / Repairing sheared impeller shaft - JD 47 snowblower attachment
  • Thread Starter
#46  
jthibodeau89: Your comment: "Congratulations, you are an accomplished machinist." Your encouragement and affirmation gave me such a smile. Thank you for that.

Having all of you guys watching and helping raises the bar for what is done here. I can't just hack this out since there are high expectations. The learning here has been tremendous too.

Incidently, on youtube there are a number of very nice videos evaluating various brands of epoxies for bonding metal. I was happy to see that my old favorite slow-curing JB Weld is right at the top. In the past, I have made "temporary" repairs with JB Weld that have lasted indefinitely. Since I'm rambling: Another repair epoxy I recently discovered is PC7. This is a fiber-reinforced epoxy paste that is insanely sticky and very very tough. I put some of this on the underside of my mower deck where rust had perforated the steel. I have been astonished to find that it stayed put for two years now and hasn't worn off.

Now I'm waiting for carbide drills to arrive.
 
   / Repairing sheared impeller shaft - JD 47 snowblower attachment #47  
Here's my reasoning: I like to make things so that I can take it apart if I need to. Like to replace the shaft again if it ever needs it. A die grinder will remove the dimple and the allan screw can be removed and the shaft pressed out of the gear. Now you will probably never have to do this but it's nice to know that you left it easy to take apart if you ever need to.

Pmsmechanic- Yes, you can technically take it apart, but in this case you can't redrill the 1/2 of the hole that will remain on the gear. A second repair will be a duplicate of the first. I.E., bore the broken shaft out of the gear and start over. Also, the 0.002 shrink fit will be difficult to press apart without galling. Back to boring the shaft out of the gear.

Dan- Do you have an old tap with a pointy end that you can sacrifice as a center punch? But be sure the hammer end is flat. If the material is that hard, you may also need a carbide tap; at least to start the hole. Take it slow and use plenty of tapmagic cutting lube.

I unfortunately just scrapped a part with several hours of machining on it by getting in a hurry. I was drilling the first stage of a 2.6" deep grease hole in a loader timing bar for a 300cx and broke a 7/64 cobalt drill at 1.5" depth. It was the last 0.100" peck before changing to the 6" long drill. Tried to over drill with 1/8" carbide drill, but the cobalt drill is much harder than the 1144 steel bar and the carbide drill started to walk off center. I just set the 45" bar aside and called it a lesson. But it has motivated me to build a sinker EDM. It will take a few months, but I'll recover the part to keep as a spare, or perhaps sell on ebay. And I'll have a nice EDM in my shop for future projects.
 
   / Repairing sheared impeller shaft - JD 47 snowblower attachment #48  
Back to boring the shaft out of the gear.

But it has motivated me to build a sinker EDM. It will take a few months, but I'll recover the part to keep as a spare, or perhaps sell on ebay. And I'll have a nice EDM in my shop for future projects.

Good point on boring the shaft out of the gear. Obviously I missed that.

A thread in this forum on your EDM build would be interesting. Hopefully I would catch it.

My first search on EDM produced Electronic Dance Machine. Ya that's not where we are going here so I added "electrical discharge xxxxxx" and came up with what I was looking for, Electrical Discharge Machine.
 
   / Repairing sheared impeller shaft - JD 47 snowblower attachment
  • Thread Starter
#49  
Some progress over the past few days. I don't seem to get much time to work on this....

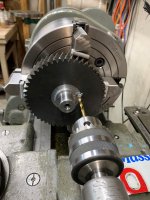
Anyway, holes were drilled on the lathe. A solid carbide drill bit was used to make it through the hard surface, then an HSS bit was used to get a little more than 1/2" deep. As can be seen, one of the holes now houses a snapped off tap, which will stay. I'm planning to use a pneumatic glue applicator to inject the hole with the slow-curing JB weld to bind that tap in there permanently. If this thing is ever reworked again, then the tap flutes will have to be ground out with a diamond burr before boring. The other holes were tapped with M6-1.0 thread after enlarging the hole a little bit.

Drilling.jpg
Drilled.jpg
 
   / Repairing sheared impeller shaft - JD 47 snowblower attachment #50  
Been there, done that, more than once. Depending on how deep it is, you may be able to break up the tap with a punch and do over in M6-1.0. Or you can burn out by edm.

Or possibly tig weld a nut onto the end of the tap. Is the tap HSS, or carbide?


EDIT: nevermind. I just noticed that the protruding end is already ground off. It is in there until you burn it out.
 

Tractor & Equipment Auctions

John Deere 855 Hydraulic Rotary Tiller (A44571)
John Deere 855...
2023 Ford F-150 4x4 Crew Cab Pickup Truck (A44572)
2023 Ford F-150...
2016 Infiniti QX80 4WD SUV (A44572)
2016 Infiniti QX80...
2023 Big Bend 20FT x 6.5FT Stock Combo Trailer - Heavy-Duty Livestock and Versatile Hauling Solut... (A46877)
2023 Big Bend 20FT...
2015 Ford F-150 Ext. Cab Pickup Truck (A44572)
2015 Ford F-150...
2022 Caterpillar D3 Crawler Tractor Dozer (A45336)
2022 Caterpillar...
 
Top