Restoring old Implements back To there former glory

   / Restoring old Implements back To there former glory
  • Thread Starter
#21  
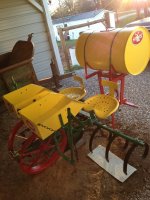
Here's my second restore i hope to use this year to plant my vegtable's in the garden lol a Holland Transplanter I picked up for $30 no one else wanted it said it was scrap. Ohh how wrong they were i love the way it turned out.
Before
IMG_0236.JPG

With out New Decal's and set of row marker's

IMG_0447.JPG

After the new Decal's in my shed

IMG_0464.JPG

IMG_0462.JPG

IMG_0461.JPG
 

Attachments

  • IMG_0465.JPG
    IMG_0465.JPG
    234 KB · Views: 306
   / Restoring old Implements back To there former glory #22  
I'm glad I am not the only one that does this. :thumbsup: Essentially my equipment is lawn art for about 10 months of the year so I might as well keep it looking halfway decent.
 
   / Restoring old Implements back To there former glory #23  
OST:thumbsup:
 
   / Restoring old Implements back To there former glory #24  
1957 Oliver manure spreader. Didn't get a before pic, but it was a sad, rusted out hulk when I got it.
Paid $300 for it, put another $900 in it (new steel and bearings mostly), sold it for $1500....figured I cleared about 5 bucks/hr....:D

ry%3D400


ry%3D400


ry%3D400
 
   / Restoring old Implements back To there former glory #25  
Here's the latest. Not going to get the "full Monty" treatment of primer and paint. Going to keep the rust and moss finish. It's 1/2 of an Oliver 4-24 potato digger. Found the missing shaker sprockets, having a tough time finding a few inches of the 140 offset drive chain. Should be ready to harvest the spuds in a couple of months. Mark

Before:


After:

 
   / Restoring old Implements back To there former glory #26  
1957 Oliver manure spreader. Didn't get a before pic, but it was a sad, rusted out hulk when I got it.
Paid $300 for it, put another $900 in it (new steel and bearings mostly), sold it for $1500....figured I cleared about 5 bucks/hr....:D

ry%3D400


ry%3D400


ry%3D400

Great restoration job. You did good.
 
   / Restoring old Implements back To there former glory #27  
Excellent restoration work that speaks volumes about the quality and character of people who do this sort of thing. What a noble pursuit.
 
   / Restoring old Implements back To there former glory
  • Thread Starter
#28  
Awesome work guys keep those post coming!! Here's my Latest Job A ford 710 Utility Blade i wasn't able to do a complete restore because someone had welded it up fixed and i think its a lot more solid now. So i left it alone and just grind down the rough spot's. Cleaned up the weld's, sanded, Primed and Painted it good. I believe it will suit me till i can get a bigger one. Have to wait on new decals the lady i use had a death in the family so gotta wait till next week. I also traded my 101 Ford 3 btm 14" Plow for a Ford 142 4 btm semi-mount 16" Plow which will be in for a redo soon. Currently redoing my Ford Rotary Hoe which has been a little tough the axle and spacers are rusted together so gotta use heat which is time consuming to say the least.

Before:
IMG_0604.JPG
During:
IMG_0652.JPG

IMG_0653.JPG
After Without Decals and a darn bird pooped on it lol:
IMG_0666.JPG

IMG_0665.JPG

IMG_0657.JPG
My Ford 142 Plow:
IMG_0664.JPG
 
   / Restoring old Implements back To there former glory #29  
You do some very nice work Greenriver. So now I'm curious about your process. What are you using to sand down the implements? What type of primer and paint are you using? Any tips you might have. I have been acquiring a few implements and would like to see them look like new. I'm afraid I will run out room in my shop if they looked as good as your equipment. Currently they live outside.
Keep the pictures coming
 
   / Restoring old Implements back To there former glory
  • Thread Starter
#30  
Thanks Northcountryboy and none of my stuff is showroom quality but, i do try to make the best of what i have to work with. The first thing i do with any item is pressure wash it really good get all the mud, flaky rust, caked on grease, and so on off. Then i go over it good with a paint scraper and a wire brush. Then i use just regular sand paper 180-320 in stages and hand sand it till it all feels smooth to the touch. Since i don't have a sand/Media blaster. Followed by a good blow off with the air tank wand. Then i wipe it down with a towel to make sure to get all the dust and crap off. I use dupli-color Spray can primer and put a light coat on it to see if i have any low or high spot's still then a good coat of spray primer. I use Majic brand paint from TSC not the best but, its cheaper and closer to the house and since i use these items alot i didn't really wanna give that dealer paint price. Then just use a normal 2 inch paint brush and take my time brushing going back over any thing that might try to run. When the paint has dried and i check for any runs or issues i go back and fix the problem or if good i put a couple coats of Majic clear coat on for a bright finish and to help protect the paint. I use a cheap air gun sprayer for the clear since it's not as messy or leaves a big mess. lol I really wish i had a good paint area with a good quality air gun but, i do all these piece's at my job on my downtime in our 30x30 garage. Gotta love those long boring 12 hour night's haha. I cant really use a air gun in there due to over spray and the mess lol. It's took time to find the right amount to put on at a time to keep from running or crumpling. But i enjoy it more to be honest doing it all by hand.
 
Last edited:
 

Tractor & Equipment Auctions

Set of (2) Containment Drums (A46502)
Set of (2)...
2013 BMW X5 SUV (A46684)
2013 BMW X5 SUV...
2013 Ford Taurus Sedan (A46684)
2013 Ford Taurus...
2016 Chevrolet Silverado 2500 HD (A47307)
2016 Chevrolet...
John Deere 5090E (A47307)
John Deere 5090E...
2013 NISSAN Xterra (A46684)
2013 NISSAN Xterra...
 
Top