Sabre Samurai Cutter attachment

   / Sabre Samurai Cutter attachment #1  

CntryDR

New member
Joined
Sep 7, 2016
Messages
9
Location
Pugwash, Nova Scotia
Tractor
John Deere 3720
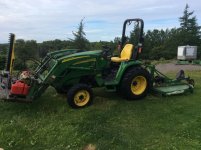
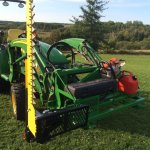
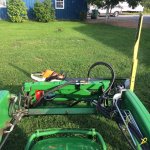
Here is my version of the Sabre Samurai cutter.
I researched this attachment on this and other sites,saw what others had done and came up with this set up to work for my trail clearing needs.
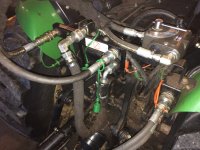
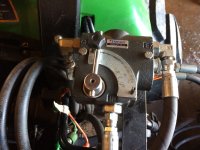
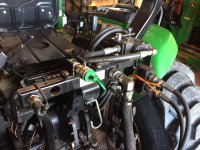
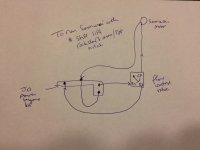
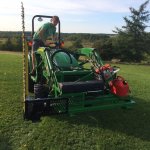
I made a quick attach frame for my FEL, modified the supplied mounting bracket and added a hydraulic ram that can extend the cutter assembly out 30" from frame.
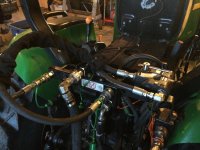
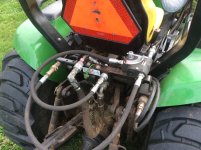
I tapped into my power beyond hydraulics that power my backhoe and used a flow controller to provide the proper Gpm. This way I can also run my bush cutter at PTO speed and lift the rockshaft arms as needed.
I have to tidy up some hoses yet to make a nice clean install but everything is working great.

It makes trail work or cleaning up the edges of woods roads a much easier and quicker thing to do!
 

Attachments

  • image.jpeg
    image.jpeg
    1.6 MB · Views: 1,649
  • image.jpeg
    image.jpeg
    1.5 MB · Views: 1,692
  • image.jpeg
    image.jpeg
    288.5 KB · Views: 2,291
  • image.jpeg
    image.jpeg
    353 KB · Views: 1,780
  • image.jpeg
    image.jpeg
    265.8 KB · Views: 2,553
   / Sabre Samurai Cutter attachment #2  
Very nice work! Well thought out. How far will the cutter angle down? As in cutting along a ditch by a driveway?
 
   / Sabre Samurai Cutter attachment #3  
Really nice work. Looks like it could've been made by one of the major manufacturers. I could use one to keep the sides of my driveway cleared. Too sloped for brush hog use.
 
   / Sabre Samurai Cutter attachment
  • Thread Starter
#4  
Thanks.
I didn't like the supplied bolt that allowed you to put in any position from vertical to horizontal as it would loosen as you were using it, found this out as I was mocking it up.

I made so it could be pinned in the vertical, at 45 degrees up, horizontal, and 22.5 degrees down to cut in the ditch. It would have been nice to mount another cylinder to make it tilt hydraulically but I didn't have another scv to use - I suppose I could have made a manifold where I mounted the quick connects for the motor and added another valve back in the operators' station - maybe this winter's project once I get our trails trimmed!

I will post some pictures again in the different positions and with it extended once I tidy up the hoses on the flow controller.
 
   / Sabre Samurai Cutter attachment #5  
Could you give me more detail on how you plumbed the samurai.
 
   / Sabre Samurai Cutter attachment
  • Thread Starter
#6  
Does your tractor already have the "power beyond" hydraulic kit from John Deere? This puts the full hydraulic power of the 3720 to the rear of the tractor.

I had this previously installed as I have a 485 backhoe as well - this was the starting point where I plumbed in a flow controller to power the samurai's hydraulic motor.
I can give you detail and pictures from this point. I am not certain how you would get access to the flow ( valve and gpm wise ) you need from another setup.
 
Last edited:
   / Sabre Samurai Cutter attachment
  • Thread Starter
#7  
I should also note that I already had a scv and hydraulics going to the loader to power a grapple bucket - This is what I use to extend / retract the ram that moves the cutter head out and in.
 
   / Sabre Samurai Cutter attachment #8  
Thanks for the reply. I have a hydraulic line(power beyond) that goes to the rear of my tractor for a backhoe. I have a Kubota and the when this line is not being used for the backhoe, it plugs back into itself. I think our situations are different for Kubota versus JD. I purchased the same flow control valve that you have in the pic, but now I think I need to add a 3rd function valve to the power beyond on the loader and then add the flow control valve if needed. I tried plugging the power beyond line going into my loader into the IN of the flow control valve, then the CF out of the valve to the Samurai. Then the EF of the valve was Teed to the line coming out of the motor. I returned this line to the PB on the loader(where the original line came out). I added QD at the Samurai. I thought that when the Samurai was removed and the flow valve was fully closed, all of the flow would go through the EF of the valve and then back into the PB of the loader. It didn't work! It does work if I attach the Samurai and open the flow valve. The valve starts to lock up and the motors starts to bog down if I try to close the valve.
 
   / Sabre Samurai Cutter attachment #9  
Nice work! Could you give closer details, more pics?, of the attachment location and how you have the ram connected. Maybe a flow diagram, etc.?

FWIW, I too have done a QA plate and mounted the Samurai to it, BUT it's in version 1.0 currently. The problem I'm having is getting the cutters close enough to the ground without the QA plate hitting the ground first. I'm going to have my welder redo the location to work better- hopefully.

Also, I'm wondering what you're using to control the cutter, on/off action and speed of cutting? Are you using a 'joystick' on a FEL lever by chance? That's what I've been using. I feed my Samurai via a pair of QDs located on the cross tube between my FEL arms. It is also used to open/close my grapple, powered by my second set of remotes and a splitter valve at the rear of the tractor with hoses run to the FEL from the valve. My joystick trigger switch controls on/off of the cutters when I pull the FEL lever toward me. Engine RPMs control speed of the cutters, which I keep at near idle to protect the cutters from potential damage if I run into something too hard to cut, etc.

Thanks,
Hope my description helps.
 
   / Sabre Samurai Cutter attachment #10  
tsrohrb, those flow control valves have a nasty habit of NEVER being quite closed, then they build up pressure which shuts the flow off completely - when I plumbed mine, I ended up having to put a small high pressure ball valve between the CF port and tank, otherwise my QD's act as the "NOT" circuit and the system goes into relief. When I'm actually USING the Samurai that extra "Bypass" valve stays closed, when NOT using it the flow control stays all the way to EF position and the bypass valve stays open. There's not MUCH flow there, but if I CLOSE that bypass without anything hooked to the QD's on the FEL, after a while I get that squeal from the relief valve.

I"ve still got some things to change on my setup, which is why it's all done with hoses and a bucketful of adapters (I call it a feasibility study) - and it's already taught me I'll need a DIRECTIONAL control in the circuit somewhere, 'cause if the Samurai bites down on a limb that's hard wood and near the max size, it LOCKS UP without a way to reverse the flow. Major PITA I still need to address... Steve


Top