She bleed out today!

   / She bleed out today!
  • Thread Starter
#21  
It would help greatly if people who post pictures would annotate the pictures, with arrows pointing out critical features.
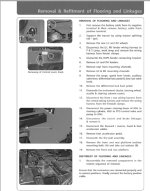
Agree and apologies. I did not have the ability to edit the photos when I posted. I had the filenames of the pics be descriptions but I see that did not carry over to the post.

The long and short of it is the pic looking down at the deck of the tractor... where the tip of the screw driver is... I need access directly below the the floor in that area to get to a hose.

I spent a couple hours yesterday trying to figure it out I don't see how the floor comes off.

I expected to see access panels I could un bolt but no such luck.
 
   / She bleed out today!
  • Thread Starter
#22  
Could you unbolt and remove the floor pan? Most tractors you can but not sure what is involved on yours.
I don't see a way to do this... Maybe the seat and fenders need to come off not sure. I'm hoping someone has some experience here. I have a shop manual but it is no help.
 
   / She bleed out today! #23  
It is easy to see that with the belly pan you don't have.
 
   / She bleed out today! #24  
I don't see a way to do this... Maybe the seat and fenders need to come off not sure. I'm hoping someone has some experience here. I have a shop manual but it is no help.
Without seeing one in person, it looks like you can unbolt the cross member to back out the distribution block that the line broke off from. Put a jack under it to relieve any droppage if you can unbolt it.
We may have a 3550 on the lot for service and if we do, I'll look under there on Monday and see what I can see.
 
Last edited:
   / She bleed out today! #25  
Probably one of the first things bolted on going down the line.
Sounds like you have a good attitude, just stick with it and once you have the cab, all the sheet metal, seat and both rear wheels laying on the ground, it'll be easy. 😆
Just kidding brother, my open station has a forbidden mystery zone also, and I wasn't kidding about your good attitude. 👍
 
   / She bleed out today! #26  
Probably one of the first things bolted on going down the line.
Sounds like you have a good attitude, just stick with it and once you have the cab, all the sheet metal, seat and both rear wheels laying on the ground, it'll be easy. 😆
Just kidding brother, my open station has a forbidden mystery zone also, and I wasn't kidding about your good attitude. 👍
It's that kind of attitude that gets to the bottom of things w/o the self drama that these kind of things tend to initiate.
Things tend to fall in place better w these types of mentals
 
   / She bleed out today! #27  
I don't see a way to do this... Maybe the seat and fenders need to come off not sure. I'm hoping someone has some experience here. I have a shop manual but it is no help.
Not pretending to know how to do this, but from the first photo am wondering if the A hose can be removed (inspected for damage), then the B fitting (square block) turned off. Then wondering if the bracket C can be unbolted to allow putting the new parts back together.
Guess the debris with ?? mark is the woody chip that may be what is left of the cause of the damage.
I do wish you well getting this solved and get you back running again.
 

Attachments

  • Oil Leak.jpg
    Oil Leak.jpg
    1.1 MB · Views: 156
   / She bleed out today!
  • Thread Starter
#28  
@beenthere (wonder if the '@' works on this board?)

you are right. "C" part came out after removing another piece of steel that runs perpendicular to the axles. Then I was able to actually remove the banjo bolt/fitting while leaving 'B' on the tractor. Hose 'A' is fine the piece of wood is superficial. My only trouble now is getting under the deck to remove the other end of my broken hose!

Thanks for your well wishes. Luckily I've been able to stay productive out there with my excavator while I try to fix the tractor.
 
   / She bleed out today! #29  
@beenthere (wonder if the '@' works on this board?)

you are right. "C" part came out after removing another piece of steel that runs perpendicular to the axles. Then I was able to actually remove the banjo bolt/fitting while leaving 'B' on the tractor. Hose 'A' is fine the piece of wood is superficial. My only trouble now is getting under the deck to remove the other end of my broken hose!

Thanks for your well wishes. Luckily I've been able to stay productive out there with my excavator while I try to fix the tractor.
That's what it looked like to me as well that you could remove the cross member but I would have liked to have seen this on the actual 3550 that came in for service last Wed.
It was gone today as it was shipped out back to the owner last Friday so I did not get the chance.
The 4500 and 5500 series we do have there were different from the 3500 and 3600 lay outs.
Glad you got at least the one side off.
 
   / She bleed out today!
  • Thread Starter
#30  
About my 3rd time through the service manual I have finally identified the part.

I am attaching (2) pics that are screen shots from the manual. The first is how to remove the part the top end of my broken hose attaches to. It is the PTO Control Valve. Steps to remove the valve include disconnecting all the hoses and "peripheral parts to access the PTO control valve". All the pics from the lower left hand corner of the sheet show the guy easily wrenching on the thing... from the top, through the plane of the floor, so the floor must be one of those "peripheral parts".

The 2nd pic attached are the steps to remove the floor of the tractor. Holy smokes, the guy who said that this hose was one of the first things bolted on at the factory wasn't kidding!

The removing the floor procedure has me concerned because I do not have a special tractor splitting jack. I do not have jack stands I would trust to support the rear of the tractor. I am concerned about jacking up the tractor out in the field. I am concerned about the weight of the wheels/tires. I do not have a way to transport the tractor this needs to be a field repair. Do I need a special jack? I could buy a big bad ass floor jack and get some meaty jack stands. Maybe some 2x10s between the bottom of the jack stands and the ground to prevent anything from settling. Not sure. Tractor is sitting on a slight side to side angle.

My alternative to removing the floor is to cut a section of it out and then weld in a few tabs to support the cut out piece (create an access panel). I am not thrilled about cutting up the floor of this sub 30 hour machine.

What would you guys do?

Bonus option 3:
-Some type of field splice for the hose? Cut off the end with the banjo fitting ,have a little 4" section with new banjo fitting made, then somehow splice the two ends together in the field. I have a feeling you guys are going to tell me that is Mickey Mouse and will not work.
 

Attachments

  • pto control vavle.jpg
    pto control vavle.jpg
    178.7 KB · Views: 119
  • floor.jpg
    floor.jpg
    166.1 KB · Views: 105
   / She bleed out today!
  • Thread Starter
#31  
pto control vavle.jpg

floor.jpg


Posting the pics of the pages again maybe easier to read this time.
 
   / She bleed out today! #32  
Being that the hose " goes up under the seat and lubricates the 'rock arms' in 3 places" per post #13, I would definitely look at the splice idea. If the fitting breaks again, it would be a easy fix.
 
   / She bleed out today! #33  
How about just plug the leak, put hydraulic fluid in it, and driving it home? Not going to hurt the rock arms.
 
   / She bleed out today!
  • Thread Starter
#34  
How about just plug the leak, put hydraulic fluid in it, and driving it home? Not going to hurt the rock arms.
The machine is on property that is all forest... home is 25 miles away. I am clearing the property to build a house. I guess if worst came to worst I could weld up the broken banjo fitting and pay someone to truck it to my house.
 
   / She bleed out today!
  • Thread Starter
#36  
I've been looking into reusable hydraulic fittings. At this point my plan is to cut off a section of the hose and bring it to a local shop. Have them identify the hose and get a reusable fitting I can install in the field on the broken end of my existing line. At the same time have them fab up a small hose with the banjo fitting I need on one side and a fitting compatible with the reusable one on the other. This way I can connect the two together.

The existing hose is hanging down vertically, so I plan to spray some WD40 through a straw up inside the damaged hose, above the cut, and let it wash out the inside of the hose to remove any debris that might get in there from the cut. Then go to town with a couple spanners.

This guy got the fittings on a hose without using a vice which is encouraging:
Field install of hydraulic fittings
 
   / She bleed out today! #37  
looks good, but if that doesn't work out for one reason or another, I THINK it would be ok to temporarily plug the banjo fitting, because it's just a lubrication line for the upper part of the 3-point hitch, and you wont be using that to just move the tractor from one place to another- so GL
Simon
 
   / She bleed out today! #38  
I think your last idea is the best. Put it in position to have it winched onto a trailer after you plug up the leak and have it trucked to your house.
Drive it off the trailer to where you would work on it.

Field work is for stop gap measure, jury rig kind of stuff. This job I would not consider such.
You don't have to have a specialized jack to split a tractor.
 
   / She bleed out today!
  • Thread Starter
#39  
I think I have a solution.

I took a piece of the hose to a hydraulic shop thinking it was SAE 100r1 which is rubber/steel braid/rubber (based on the cross section I saw) to get the reusable fitting. They told me it was not SAW 100r1, it was just rubber hose with fiber/cloth reinforcement. We peeled back the outer layer of rubber and they were right. They told me no reusable fitting since this was not a high pressure line.

At first I was doubtful, but then had an epiphany... if the hose was dumping back into the transmission, there is no way this could be high pressure.

Checked the hydraulic charts, the PTO control valve is fed from power steering return and lubricates and/or activates the PTO clutch once engaged via a solenoid. Oil is then sent, via my broken hose, back to the transmission sump. They hydraulic chart indicates that this hose only sees tank pressure, which has got to be 20 psi or less.

I picked up a foot of hose (300 psi rated, they said it matched my sample), a new banjo bolt on a barb, and a splice barb to connect to the existing hose. Need to grab some hose clamps and I'll have her patched up this weekend.

I need about 10 gal of tractor fluid now. The manual says SAE 80w that meets GL-4. I'm looking at the Tractor Supply Travelers fluid, but don't see GL-4 listed on the bucket. They list a bunch of manufactures but Mahindra is not there. Any idea if this will work? Do I need the premium version or is standard ok?

Thanks everyone for your help here and encouragement.

fix.jpeg
 
   / She bleed out today! #40  
Wow....80w fluid? That seems a bit thick for that. Is this hydrostatic fluid? Hydraulic fluid?
 

Marketplace Items

2014 Ford Taurus Sedan (A59231)
2014 Ford Taurus...
2019 Dodge Charger Sedan (A59231)
2019 Dodge Charger...
2019 CATERPILLAR 304ECR EXCAVATOR (A60429)
2019 CATERPILLAR...
2014 JCB 930 (A53317)
EZ-GO Utility Cart (A55851)
EZ-GO Utility Cart...
2011 FORD F-550 (INOPERABLE) (A55745)
2011 FORD F-550...
 
Top