Ideehoan
Bronze Member
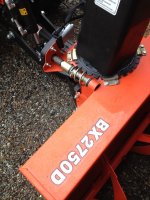
So I finally broke down and got a front blower to give my neck a break from the PTO blower (arthritis setting in). Other member here get the credit for how to do it. I thought others might like some detail on the process.
Dorman 742 297 New Window Motor | eBay (wiper motor $41.64)
Heavy Duty 4 inch Linear Actuator Lift Hood Adjustable Stroke 225lb 12 Volt DC | eBay (4" linear actuator $44.97)
1 Waterproof DPDT Momentary Off Momentary on Off on Toggle Switches 15A 1 2" | eBay (2 switches $7.95 ea)
Amazon.com: Techflex PTN0.50BK25 Flexo PET General Purpose 1/2-inch Braided Cable Sleeve, Black - 25 Foot: Electronics (cable sleeve $13.94)
Amazon.com: Ancor 607017 Marine Grade Electrical Inline Fuse Holder (ATC, 12-Gauge, 30-Amp): Sports & Outdoors (fuse $2.74)
Amazon.com: Hopkins 47965 2-Pole Flat Extension: Automotive (2 connectors $2.99 ea)
Here's a video of its operation.
Snowblower chute mods - YouTube
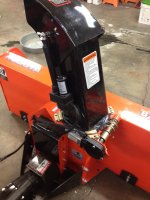
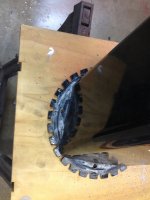
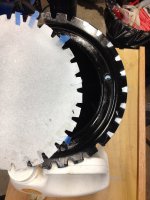
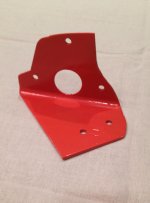
The bracket took the most time. I used existing holes to attach it. An 18 mm 6 point socket fit the wiper motor gear. I cut the square drive off, the ID was just under the 3/4" diameter needed to fit over the screw driveshaft so I drilled it out. To make drilling easier I first de-tempered it by heating with a torch. To prevent damage, I cut nine teeth in the rotator so it can go 360 (and give me a facewash :laughing") . Mounting the linear actuator was a simple matter. I mounted a bolt into the upper end of the adjuster slot using a nut as a spacer, and used a piece of pipe cut to space the lower mounting point on a hole drilled in the chute. I set the drilled hole position by fully extending the actuator with the upper end attached, set the chute to full up position and drill the lower hole through the mounting point. One picture shows where the chute corner extends down far enough to cause resistance as it passes over the hold-down so this was "adjusted" with a cutoff wheel.
. Mounting the linear actuator was a simple matter. I mounted a bolt into the upper end of the adjuster slot using a nut as a spacer, and used a piece of pipe cut to space the lower mounting point on a hole drilled in the chute. I set the drilled hole position by fully extending the actuator with the upper end attached, set the chute to full up position and drill the lower hole through the mounting point. One picture shows where the chute corner extends down far enough to cause resistance as it passes over the hold-down so this was "adjusted" with a cutoff wheel.
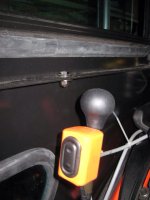
I popped the instrument panel off and found one of the larger wires with power controlled by the key and spliced in the fuse holder. Ground was run to a bolt under the seat. All wire connections were soldered and shrink wrapped. The cable wrap is nice except the ends tend to fray. I used a tie wraps to solve that problem. There was just enough room where I put the switches to avoid lever interference.
A lot of the time to do the project is in the planning and decisions. It took me a good part of a weekend. I got a lot of ideas from this forum. Hopefully someone can use this to streamline their project.
Its not tested yet, but snow is forecast for tomorrow. I'm looking forward to it for a change. :cool2:
Dorman 742 297 New Window Motor | eBay (wiper motor $41.64)
Heavy Duty 4 inch Linear Actuator Lift Hood Adjustable Stroke 225lb 12 Volt DC | eBay (4" linear actuator $44.97)
1 Waterproof DPDT Momentary Off Momentary on Off on Toggle Switches 15A 1 2" | eBay (2 switches $7.95 ea)
Amazon.com: Techflex PTN0.50BK25 Flexo PET General Purpose 1/2-inch Braided Cable Sleeve, Black - 25 Foot: Electronics (cable sleeve $13.94)
Amazon.com: Ancor 607017 Marine Grade Electrical Inline Fuse Holder (ATC, 12-Gauge, 30-Amp): Sports & Outdoors (fuse $2.74)
Amazon.com: Hopkins 47965 2-Pole Flat Extension: Automotive (2 connectors $2.99 ea)
Here's a video of its operation.
Snowblower chute mods - YouTube
The bracket took the most time. I used existing holes to attach it. An 18 mm 6 point socket fit the wiper motor gear. I cut the square drive off, the ID was just under the 3/4" diameter needed to fit over the screw driveshaft so I drilled it out. To make drilling easier I first de-tempered it by heating with a torch. To prevent damage, I cut nine teeth in the rotator so it can go 360 (and give me a facewash :laughing
. Mounting the linear actuator was a simple matter. I mounted a bolt into the upper end of the adjuster slot using a nut as a spacer, and used a piece of pipe cut to space the lower mounting point on a hole drilled in the chute. I set the drilled hole position by fully extending the actuator with the upper end attached, set the chute to full up position and drill the lower hole through the mounting point. One picture shows where the chute corner extends down far enough to cause resistance as it passes over the hold-down so this was "adjusted" with a cutoff wheel.I popped the instrument panel off and found one of the larger wires with power controlled by the key and spliced in the fuse holder. Ground was run to a bolt under the seat. All wire connections were soldered and shrink wrapped. The cable wrap is nice except the ends tend to fray. I used a tie wraps to solve that problem. There was just enough room where I put the switches to avoid lever interference.
A lot of the time to do the project is in the planning and decisions. It took me a good part of a weekend. I got a lot of ideas from this forum. Hopefully someone can use this to streamline their project.
Its not tested yet, but snow is forecast for tomorrow. I'm looking forward to it for a change. :cool2:
Attachments
-
 mods installed.jpg278.8 KB · Views: 2,795
 -
 switches.jpg319.2 KB · Views: 1,043
 -
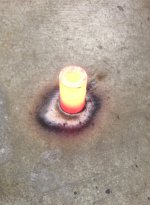 heating socket.jpg845.5 KB · Views: 1,020
 -
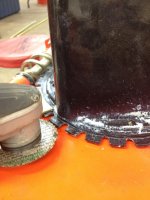 chute interference.jpg299.2 KB · Views: 1,007
 -
 chute teeth.jpg250.9 KB · Views: 1,019
 -
 chute template.jpg290.8 KB · Views: 1,034
 -
 bracket.jpg200.7 KB · Views: 816
 -
 mods installed 2.jpg318.8 KB · Views: 1,353