Step by step photos of new garage

   / Step by step photos of new garage #411  
Roger, Humidity is humidity from whatever source. If your garage is well vented and not heated a wet vehicle is not much of a problem if there is a breeze part of the time to cause circulation. Sweeping out or using a squeegee on the excess slush and melt water is a help. Unless there is road salt in the water you get on the garage door (and the door's metal isn't standing in water) the rubber strip will hold the metal off the wet pavement and doors should last indefinitely.

Heating the air in the garage reduces the relative humidity and lets the air hold more water in it. Then when you let the garage cool the cool air can't hold the water and it condenses out on the cooler surfaces like dew on grass does.

Higher relative humidity promotes rust. Warm plus humidity promotes rust even worse. Rust is iron oxide. It is the atmospheric oxygen combining with exposed iron as if it were burning. Water promotes the activity and accelerates it so that you can get considerable oxidation at temperatures much lower than "burning" iron.

Just heating a garage into which you bring significant moisture (ice and slush on car) is not the ideal rust prevention strategy. If you heat the garage and ventilate it a bit too the excess moisture will be removed and if you let the garage cool the relative humidity will not go up as much as an unvented heated space that is allowed to cool.

If the heat source is a vent free gas heater (flame exposed to atmosphere of the heated space) you will be introducing VAST QUANTITIES of moisture into the space along with the heat. DRY heat is far better, things like a wood stove, oil burner, vented gas burner, electric heater, heat pump, solar heat, and such "DRY" heat sources.

The worst rust promoting environment is warm and moist. Vent free heaters provide warm and moist. Warm and moist also promotes mold and rot in wood and some other materials and is good to avoid.

A dry heat source and some ventilation to allow warm moist air to escape will dry the space.

Pat
 
   / Step by step photos of new garage #412  
patrick_g said:
the majority of residential A/C installations in the US are NOT PROPERLY SIZED because the seller/installer doesn't actually know how to RIGHT SIZE the equipment so the trend is to oversize it to be sure it will get the job done and reduce callbacks. That plus the bigger the unit the more $ for the seller.

Unfortunately, oversized units cost more to operate and maintain. They short cycle which increases maintenance requirements and can lead to premature failure. They also do not dehumidify as well as right sized units (especially multi or variable speed units or dual compressor units) so since the air isn't dehumidified properly you have to cool the air more to be comfortable and the greater delta T inside to out costs more to maintain by even more short cycling run time.

The efficiency of a given unit goes up from startup through the first 30-45 min (typically) and then gives the most colling per unit runtime. If the unit is oversized, as over 50% of residential retrofit units are, then it spend much more of its run time in short cycling and thus spends the majority of its time in the startup portion of the efficiency curve and because of that costs more to run even if in theory it is a high SEER unit.

Pat

Pat is right, and another important thing that is even more neglected and overlooked is the quality and sizing of the supply and return air ducts. The most efficiently engineered unit in the world will be terribly inefficient if connected to loose or leaky ducts, or more commonly, ducts without sufficient return air flow capabilities. Many times these aren't checked, and airflows aren't measured, and these things are taken for granted.

And often, with newer homes, the installer used flex duct without compensating for the high restriction effects of this stuff. Anytime this duct is used it needs to be increased in size at least one size over metal duct, and most installers don't do this. And it needs to be as straight and short as possible, and upsized at least twice if the length is over 10' long. And very few installers do this, and they snake it around things they shouldn't, etc.

IMO, improving the supply and return air duct systems in a house are far more important than installing super-high efficiency equipment. The payback is better, and I can guarantee you that a 10 SEER AC with proper ducting will be more efficient than a 14 SEER unit with lousy duct work. And it will be more comfortable also, because lower efficiency equipment does a better job of dehumidifying than the super-high efficiency stuff. But since the govn'mt can't control the installation, but can control the rated efficiency of the equipment, guess which gets controlled!

In addition, the high efficiency ratings are achieved under ideal lab conditions, which never apply in the field, so take them with a grain of salt. The equipment must be maintained and kept clean to have any hope of getting close to the rated efficiency. Things like high efficiency air filters are often restrictive, and impact air flows, hence the efficiency ratings are negatively impacted.

P.S. And Patrick is right about humidity. In general, for natural gas figure that for every therm you burn in an unvented heater you are putting app 1 gallon of water in the air. I don't know the exact amounts for other fuels, but they will be similar. App 1 gallon per 100,000 BTU of water is released.
 
   / Step by step photos of new garage #413  
KMDIGITAL

In my own home I have no flex duct. Everything is either custom bent up out of sheet metal or is the spiral wrap metal duct pipe. My HVAC contractor doesn't do many residences and only if they get to do it right. I have a pair of 19.x SEER air to air Lennox heat pumps with Lennox propane furnaces for backup heat (and when temps go below the outdoor t'stat) and as system air handlers plus a Water Furnace Geothermal Heat pump for the in-floor and in-ceiling hydronics as well as chilled air too.

Yea verily, steel ducts, preferably run in conditioned spaces (soffits or...) when able and sealed properly at joints with "duct butter." If ou do have to run through an unconditioned attic space you need to insulate the devil out of the ducts. Even if you use the self insulated flex duct, insulate it again if you are running it through an unconditioned attic. Oh, and be prepared to change it out if it is over 10-15 years old as it deteriorates and leaks like a sieve. Yet another case of not paying to do it right so getting to pay to do it again and again or just throwing away $ in the form of cold air released in the attic all through the cooling season and hot air during the heating season.

I'm not so quick to put down higher SEER. Whether or not you get it all is a separate thing. If you have 10 Seer you won't get it all either in a bad installation. You should want both high efficiency AND a good installation. I'm also not quite so condemning of the ability of a high SEER unit to dehumidify since I only recommend either dual compressors or multispeed or variable speed compressors.

For the uninitiated: a dual compressor heat pump runs just one compressor under lmoderate loads. This ensures longer run times and the higher efficiencies gained thereby. It also causes the air to be circulated more with more passes through the evaporator where dehumidification takes place. You get SUPERIOR dehumidification and good efficiencies so lower running cost. Still if there is a heat wave you have the other compressor that will kick in and help out. Sort of like the automotive engine that turns off some cylinders when not needed. Multi speed or variable speed compressor systems use just one compressor but change the speed to get essentially the same effect as the multiple compressor systems. My Lennox are multi-speed.

I pay about $0.10-11 per killowatt hour for electricity. We are all electric except stove top and hot water (and decorative or backup heat which is rarely used.) We have 3 heatpumps in our central heat and air system. I pay from $0.02 to $0.03 per sqft per month for electricity which includes the big screen projection TV, lights, my shop work with welding etc. plus heating and cooling. I never exceed $0.04 and at times it gets down to about $0.015 per sq ft in the "shoulder" seasons.

I'd be curious to know what some of you other guys pay for electricity (per KWh) and per sqft per month. I thought I was doing pretty good but who knows.

Pat
 
   / Step by step photos of new garage #414  
Pat I will have to tell my friend about your post. I am sure he would be glad to argue the point with you. Basically he has been installing HVAC units from the time he got out of high school and that was a LONG time ago. He actually runs the duct work shop of his company and he exclusively does commercial installations. ( mine was a very special favor). I understand what he was saying and a good part of what he was saying is that the higher SEER unit was exactly twice what my unit cost. When you figure the payback time it starts getting hard to justify the extra expense. He also worried about out of warranty repairs the cost of the higher units for parts versus the simpler unit that I got. It was my decision to do that he offered to put in whichever one I wanted. Sizing of the unit was not a problem he has been doing that forever from everything to a small house to nursing homes. Plus he just replaced what was there and the original installer was very good at his job. For the guys that like numbers my house is 2500 sq feet ranch style and I have a 4.0 ton unit I believe it is 4.0 or 4.5 but i dont think you can get half tons so it is probably 4.0. My ex brother in law also installs commercial ductwork and he installed all the duct in the house There is NO flex anywhere I hate that and wont use it for anything. I have a 16 inch return air grill located right above my wood stove. A 12 inch grill in the hallway outside of the bedrooms and a 12 inch grill in my bedroom. I think I am good on return air :)
For anyone that has not heard about Pats HVAC it is an engineering marvel. It is probably going to be the most efficient unit I have seen. I did not build my house from the ground up and I am too cheap to do that good a job.


Pat please forgive me if I dont worry about you getting cold. Your bedroom could be heated by a 100 watt light bulb and You have how many different heating systems in your house. If you get too cold you can sleep in the camper and if worse comes to worse you can come stay at my house. The cat will share the wood stove with you.
 
   / Step by step photos of new garage #415  
gemini5362 said:
Pat I will have to tell my friend about your post. I am sure he would be glad to argue the point with you.

Pat please forgive me if I dont worry about you getting cold. Your bedroom could be heated by a 100 watt light bulb and You have how many different heating systems in your house. If you get too cold you can sleep in the camper and if worse comes to worse you can come stay at my house. The cat will share the wood stove with you.

I might learn a lot from a good argument. I define argument as a series of connected thoughts arranged in logical sequence to support a contention, not getting mad and shouting. I know I was painting with a broad brush when I made my somewhat inflammatory remarks which may very well not fit your friend's work.

I recall a comment made about my bedroom. Something to the effect that it could be heated with a candle and cooled with an ice cube. I don't recall the calculated R value. It has 2 1/2 inches of styrofoam on the inside of the wall and the same on the outside and has 8 inches of concrete in the middle. In certain performance situations it acts as if it had an R value of about 50 due to the phase shifting effect of the substantial thermal mass even though the actual R value is considerably less.

Just a couple days ago I had the HVAC repair guys out to work on my SUPER COMPLICATED system with SUPER HIGH TECH equipment. Seems a draft blower got sticky and wouldn't start. Pretty mundane mechanical problem. He freed it up and all is well. So far I have had no high tech failures. I did have a CHEAP CHINESE BRASS COLORED check valve corrode and not work right in the hot water recirc system and replaced that.

Pat
 
   / Step by step photos of new garage #416  
ehchvac said:
if it was mine to build,...
big doors tall and wide.
max ceiling height.
pitch the floor out not to a drain.
either trusses or a steel beam so there would be no lally columns.
if trusses still some kind of heavy beam for lifting.
put radiant in the floor even if you cant afford to hook it up now.
large cement apron in front with more radiant, no shoveling in front of doors.
max electric service for welders, big compressor, a/c, etc.
piping for remote compressor air usage.
max outlets 110v and 220v.
lots and lots of lights, nothing is worse than too little light.
plumbing roughs for future hot and cold water, bathrooms, dog wash station, etc.
separate walk in door less heat loss than thru the overheads.
fire code sheet rock even if its not required, welding sparks etc.
if its going to have live water in it overhead sprinklers are real cheap.
secure locks, dead bolts.
no windows, not even on the doors.
thats just off the top of my head, seen to many regrets from homeowners after the fact.
woulda, coulda, shoulda, gets real expensive after the fact.
this list brought to by caffine,... and 30 plus years in new construction.
This is really late in the thread but oh well, ....
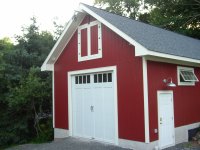
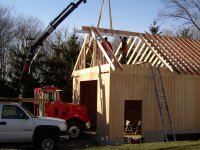
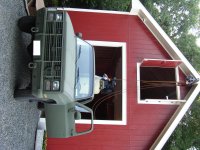
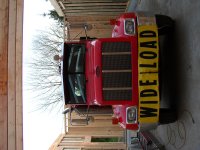
I agree totally, I had the exact same thoughts. What I did also: 8 inch thick 4000psi slab so I could later install a 2 post car lift if I want, 100 amp service, six 8 foot floresent overhead lights, a big through wall exhaust fan, an industrial ceiling fan. The roof is 9 in 12 pitch so it has good walk around clearance and a 3/4 inch plywood attic that i varnished. The steel beam and trolly is really good at moving large things into the attic loft. The front door is 10 x 10, you can see the peterbuilt parked in the barn during construction, it fits fine. What I screwed up was not pitching the concrete floor enough toward the front overhead door, a good pitch would have allowed ice melt to run out or a little hose down action. I had plans to 5/8 inch fire code sheet rock the back welding area but just use portable spark sheild which seem to work fine. I really like the 2' concerete stub walls, this was to catch the sprarks and splatter. What my wife liked was that it looks good, it is the first thing you see when you come in, not industrial despit the 20' peak and 10 x 10 door, which is on torsion springs to save space. There is no heat, I don't want to spend the money, as it is I get by with a 110K btu kerosene salamander heater and burn about 10 gal a year running it every once in a while... There is over 11 and a half foot of clearance to the bottom of the attic floor joists. The building is 20 x 36 foot. The two side windows can be left open and are very high off the ground, give light but you can't see in or easily get to them. Remember to scrape off the good soil and save it seperatly so you have it for top soil later.... Glad to see your project turned out so well. It took us a while also, but after the better part of a year I can finally get to the projects built in the barn...
 

Attachments

  • P2010081.JPG
    P2010081.JPG
    704.3 KB · Views: 225
  • P1010033.JPG
    P1010033.JPG
    680.2 KB · Views: 203
  • P3010019.JPG
    P3010019.JPG
    685.6 KB · Views: 214
Last edited:
   / Step by step photos of new garage #417  
ASGAR said:
This is really late in the thread but oh well, ....
I agree totally, I had the exact same thoughts. What I did also: 8 inch thick 4000psi slab so I could later install a 2 post car lift if I want, 100 amp service, six 8 foot floresent overhead lights, a big through wall exhaust fan, an industrial ceiling fan. The roof is 9 in 12 pitch so it has good walk around clearance and a 3/4 inch plywood attic that i varnished. The steel beam and trolly is really good at moving large things into the attic loft. The front door is 10 x 10, you can see the peterbuilt parked in the barn during construction, it fits fine. What I screwed up was not pitching the concrete floor enough toward the front overhead door, a good pitch would have allowed ice melt to run out or a little hose down action. I had plans to 5/8 inch fire code sheet rock the back welding area but just use portable spark sheild which seem to work fine. I really like the 2' concerete stub walls, this was to catch the sprarks and splatter. What my wife liked was that it looks good, it is the first thing you see when you come in, not industrial despit the 20' peak and 10 x 10 door, which is on torsion springs to save space. There is no heat, I don't want to spend the money, as it is I get by with a 110K btu kerosene salamander heater and burn about 10 gal a year running it every once in a while... There is over 11 and a half foot of clearance to the bottom of the attic floor joists. The building is 20 x 36 foot. The two side windows can be left open and are very high off the ground, give light but you can't see in or easily get to them. Remember to scrape off the good soil and save it seperatly so you have it for top soil later.... Glad to see your project turned out so well. It took us a while also, but after the better part of a year I can finally get to the projects built in the barn...


I'm curious about the beam and trolley and how you have it suspended and attached to the garage?

Wedge
 
   / Step by step photos of new garage #418  
wedge40 said:
I'm curious about the beam and trolley and how you have it suspended and attached to the garage?

Wedge
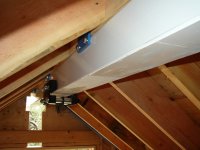
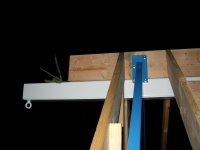
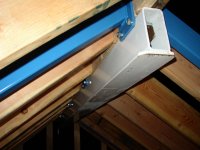
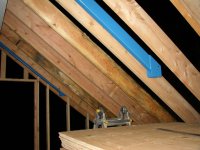
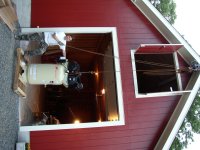
What I did is make a double ridge beam so it would be 3 inch thick. I used 3 by 6 inch by 1/4 inch steel tubing to which I welded 3/8 by 6 inch flat stock on the bottom to form the trolly run. I used seam sealer to fillet out this joint prior to painting so it would not be a rust trap. I made two sets of brackets to bolt through the ridge beam and four tubular legs that followed the roof pitch then dropped down to the attic deck and were bolted into doubled floor joists. The brackets that join the pitched part to the vertical part are shown in the 51 picture. I waited a long time to bolt the bottom of the legs so that the barn structure would be all dired out and shrunk. All the bolts are grade 5. The holes are all 1/2 inch and all line up because I used a milling machine to bore them. Every piece of metal including the tubing with the plate welded on were all cut with a milwaukee dry cut 8" metal circular saw. This is by the way a fantastic saw. I get many projects out of a blade because I use guides or jigs so I never pinch the cut. I have cut both 2x2 solid and 3/4 plate with really no problem. The ring and pully are really for looks or hauling up single small bales of hay. The trolly gets used with a four part part block and tackle or a light chain hoist. With this set up I can easliy put everything from a small boat to the tiller or snowthrower up there on the off season. If I were to do it again I would have used a much longer beam so I could get deeper into the attic. The beam was found metal so I can't complain, it was about 12 foot long, the over hang is 2 foot of roof, 3 foot of beam and the reach into the attic was about nine foot. All in all it works well. I don't get any bad noises when I pick up 1000 lbs or so and the wieght is not all on the rafter to sill plate connection either. In these pictures I have not cut out the space for the trolly to go through yet and the vertical legs are not in place yet. That 7-1/2 hp air compressor wieghs in at about 650lbs. (I worked for a division of IR so I got a good deal on it...)
 

Attachments

  • P1010026.JPG
    P1010026.JPG
    718.5 KB · Views: 206
  • P1010049.JPG
    P1010049.JPG
    645.3 KB · Views: 159
  • P1010051.JPG
    P1010051.JPG
    677 KB · Views: 169
  • P1010052.JPG
    P1010052.JPG
    705.6 KB · Views: 166
  • lift.JPG
    lift.JPG
    525.5 KB · Views: 165
  • P1010027.JPG
    P1010027.JPG
    710.3 KB · Views: 177
   / Step by step photos of new garage #419  
Very well done... the welds look great!
 
   / Step by step photos of new garage #420  
ASGAR said:
What I did is make a double ridge beam so it would be 3 inch thick. I used 3 by 6 inch by 1/4 inch steel tubing to which I welded 3/8 by 6 inch flat stock on the bottom to form the trolly run. I used seam sealer to fillet out this joint prior to painting so it would not be a rust trap. I made two sets of brackets to bolt through the ridge beam and four tubular legs that followed the roof pitch then dropped down to the attic deck and were bolted into doubled floor joists. The brackets that join the pitched part to the vertical part are shown in the 51 picture. I waited a long time to bolt the bottom of the legs so that the barn structure would be all dired out and shrunk. All the bolts are grade 5. The holes are all 1/2 inch and all line up because I used a milling machine to bore them. Every piece of metal including the tubing with the plate welded on were all cut with a milwaukee dry cut 8" metal circular saw. This is by the way a fantastic saw. I get many projects out of a blade because I use guides or jigs so I never pinch the cut. I have cut both 2x2 solid and 3/4 plate with really no problem. The ring and pully are really for looks or hauling up single small bales of hay. The trolly gets used with a four part part block and tackle or a light chain hoist. With this set up I can easliy put everything from a small boat to the tiller or snowthrower up there on the off season. If I were to do it again I would have used a much longer beam so I could get deeper into the attic. The beam was found metal so I can't complain, it was about 12 foot long, the over hang is 2 foot of roof, 3 foot of beam and the reach into the attic was about nine foot. All in all it works well. I don't get any bad noises when I pick up 1000 lbs or so and the wieght is not all on the rafter to sill plate connection either. In these pictures I have not cut out the space for the trolly to go through yet and the vertical legs are not in place yet. That 7-1/2 hp air compressor wieghs in at about 650lbs. (I worked for a division of IR so I got a good deal on it...)

Nice job.. I would have never thought of something like that. I'll have to keep this thread handy for when I build my shed. The big difference is I plan on using a gambrel roof. I'm interested in putting the hoist in the lower section and anything else I'll lift up with the front end loader and boom if needed.

Wedge
 

Tractor & Equipment Auctions

2013 PETERBILT 365 T/A DUMP TRUCK (A51406)
2013 PETERBILT 365...
2008 Ford E-250 Cargo Van (A50323)
2008 Ford E-250...
2019 JGL 2632ES 26ft Electric Scissor Lift (A50322)
2019 JGL 2632ES...
2010 Ford Edge SE SUV (A51694)
2010 Ford Edge SE...
2017 TAKEUCHI TS50V SKID STEER (A52706)
2017 TAKEUCHI...
2016 FREIGHTLINER  CASCADIA (INOPERABLE) (A53843)
2016 FREIGHTLINER...
 
Top