Sweepster Rotary Broom - rebuild and modification

   / Sweepster Rotary Broom - rebuild and modification
  • Thread Starter
#71  
Thanks, Peter. No, I did not consider having a need to spin it in reverse. I suppose if it was critical for some reason, I could just swap hoses, even if just for a couple minutes, like if something got wound up and needed to get unwound. I don't see a general need otherwise. It does actually have a diverter on it already but that is for the angle cylinder only.

It worked well overall. Best on smaller snowfalls, which was almost all of what we had this winter, and is most common here. Most snowfalls were 2-4" and even wet snow was not a problem at those depths. We had a couple big dumps including one late in the season when the snowbanks had built up a fair bit and I tried but found the broom not very useful, so I put the bucket on for that one, and used the bucket and rear blade.

The biggest issue I had by far was maintaining good ground/broom contact. As the angle of the ground changes you either start to lose contact or you get so much that it stalls the broom, so you are constantly adjusting the FEL joystick up and down in very tiny increments, and the control is just not that precise. This is why I am in the process of making a set of gage wheels for it. I am going adjustable whereas the factory makes a fixed set as an option I thought I had it figured out but my first trial showed them to be too short, so I got out the "steel stretcher" ;) and am adding a few inches to each side now. Once it is done I'll post up pics and details here.

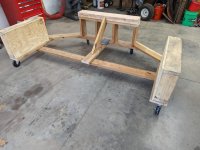
Now I need to make a storage dolly for the off season!
 
   / Sweepster Rotary Broom - rebuild and modification
  • Thread Starter
#72  
Allright, finally time to update this. By the time I had time and got around to working on Casters to help guide the broom depth better, the season was done. No biggie as it will help next year in any case. So I put them in about the same place as the factory option but made mine adjustable and mounted them differently. I ran into some issues along the way...

First off, my CAD model of the broom was made with a tape measure and eyeball and apparently not very accurate. Not terribly surprising but the first iteration came in too short to do any good. This is interesting as the factory option would be even shorter. I think it has something to do with how this is mounted on the SSQA plate and the loader geometry being different than a skid steer. The only way to get the casters to make ground contact required rolling it back too much so the "feet" on the loader would be dragging. Well that wouldn't work so I extended them.

Here is the initial design. The adjustment is 2" hitch stock inside 2.5" receiver stock with a 3/4" Acme screw for the adjuster.

Casters fab done (1).jpg
Casters fab done (2).jpg
Casters fab done (3).jpg
Casters fab done (4).jpg


That little wood stand you see the broom sitting on later becomes part of my storage dolly. But like I said this was too short, so I extended it. Unlike wood and the mythical board stretcher, there is such a thing as a steel tube stretcher! And here it is!

Caster extension.jpg


After welding that out and grinding flush, they were ready to go. Yes, the joints were beveled fully to allow full penetration welds.

So here it is extended in the trial run. It appear to help but is not a perfect solution. But anything that makes controlling the height adjusting better is very welcome given how touchy it was to do manually. I also tweaked how the float springs worked by shortening the chain a bit to help the casters be more effective

Casters with extra extension.jpg


Oh yeah, I also made a little retainer to keep the adjuster screw from moving once I get it set right. The tape was just temporary to keep the loose pin in place while I was sorting things out:

Caster adjustment lock.jpg
 
Last edited:
   / Sweepster Rotary Broom - rebuild and modification
  • Thread Starter
#73  
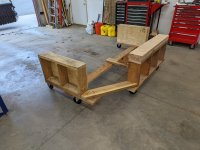
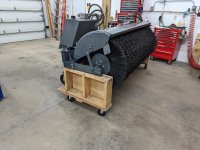
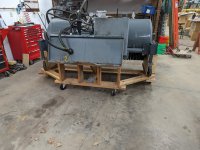
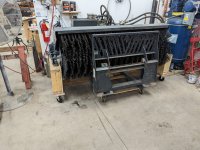
Now the storage dolly. I scratched my head a while on this and this is what fell out. it seems to work, but I might need a couple more casters under the SSQA plate as most of the weight appears to be there and I think it could use extra support. I won't deal with that until I re-mount it to the tractor next winter. Some photos of it, plus the caster mounts fully painted, plus all tucked away in the back:

Sweeper dolly (1) (Large).jpgSweeper dolly (2) (Large).jpgSweeper dolly (3) (Large).jpgSweeper dolly (4) (Large).jpgSweeper dolly (5) (Large).jpg

The 2 supports on the side are what was holding the broom off the ground when mounted on the tractor. 2 screws hold them onto the dolly so I can pull them and use them the same way again next winter.

Hopefully that is it for the mods and it will now work well for the remainder of my days! (yeah right...)
 
   / Sweepster Rotary Broom - rebuild and modification #74  
Thanks for the update, mobile carts a great idea, Job Well Done!

Mike
 
   / Sweepster Rotary Broom - rebuild and modification
  • Thread Starter
#76  
Thanks guys. This thing takes up a lot of space so i had to move things around to make a home for it, thus making the dolly pretty important. Fortunately the forks slide right under it too (that was my plan from the start...)

The casters are pretty similar to what the factory option uses, so I guess I expect them to hold up similarly. They are 8" rubber over cast iron, full swivel. I guess time will tell... Worst case they are easy to replace and were like $25-30 ea from Surplus Center so not real bad.

I don't expect I will need the adjustability long term as once I find the sweet spot, they will probably stay there for life, or maybe get adjusted if the broom ever wears down a lot, but with just residential use at my place, that seems unlikely to me.
 
   / Sweepster Rotary Broom - rebuild and modification #77  
Again, great set of builds!

On the factory wheel height: SSQA tend to operate with the loader arms all the way down, locked down against the chassis, making for a very rigid mounting. If the sweeper is that low at the back, it looks to me as if you could compensate by moving the "Z" shaped bracket near the motor to a different hole, which might explain how the factory casters function. Pure speculation on my part.

I just got my own new to me broom running, and I am curious how you deal with road slope/camber. Do you angle the broom and adjust the height to compensate?

All the best, Peter
 
   / Sweepster Rotary Broom - rebuild and modification
  • Thread Starter
#78  
Yeah, I figured it might be the different geometry between a tractor FEL and a skid steer that was the issue, but fortunately when you "Build it Yourself" you can make it work for any setup!

I used the angle function a lot at first but found that it was not as helpful as I expected. There are still times when i do use it, but a lot of my brooming is pretty much straight ahead and it works great. Certain sections of my driveway are best approached from one direction over the other due to slope/camber. It does not really float much side to side so it is easy to leave snow on one side in those cases. Often just coming at it from the opposite direction helps. I am hoping that the casters help me from the constant adjusting I have had to do so far to maintain contact while avoiding stalling the broom. I know it won't eliminate it, but am hoping it reduces it.
 
   / Sweepster Rotary Broom - rebuild and modification #79  
Thanks, that helps a lot. I have draft control, which really helps control the height and down force, though the weight of the broom, as far out as it is, is pushing the limit of my draft controller.

All the best,

Peter
 
   / Sweepster Rotary Broom - rebuild and modification
  • Thread Starter
#80  
Time for an update on this. When I mounted the broom back in Nov, I tested it out, like always to make sure it is operating correctly at the start of the season. Well if you recall, the angle cylinder is driven from a diverter on the unit and when you trigger the diverter, it sends quite a pressure spike though the system as a cylinder takes almost no fluid compared to spinning the motor. Well it appears I had been dragging the main pressure hose from the pump on the ground a bit and did not realize it...

Spun up the broom, all good. Hit the angle switch and BLOOSH fluid shooting out everywhere. Took a couple seconds of shock to get to the PTO button to stop it. Was easy to find the leak but the pressure spike blew out the hose where it had worn through partway. So that was fun with fluid EVERYWHERE. It was probably at most a couple quarts of fluid (out of 20 gal) but you know how a little oil goes a long way on making a mess... Got a new hose, this time 1 foot shorter so it won't drag and added spiral abrasion wrap to it. That was enough to get me through the season.

But then a new problem started to crop up in use. When I would trigger the angle cylinder, it worked fine to the right, but when you go to swing it back to the left it sometimes would just sit there. A few clicks and it would work out but it got worse and worse so I had to do something. At one point it really did not want to come back to straight and took several minutes to finally catch, so I left it centered then.

I tested a couple things on the diverter, but decided the better method here was to run the angle cylinder off my 3rd function instead. Easy to do and very controllable and no worries about that pressure spike, plus the broom keeps spinning while you change the angle.

Removing the diverter really simplifies all the plumbing on this. I had to get a couple new hoses and fittings and I used this opportunity to make a couple other improvements. The pressure gage is what I use to monitor the broom is still spinning good and not bogging down, so I got a bigger one that is 3000 psi vs 5000 on the old one so I can see it easier with better resolution.

So here is what the hose nest used to look like:

Sweeper hyd hoses installed (4) (Large).jpg


And now it's a lot simpler and back in business:
New hose routing and 3rd function angle (1).jpg


A few more photos:

I also cut the pump supply hose shorter at the same time to help avoid more hose dragging issues.

New hose routing and 3rd function angle (2) (Large).jpg


New hose routing and 3rd function angle (3) (Large).jpg


Big new gage up high where I can see it:
New hose routing and 3rd function angle (4) (Large).jpg


The real miracle is that I connected it all up correctly the first time and didn't have to go swap any hoses to get it right and make more of a mess... Woo hoo!
 

Tractor & Equipment Auctions

2025 Kivel 48in Forks and Frame Skid Steer Attachment (A49346)
2025 Kivel 48in...
2025 DOWN 2 EARTH GOOSENECK TRAILER (A50459)
2025 DOWN 2 EARTH...
2018 RoGator 1100C (A50397)
2018 RoGator 1100C...
Roll Off Trash Compactor (A48837)
Roll Off Trash...
2013 Ford Explorer SUV (A48082)
2013 Ford Explorer...
HEAVY DUTY QUICK ATTACH PALLET FORKS W/ 48" FORKS (A50460)
HEAVY DUTY QUICK...
 
Top