Thumb for mini hoe

   / Thumb for mini hoe #21  
KentT said:
Bob,

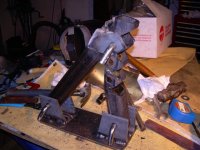
I think that amount of angle will work fine. Now, just weld up the cuts necessary to bend it... :)

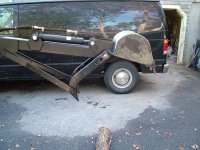
It's looking good. How long is it? While you're "playing with measurements" see if you can make it adjustable so that at one position it will go completely inside the bucket, yet in another position it will mate up with the bucket teeth...

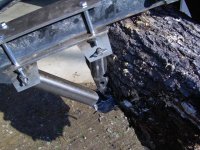
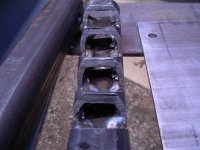
The thumb is 13 inches long. Maybe I can make two different backing arms. They should be pretty easy to make. Also the whole thing can slide on the minihoe boom, but it would be easier to change the backup arm. I will be welding up the cuts.

Why does it need to go inside the bucket? When does that help?
Keep the suggestion coming.

I got a new drill press for Christmas so I can drill large holes a lot easier, upto 1 inch. With that, the belt sander and the band saw I can do a lot better than before. Now if my welding would improve.
 
   / Thumb for mini hoe #22  
bob, Here is a simple grapple thumb that someone put together.
 

Attachments

  • graphoe-2.JPG
    graphoe-2.JPG
    52.1 KB · Views: 238
Last edited:
   / Thumb for mini hoe #23  
BobRip said:
... I got a new drill press for Christmas so I can drill large holes a lot easier, upto 1 inch. ...

I highly recommend the Milwaukee bi-metal hole saws for your new drill press. They are inexpensive and really do work.
 
   / Thumb for mini hoe #24  
BobRip said:
Why does it need to go inside the bucket? When does that help?
Keep the suggestion coming.

If the thumb can go into the bucket, you can then use it to pick up/pull up thin vines, sprouts or briars. Works great for honeysuckle, sawbriers or blackberries for example. Just wait unit the ground is wet and soft, and you'll be able to pull them out by the roots. If you try grabbing something like that between the teeth of the bucket and the thumb, you'll just pinch them into pieces...
 
   / Thumb for mini hoe #25  
Well I tried out the thumb today and worked great picking up short logs. Then I got out and noticed that there was a break in one of the welds where I had back filled the slot used to bend the thumb. I rewelded, but I want to add some reinforcement before I use it again. I will probably put some patches across the thin bending area. Another hour or two could do it. This unit seems a little complicated, but the abilty to adjust its position on the minihoe are and remove it from the minihoe are definite postives. I have attached a picture of it off the minihoe. It still needs cleaning and painting.
 

Attachments

  • minihoe thumb 007.JPG
    minihoe thumb 007.JPG
    114.8 KB · Views: 202
  • minihoe thumb 008.JPG
    minihoe thumb 008.JPG
    115 KB · Views: 188
   / Thumb for mini hoe #26  
MossRoad said:
I highly recommend the Milwaukee bi-metal hole saws for your new drill press. They are inexpensive and really do work.

Moss, when do you use a hole saw versus the drill bits? Are they easier to drill with on large holes? It's nice to have a drill press that will got down to 200 RPMs and has a one horsepower mower. That should work nicely with the hole saw.
 
   / Thumb for mini hoe #27  
BobRip said:
Moss, when do you use a hole saw versus the drill bits? Are they easier to drill with on large holes? It's nice to have a drill press that will got down to 200 RPMs and has a one horsepower mower. That should work nicely with the hole saw.

This backhoe project is the first time I have used them. I tried 1" drill bits in my drill press. It was horrible. These things go through very well. I have a weeney drill press so your 1HP unit will spin them with ease. I have drilled over 20 holes with one bit and had no visible dulling of the blade. Very nice.

Here's a link to Milwaukee's info on them.
 
   / Thumb for mini hoe #28  
BobRip said:
Well I tried out the thumb today and worked great picking up short logs. Then I got out and noticed that there was a break in one of the welds where I had back filled the slot used to bend the thumb. I rewelded, but I want to add some reinforcement before I use it again. I will probably put some patches across the thin bending area. Another hour or two could do it. This unit seems a little complicated, but the abilty to adjust its position on the minihoe are and remove it from the minihoe are definite postives. I have attached a picture of it off the minihoe. It still needs cleaning and painting.

Bob,

I like it -- it looks very versatile. I think you'll really like it, once you've reinforced it and used it more. You'll likely find yourself picking up all kinds of things with it... and coming up with new uses for it all the time.

For my needs the grapple bucket and the minihoe with thumb are the two most valuable/useful attachments, by far...

One suggestion -- you might want to consider pins that are shorter, with flush heads, (instead of those curved ones used in receivers) so that they provide less chance of catching on things. I've lost a couple of the clips on mine, working in the woods, so I now carry spares in my toolbox.
 
   / Thumb for mini hoe #29  
KentT said:
Bob,

I like it -- it looks very versatile. I think you'll really like it, once you've reinforced it and used it more. You'll likely find yourself picking up all kinds of things with it... and coming up with new uses for it all the time.

For my needs the grapple bucket and the minihoe with thumb are the two most valuable/useful attachments, by far...

One suggestion -- you might want to consider pins that are shorter, with flush heads, (instead of those curved ones used in receivers) so that they provide less chance of catching on things. I've lost a couple of the clips on mine, working in the woods, so I now carry spares in my toolbox.

Where do you get the other pins? Sounds like Tractor Supply maybe.

I reinforced it this morning and moved about 30 logs around 24 inches in diameter and 2 feet long today. It worked great. It was easy to grasp a long either length wise or across the diameter. It never dropped a log. I am extremely pleased. KentT, I agree with you that this and the grappling bucket are excellent matches to the 422/425 capabilities and are most impressive when used.

After moving all of the logs no cracks in the welds. In the weak areas I put in some steel scraps that were one inch long by a little less than the width (say 7/8 inch) of the channel and they were about 5/8 of an inch thick. I welded these to the sides of the channels and up to the notch. I figure this must be at least 3 times stronger that it was before.

Thanks to everyone for their input. You know, I could probably design and built this all by myself, but I would probably have to make 3 or 4 totally different versions, waste a lot of materials and a lot of time. Here I have one working well with only a few modifications. My biggest problem seems to be that the parts would shift after welding. I would have everything lined up and then weld and it would not be lined up. Does anyone have suggesting to correct this. Maybe I should drill the holes after welding.

I have attached a few more pictures.
 

Attachments

  • minihoe thumb 009.JPG
    minihoe thumb 009.JPG
    115.1 KB · Views: 176
  • minihoe thumb 010.JPG
    minihoe thumb 010.JPG
    112.9 KB · Views: 166
  • minihoe thumb 011.JPG
    minihoe thumb 011.JPG
    113.6 KB · Views: 176
   / Thumb for mini hoe #30  
MossRoad said:
This backhoe project is the first time I have used them. I tried 1" drill bits in my drill press. It was horrible. These things go through very well. I have a weeney drill press so your 1HP unit will spin them with ease. I have drilled over 20 holes with one bit and had no visible dulling of the blade. Very nice.


Here's a link to Milwaukee's info on them.

Moss, the trouble with drilling large holes with bits is that I generally have to use at least two and sometimes three different bits, working my way up the sizes. I think with the hole saw this would not be needed. Is this true? I will probably pick up some next week if you confirm this.
 
   / Thumb for mini hoe #31  
I would like comments on the different uses people have found for the thumb. So far I have heard of picking up logs and rocks and pulling up brush. Any other uses and descriptions of how you do this would be appreciated.
 
   / Thumb for mini hoe #32  
I have attached two more pictues on the thumb parts.
 

Attachments

  • fire loader 004.JPG
    fire loader 004.JPG
    116.3 KB · Views: 191
  • fire loader 005.JPG
    fire loader 005.JPG
    113.1 KB · Views: 176
   / Thumb for mini hoe #33  
BobRip said:
My biggest problem seems to be that the parts would shift after welding. I would have everything lined up and then weld and it would not be lined up. Does anyone have suggesting to correct this. Maybe I should drill the holes after welding.

I have attached a few more pictures.

Put pins through the holes before welding.

Spot weld everything first.

Only do about an inch of weld on one side at a time so the heat does not deform or move things.

Build a jig and assemble the things in the jig.

Use welding magnets to keep stuff square.
 
   / Thumb for mini hoe #34  
MossRoad said:
Put pins through the holes before welding.

Spot weld everything first.

Only do about an inch of weld on one side at a time so the heat does not deform or move things.

Build a jig and assemble the things in the jig.

Use welding magnets to keep stuff square.

Moss, I did all of that, but welding only about an inch at a time. I will try that next time. Thanks for the input.
 
   / Thumb for mini hoe #36  
I've had the same problem with stuff moving on my backhoe project. Everything all nice and lined up, tacked in place, nice a square. Lay down an entire stick for a couple inches of nice weld, measure... YIKES!!! It's off 1/8 inch. Weld the backside from the first weld. Lay down another stick. It comes back, but not as far. So lay down another stick on the wide side, etc... back and forth from side to side keeps it pretty square but is a pain. This kind of welding is where a wire feed with gas shield would be nice. No slag to worry about. Just flip from side to side welding as needed to keep stuff square.
 
   / Thumb for mini hoe #37  
MossRoad said:
I've had the same problem with stuff moving on my backhoe project. Everything all nice and lined up, tacked in place, nice a square. Lay down an entire stick for a couple inches of nice weld, measure... YIKES!!! It's off 1/8 inch. Weld the backside from the first weld. Lay down another stick. It comes back, but not as far. So lay down another stick on the wide side, etc... back and forth from side to side keeps it pretty square but is a pain. This kind of welding is where a wire feed with gas shield would be nice. No slag to worry about. Just flip from side to side welding as needed to keep stuff square.

I have the mig with gas so maybe I can do better. Would this be the best approach.
1. Short welds with a wet rag to cool the weld prior to other welding.
2. Alternate sections so no area gets too hot over too big an area.
3. Clamp things in position prior to and during welding.
 
   / Thumb for mini hoe #38  
I don't know about the wet rag, but by moving around the workpiece and working on opposite sides of it, you can minimize the movement caused by the heat. Just check it often for straight and square.
 
   / Thumb for mini hoe #39  
ksimolo, I have ordered the Bio-Tec thumb and should receive it this month. I will post pics and let everyone know how it works. Richard who builds the thumb has been very cooperative and this will be the first he has built for a PT. I think it will work well but we will see.
 
   / Thumb for mini hoe #40  
Bob,
In addition to what Moss said,
I tend to tack everything together as much as possible, and weld it assembled where possible too.
Lots of clamps too, I grabbed some big chunks of alley angle to clamp stuff too, and as they are square you can use them to keep things at 90 degrees. The alley means that you dont accidentally weld your work to it :D
A big hammer works good too ;)
 

Tractor & Equipment Auctions

John Deere 3025E (A53317)
John Deere 3025E...
2008 KOMATSU D51PX-22 CRAWLER DOZER (A60429)
2008 KOMATSU...
2024 CATERPILLAR 305 CR EXCAVATOR (A60429)
2024 CATERPILLAR...
30 INCH TOOTHLESS BUCKET FOR MINI EXCAVATOR (A58214)
30 INCH TOOTHLESS...
2022 Ford Explorer AWD SUV (A59231)
2022 Ford Explorer...
2014 International WorkStar 7300 4x4 Altec AA55E 55ft. Material Handling Bucket Truck (A60460)
2014 International...
 
Top