3-Point Hitch Top & Tilt and Rear Remotes Installed

   / Top & Tilt and Rear Remotes Installed #1  

paulwestski

Gold Member
Joined
Mar 30, 2011
Messages
322
Location
VA Beach & Amherst, VA
Tractor
Kubota L4240
Finished up my rear remote and top and tilt install on my new Kubota L3800 this week.
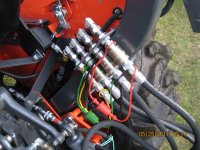
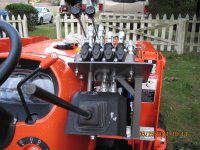
The spool valve and hoses are from Surplus center. I went with a four spool Wolverine valve.
All of my fittings were purchased from Discount Hydraulic Hose, they're close enough to me that standard ground shipping is overnight.

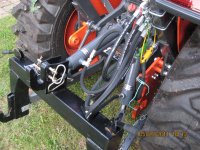
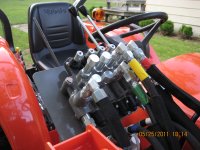
I decided the best place to mount the valve was on top of the loader valve. I fabricated a mounting bracket out of scrap steel from the scrap rack.
Aside from the welding to fabricate the spool valve bracket the entire install is a drill a few holes and bolt on installation.

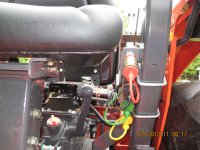
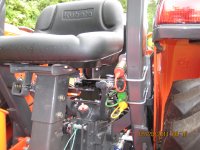
The rear remote mounting location was a challenge. My L3800 has the factory backhoe. the remotes had to be out of the way to clear the backhoe and of course the 3pt and top and tilt. It took a lot of prototyping to make it work. There's not a lot of space back there on the L3800 and I didn't want the install to look like a strap on after thought. My final decision was to mount to the side of the ROPS. I fabricated a mounting plate and used U-bolts to attach. Grainger had the best price on the U-bolts, only because they don't charge shipping if you pick up from one of their branch stores.

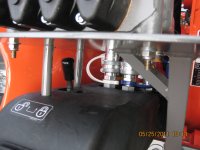
I'm not going to go into a bunch of detail on the hydraulic plumbing. It's really so simple once you understand the whole power beyond concept.

I've only plumbed two of the valves to serve the top and tilt remotes for now. The other two are capped and I haven't installed the handles. Once I add hydraulics to some of my 3pt attachments I'll complete the plumbing and mounting of the other two remotes.

I'll add some more pictures with the backhoe installed this weekend.
 

Attachments

  • IMG_3755.JPG
    IMG_3755.JPG
    634 KB · Views: 2,918
  • IMG_3757.JPG
    IMG_3757.JPG
    905.6 KB · Views: 2,863
  • IMG_3765.JPG
    IMG_3765.JPG
    677.4 KB · Views: 2,396
  • IMG_3767.JPG
    IMG_3767.JPG
    754.9 KB · Views: 2,824
Last edited:
   / Top & Tilt and Rear Remotes Installed #2  
Paul, I would say you were successful in making it a neat looking install. That is a nice set up and I like the ability to add a few more items to the valve. Great job.:thumbsup::thumbsup:
 
   / Top & Tilt and Rear Remotes Installed
  • Thread Starter
#3  
Here's a couple of photos of the remotes with the backhoe installed.
 

Attachments

  • IMG_3789.JPG
    IMG_3789.JPG
    674.6 KB · Views: 1,604
  • IMG_3788.JPG
    IMG_3788.JPG
    696.5 KB · Views: 1,864
   / Top & Tilt and Rear Remotes Installed #4  
You sir are not just a craftsman, but you are an artisan! What beautiful well though out work! My hats off to your ability's

James K0UA
 
   / Top & Tilt and Rear Remotes Installed
  • Thread Starter
#5  
I forgot to mention the top and tilt cylinders came from Fit Rite. Brian was great to work with and is very knowledgeable about the whole T&T setup.

And it didn't hurt that he has the best pricing and quick turn around.

I had ordered the T&T cylinder kit from Brian before I took delivery of the tractor. I thought that I was was getting a Kubota L3400. Brady Barlow emailed me and said that since the backhoe sub frame for the L3400 was on back order he was going to upgrade me to a L3800 for the same price. I couldn't complain. Brian at Fit Rite said there were subtle differences in the tilt cylinder length. All-though It seems to work just fine with the HF quick hitch mounted. I'll know for sure once I take the tractor back to the mountain property where all of the 3pt attachments are stored and test the T&T.
 
Last edited:
   / Top & Tilt and Rear Remotes Installed
  • Thread Starter
#6  
I wanted to mount the new spool valve lower to the loader valve but needed enough clearance to operate the loader valve lockout. In reality the loader will probably always be mounted except to service the engine.
 

Attachments

  • IMG_3768.JPG
    IMG_3768.JPG
    591.7 KB · Views: 1,317
   / Top & Tilt and Rear Remotes Installed #7  
Beautiful work, :thumbsup: How, do you keep that tractor, that clean?
 
   / Top & Tilt and Rear Remotes Installed
  • Thread Starter
#8  
Beautiful work, :thumbsup: How, do you keep that tractor, that clean?

It only has 8 hours on it, 6 of which was just using the pallet forks moving materials around the property. Used the BB for a few passes up and down the rough cut access road.
 
   / Top & Tilt and Rear Remotes Installed
  • Thread Starter
#9  
Thanks for all of the compliments.

My next project is to fabricate a "V" shaped ditching blade that will bolt onto the backhoe bucket. I've a piece of 3/8" scrap diamond plate that I'm trying to use, not sure how pretty it'll be but it should be functional. :thumbsup:
 
   / Top & Tilt and Rear Remotes Installed #10  
Where did you get your hydraulic quick connect rubber protector caps at? I really like those. The oem ones for my fel keep falling off. Those look really nice. Thanks. Philip.
 
   / Top & Tilt and Rear Remotes Installed
  • Thread Starter
#11  
Where did you get your hydraulic quick connect rubber protector caps at? I really like those. The oem ones for my fel keep falling off. Those look really nice. Thanks. Philip.

I got them off of Ebay. They don't fit the female QC very well at all. They fit the male QC just fine. I've 3/8" QC's and that's what the dust caps are.
They just don't engage the ball bearings in the QC tight enough. You can push them in and pull them right out of the female QC. My factory ones you must pull back on the QC sleeve to put on and remove. The guy I bought them from said I could exchange them for 1/2" dust caps but that probably won't fit.
 
   / Top & Tilt and Rear Remotes Installed #12  
Paul, a little off the subject, :rolleyes: but is the dozer in your avatar yours also?
 
   / Top & Tilt and Rear Remotes Installed
  • Thread Starter
#13  
Paul, a little off the subject, :rolleyes: but is the dozer in your avatar yours also?

No that was a rental I used when I was clearing the property. I also used it to move my 8' x 20' shipping container up the logging road and then my access road to set it on my property. It also was handy to tow my 30' camper up to the property. I unbolted one of the loader bucket teeth and bolted a 2" receiver hitch to the bucket. It was slow going but I was able to park the camper exactly where I wanted it. My 1 ton SUV could have towed it up the mountain but parking it exactly where I wanted to might have been another thing.
 

Attachments

  • IMG_3670.jpg
    IMG_3670.jpg
    856.8 KB · Views: 546
  • IMG_3669.jpg
    IMG_3669.jpg
    843.5 KB · Views: 607
  • 3 22 11_0002.jpg
    3 22 11_0002.jpg
    203.9 KB · Views: 871
Last edited:
   / Top & Tilt and Rear Remotes Installed
  • Thread Starter
#15  
Picture 3 is pretty impressive. :shocked:

We used to move loaded containers from the side the same way with big rough terrain forklifts. Just fork it from the side and run two chains to the top corners on the same side. Just make sure you're using 3/8" chains or larger.
 
   / Top & Tilt and Rear Remotes Installed #17  
Where did you get your hydraulic quick connect rubber protector caps at? I really like those. The oem ones for my fel keep falling off. Those look really nice. Thanks. Philip.

Discount Hydraulic Hose carries those. I have standard AG connectors and they fit fine. Both male and female.

Very nice work Paul :thumbsup:
 
   / Top & Tilt and Rear Remotes Installed #18  
Awesome fabrication paulwestski!! I wish I had your skills.
 
   / Top & Tilt and Rear Remotes Installed #20  
Paul,
Thanks for posting the pics and details of where you mounted the valve. I am ordering that same 4 spool wolverine valve from Surplus as well. I'm not really sure where to mount it yet and I never thought of mounting it where you did. How do you like it now that it's been on there a few weeks? Is it easy to control the top n tilt while looking back at the implement? I may end up mounting it in the same spot on my L4610. I was also thinking of mounting it on the right side fender somehow or attaching some angle iron to span the ROPS in the back and attach it to there. Any other suggestions or opinions on that?

Also, if you could mount it in the back near the top n tilt in an out of the way location, can you just directly plum the hydraulic lines into the valve? Rather than using the rear bracket setup like you have (although I realize this wouldn't look factory by any means)

Thanks again and great job on the fabrication. :thumbsup:
 

Marketplace Items

(18) 10'-6" PVC CONDUIT PIPE (A60432)
(18) 10'-6" PVC...
5ft Rotary Brush Cutter Tractor Attachment (A59228)
5ft Rotary Brush...
2021 Ford F350 XL (A57148)
2021 Ford F350 XL...
2013 PETERBILT 367 DAYCAB (A58214)
2013 PETERBILT 367...
2382 (A60432)
2382 (A60432)
2022 Fairbanks Nijhuis | Commercial & Industrial Water Supply Pump (A59228)
2022 Fairbanks...
 
Top