We call it the barn

   / We call it the barn #1  

deranged

Gold Member
Joined
Nov 12, 2013
Messages
257
Location
Marthasville, MO
Tractor
Cub Cadet 102, L3600 Kabota; 1530 John Deere
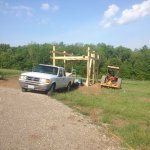
We started the shed\barn today. It is only going to be 29x20 so it is not huge. I would love to have the ability to take what I think I need, add 30% then double it but that is not in the cards right now. This will be the hay loft, tractor roof, feed storage with a stall for a cow in the future.

I had fun trying to level the place. My property is sloped where ever I go so I used the tiller to loosen the soil then scooped and pulled it around. Im proud of it but I know it could have been done a lot better.

Started setting the 6x6 posts. It started raining on post 4 so I had to call it for the night. They are 3' deep and our frost line is 2'. With drainage issues with my clay I add some rock to the bottom foot then just back fill with soil.

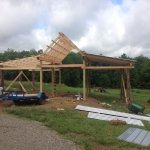
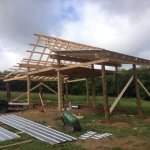
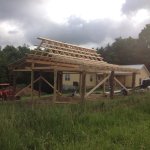
More to come as I get time.

Barn1.PNGBarn2.PNGBarn3.PNGIMG_1885.jpgIMG_1886.jpg
 
   / We call it the barn #2  
Looks similar to the barn I built in 1994. I made it twice as big as I first intended, ending up 48wx36 deep and outgrew it in less than 5 years. For budget reasons, I only put concrete floors in the center section, a big mistake I rectified as quickly as I could.
Lighting , power, and concrete floor, or you will never be satisfied with the finished project.
 
   / We call it the barn #3  
Good luck with your project. I too am going to build a barn in the early fall. Nothing fancy, looking at 42' X 72' pole barn. I had to level the area also, its close but not perfect. Not going to worry about getting it level, the roof line will be perfect, I'll just have some walls taller than others. Will fill in the low area's after its built. Keep us posted with pictures as you go.:)
 
   / We call it the barn #4  
Looks like you are off to a good start. I like the plan, it will be fun to follow your progress

Eddie
 
   / We call it the barn
  • Thread Starter
#5  
I've been dodging rain this last week whenever I have time to work. So it has been after dark when I quit so sorry for no photo updates till now.

I got all the 6 main poles dug and sunk. The hayloft is up. Hopefully tonight I can get the decking on it. Then on to "trusses". I've got 2x6x8 for the trusses I just have to figure out my angles on the first one then make a jig.
 

Attachments

  • image-2139592329.jpg
    image-2139592329.jpg
    806.9 KB · Views: 398
   / We call it the barn
  • Thread Starter
#6  
Well the wife and I have been busy. Got the floor up and then started on trusses. After figuring out the proper way to tie the trusses to the decking things started going surprisingly quick. It was also surprising how quick it went from shaky to a mostly solid frame. Next up is the side sheds. We will see if those come tomorrow or next week.

What is everyone favorite siding? I'm wavering between t11, metal, or maybe vertical boards.

IMG_1897.JPGIMG_1898.JPG
 
   / We call it the barn #7  
Batten on board would look real nice once weathered.
 
   / We call it the barn #8  
I'd put hardi plank on and never have to worry about it.
 
   / We call it the barn
  • Thread Starter
#10  
This hardy board intrigues me. I was leaning towards ruff cut and battens but we will see. I've got the roof framed and some tin up. The picture upload keeps messing up so I'll do a separate post of pictures
 
   / We call it the barn
  • Thread Starter
#11  
Picture1
 

Attachments

  • image-522562674.jpg
    image-522562674.jpg
    698.7 KB · Views: 278
   / We call it the barn
  • Thread Starter
#12  
Picture2
 

Attachments

  • image-2493070778.jpg
    image-2493070778.jpg
    699.4 KB · Views: 231
   / We call it the barn
  • Thread Starter
#13  
Pictute3
 

Attachments

  • image-1509803659.jpg
    image-1509803659.jpg
    656.8 KB · Views: 242
   / We call it the barn #14  
Nice touch with the cedar logs. Are they from your land? I use them on porches and gazebo's at my place. I found that when I put them in the ground, they start to rot fairly quickly. I have two on my porch that I did that way and I noticed the rot in about five years. They will be coming out this year and I will put them on to of a concrete pad. All of mine rest on concrete several inches above the ground. I drill a 3ft deep, 1ft wide hole in the ground and put a five foot length of channel iron in the hole. Then I fill the hole with concrete and make a form out of wood or a few inches cut off of a sono tube to get above grade. Then I put the post on top of the concrete and drill two holes through it and the c channel. Since the logs are so thick, I use galvanized threaded rod to bole it all together. This has proven to be a good long term solution to the rotting log problem.

28.jpg


37.jpg


45.jpg

Eddie
 
   / We call it the barn
  • Thread Starter
#15  
Nice touch with the cedar logs. Are they from your land? I use them on porches and gazebo's at my place. I found that when I put them in the ground, they start to rot fairly quickly. I have two on my porch that I did that way and I noticed the rot in about five years. They will be coming out this year and I will put them on to of a concrete pad. All of mine rest on concrete several inches above the ground. I drill a 3ft deep, 1ft wide hole in the ground and put a five foot length of channel iron in the hole. Then I fill the hole with concrete and make a form out of wood or a few inches cut off of a sono tube to get above grade. Then I put the post on top of the concrete and drill two holes through it and the c channel. Since the logs are so thick, I use galvanized threaded rod to bole it all together. This has proven to be a good long term solution to the rotting log problem.


Eddie

Eddie,

Yes the cedar is from my land. I debated long and hard about burying them even for the center posts but ended up purchasing 6x6 treated for the buried main supports. I wanted the look of cedar and couldn't beat the price so I dug 3' down and poured cement then used rigged up forms to make a raised platform that slopes with a 1/2" J bolt in the middle. I wish I had pictures of before but this is what my poles base looks like. I figure the white wood will rot quicker then the red so the poles are bigger then the base. Im so envious of your cement mixer, I did one bag at a time in a trough that is just wide enough for a hoe to fit it.

IMG_1903.JPG

We also used the cedar poles to outline our front porch. There is a 6x6 holding up the corner then we did some chainsaw butchery to make supports. The cross cedars, I used a 1 1/2" hole saw and bored the center of the poles then used a rezip saw to carefully cut away the outside leaving me with a nice post to fit the corresponding hole.

IMG_1906.JPG
 
   / We call it the barn
  • Thread Starter
#16  
IMG_1904.JPGIMG_1905.JPG

Here it is with most of the tin on it. The ridge cap has not come in yet but otherwise its on to framing out and siding on.:dance1:
 
   / We call it the barn #17  
Okay, you officially made building a pole style shed look easy! I have collected a few cedars about your size to do just this and make a shed or barn or something like you have and to perform similar duties.

Did you buy the tin for the roof used or new? What was the rough price on that. That is the biggest part I need to have in the bank or lined out.

I will continue to watch as I love seeing folks build stuff.

And now I have to go see what Eddie made with those huge logs!
 
   / We call it the barn #18  
Looks good. What color siding are you going with?
 
   / We call it the barn #19  
I couldn't tell how you set your logs and it's nice to see you took the extra step to protect them from rotting out.

Looking forward to seeing your progress!!

Eddie
 
   / We call it the barn
  • Thread Starter
#20  
Okay, you officially made building a pole style shed look easy! I have collected a few cedars about your size to do just this and make a shed or barn or something like you have and to perform similar duties.

Did you buy the tin for the roof used or new? What was the rough price on that. That is the biggest part I need to have in the bank or lined out.

I will continue to watch as I love seeing folks build stuff.

And now I have to go see what Eddie made with those huge logs!

J, I would be misleading you if I said it was easy so far. Trying to get things squareish and plumb have not been easy. But it has been worth it in knowing I can do it and that the tractor has a roof over its head for the first time. And as a side bonus the wife loves it. She even drove the tractor out to make room for her party she was having in it. She bent the auger backing over it but she loves the barn...:confused2:

I tried to get used tin for the roof off craigs list but since I work during the day I missed all the ads I saw. So the roof came from menards. It is a steel roof and has cost ~900. I used 3'x8' and 3'x12' panels with 20" rolled steel bent in place as valley transition between roofs. I can take pictures if you need. Also I did not put the ridge cap on yet but that is in the 900 figure. For I'm guessing 300 more I could have put weatherstripping on the sides of the roof but I did not. We will see how bad it weathers.

Make sure you don't make the same mistake as I have too many times this project, take whatever number of screws or nails and buy double. I have had to make three emergency trips to get more nails and then screws. This really threw off my night and made me a crabbier then normal person. I think we used almost 15 lbs of nails so far and 10 lbs of screws.
 

Tractor & Equipment Auctions

2016 Bobcat E85 Midi Excavator (A59228)
2016 Bobcat E85...
MARATHON 76KW GENERATOR (A58214)
MARATHON 76KW...
2017 Yale GLC050VX 3,500 lb LPG Forklift - Powershift, Aux Hydraulics (A56438)
2017 Yale GLC050VX...
CHALLENGER MT525B TRACTOR (A59823)
CHALLENGER MT525B...
EZ-GO Utility Cart (A55851)
EZ-GO Utility Cart...
2008 MAXX-D FUEL TRAILER (A58214)
2008 MAXX-D FUEL...
 
Top