White Oak - Mission Style Sofa Table

   / White Oak - Mission Style Sofa Table #1  

scott_vt

Super Member
Joined
Oct 5, 2004
Messages
7,287
Location
east wells,vt
Tractor
1986 MF 1040, 1942 Farmall A, 1949 Farmall Super A
Good Afternoon Guys,
My youngest son asked me to build him a sofa table for his newly remodeled home. He moved in there this past fall, and its slowly comming together for him...

I thought I would share the project on TBN, and how I go about building something like this.

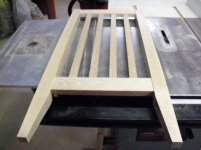
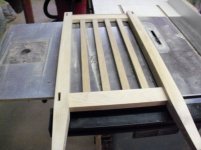
White oak is one of my favorites, and I pretty much use it exclusively when ever Im doing a mission style piece.

Im presently about half way done building this table, but I will try to cover everything from start to finish.

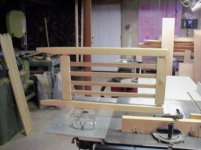
I had a fairly good plan in my head to start with, so I started jotting down some sizes, and went from there. The table will be situated behind his family room sofa, with the intension that his buddies can sit at this sofa table on stools, while others are sitting on the sofa, and all can watch the all important sunday football games, while partaking in their favorite beverage ! :)

The table will be counter height, 36", and be able to accomadate three large beer swilling buddies...

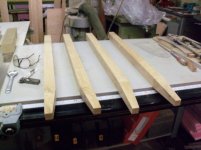
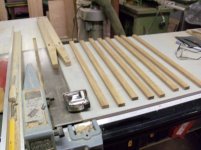
So here are my dimensions, the table top will be 7/8"thk by18" wide and 68" long.There will be no lower rail on the front side of the table, so that three stools can be stored underneath, while not being used.

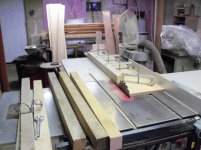
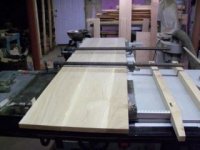
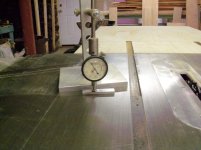
Knowing my rough dimensions, its time to go to my local saw mill to get things rolling. I like to purchase my lumber and then leave it in my shop a couple of weeks before I even start milling things up so it can acclomate to its new enviroment.

The trip to the saw mill is allways fun, but you have to have plenty of time to properly select your lumber, I never go when time is an issue...

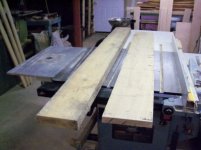
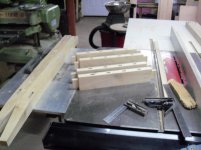
Here is a picture of what the rough lumber looks like before I start milling it up. The board on the left is 8/4 stock for the legs, and the other board is 5/4 stock used for the top...

BTW, this will probablly will be the last project done before moving my shop to the barn I built on my Vt property...:)
 

Attachments

  • TabR.jpg
    TabR.jpg
    835.2 KB · Views: 275
   / White Oak - Mission Style Sofa Table #2  
Your project, being that it is made of white oak, will last for generations upon generations. You Son will most definitely appreciate a piece of furniture that is constructed far better than he could buy in the average furniture outlet.:thumbsup:
 
   / White Oak - Mission Style Sofa Table
  • Thread Starter
#3  
Your project, being that it is made of white oak, will last for generations upon generations. You Son will most definitely appreciate a piece of furniture that is constructed far better than he could buy in the average furniture outlet.:thumbsup:

Good Afternoon Creekbend,
I certainly hope so, with all the junk they sell in some of these supposed furniture outlets, its hard to find good quality ! ;)

I have seen so much laminated chip board junk that stores are charging top dollar for it makes one sick ! :(

Anyway getting back to the table. I started rough cutting the stock for the legs. The finished dimensions will be 1 3/4" sq by 35 1/4" long. I rough cut the legs, 2" sq by 38" long to start and then get one side flat on the joiner, then I plane the thickness to 1 3/4" thk taking equal amounts of stock from each side of the leg. I then go back to the joiner and square the rough side to the previously finished side. And repeat the process over again to get my 1 3/4" sq.

I leave the legs a little long in case I get some checking on the ends, small cracks from the drying process. After getting the legs to the proper length, I made a taper jig, so that I can put a short ,7deg taper on the bottom inside edges of all four legs, 6" long.

You can see in the picture that I made a jig for the table saw so that I can start squaring up the leg stock.
 

Attachments

  • Doug & Stefs Sofa Table.jpg
    Doug & Stefs Sofa Table.jpg
    798.5 KB · Views: 451
   / White Oak - Mission Style Sofa Table
  • Thread Starter
#4  
Good Afternoon Guys,
OK a little fast forward to the finished leg..... :)

I think I gave everyone an idea how I went about cutting and milling the table leg. The next job on the legs was to cut the mortises, remember on the first post that I mentioned,there wont be a rail on the bottom front of the table, so I layed out where all the mortises were going with pencil, so as not to put one in the wrong location ! :confused:

I used to cut all my mortises with a jig and plunge router for years but I finally broke down and bought a bench top Delta mortiser a couple of years back. As long as the mortising chisels are kept good and sharp, this little unit works great.

The rails are going to finish in thickness at 7/8", so I layed out the mortise locations, so that when the rails are assembled to the legs, I will have an 1/8" reveal between the edge of the leg and the rail.
 

Attachments

  • D&S Table1.jpg
    D&S Table1.jpg
    732.9 KB · Views: 295
   / White Oak - Mission Style Sofa Table
  • Thread Starter
#5  
Good Afternoon Guys,
I cant empathize enough on the importance of getting in the mindset of constantly using stops when trying to make duplicate parts. Whether they are table legs, table rails or cutting mortises, no matter what your doing, they all have to be the same length. This will make the project go so much smoother... :)

Heres the only picture I can find of the table legs with the mortises cut allready, sorry.

In this pic I had allready milled up the boards for the table top and glued and clamped it all together.....
 

Attachments

  • Legs & Top.jpg
    Legs & Top.jpg
    14.5 KB · Views: 283
   / White Oak - Mission Style Sofa Table
  • Thread Starter
#6  
Good Afternoon Guys,
These next pictures, show the table ends, you can see the importance in using stops for all of thses parts, because if you didnt, you would not be getting any tight joints after assembly, and you wouldnt have a quality piece of furniture.

Open joints weakens the furniture, and is the earmark of sloppy craftsmanship... IMO ;)

The first pic is the end rails, tenons done,and the four mortises allready cut in the top and bottom for the slats...
 

Attachments

  • TRails.jpg
    TRails.jpg
    749 KB · Views: 232
   / White Oak - Mission Style Sofa Table
  • Thread Starter
#7  
Good Afternoon Guys,
Im sure alot of wood workers use different methods when cutting their tenons. I like to use my dado set, I can set the height using a dial indicator and gage block, thats the old toolmaker coming out of me I quess :). But it works quite well and once I get the height set, I can lock the saw, and they all come out the same, I ususally leave them a few thousanths big and then use a rasp to fit each one individually...

Youll notice the alluminum throat plate in the saw, I made that when I was still working in the shop, I can remove that lexan piece for different widths of the dado set...
 

Attachments

  • TIndic.jpg
    TIndic.jpg
    829 KB · Views: 273
   / White Oak - Mission Style Sofa Table
  • Thread Starter
#8  
Good Afternoon Guys,
Here are a couple additional pics of the table ends...

The tenons have not been milled on the slats in this pic yet....

I forgot to mention that the table rails are 2 1/2" wide, so I went with 3/8" by 1 1/2" tenons on the rails, and matching mortises in the legs.

The slats on the table ends are 1/2" by 1", and I decided to go with 1/4" by 1/2" tenons on these pieces.

After all the parts were milled and fitted, I allways dry assemble and clamp it to make sure all the joints are done correctly...

Here is a pic of the dry assembly in process...
 

Attachments

  • TSlats.jpg
    TSlats.jpg
    720.6 KB · Views: 323
  • TAssm.jpg
    TAssm.jpg
    664.9 KB · Views: 224
   / White Oak - Mission Style Sofa Table
  • Thread Starter
#9  
Good Evenin Guys,
After fitting both end assemblies together, I pull everything apart, and pre sand all the parts. I dont get too carried away with sanding at this point because the parts will invariably get banged or scraped before the table is assembled as a complete piece.

You will also notice in the second picture, that I cut a 1/4" by 1/4" dado in the top rail. In the third pic is the clamp that will hold the table top in position to the base. The table top will expand and contract with the seasons, and by using this method of attaching the top it can move without effecting the structural integrity of the base...
 

Attachments

  • EAssm1.jpg
    EAssm1.jpg
    711.9 KB · Views: 171
  • EAssm2.jpg
    EAssm2.jpg
    724.7 KB · Views: 165
  • TClamp.jpg
    TClamp.jpg
    793.4 KB · Views: 156
  • TClamp1.jpg
    TClamp1.jpg
    887.8 KB · Views: 325
   / White Oak - Mission Style Sofa Table #10  
Thanks for the detail you are putting in the post. I like the mission style furniture. Your attention to detail is great. I look forward to the rest of the tread.
 

Tractor & Equipment Auctions

TOFT 1000 Grass Cutter for Excavator (A49251)
TOFT 1000 Grass...
2001 Dodge Ram Ext. Cab Pickup Truck (A48081)
2001 Dodge Ram...
Kerian 50” Potato Sizer (A47369)
Kerian 50” Potato...
78in Buckets (A49251)
2016 Ford Explorer AWD SUV (A48082)
2016 Ford Explorer...
Extra Heavy Duty Powder Coated Hay Feeder (A49251)
Extra Heavy Duty...
 
Top