WKY Horse Barn

   / WKY Horse Barn
  • Thread Starter
#101  
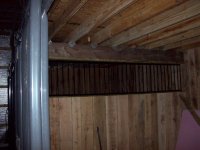
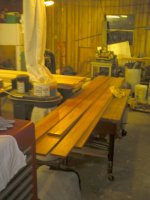
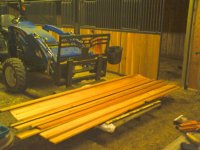
We wanted the barn to have good ventilation & light in the stalls so carrying the oak divider walls solid up to the ceiling was a no-go.

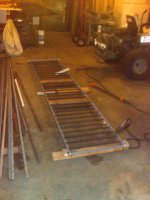
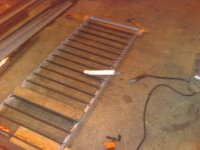
I ended up fabricating a custom grillage divider 24" high out of 3/4" galv angle with 3/8" tube steel pickets welded in on 3.5" centers. This sits ontop of the oak divider wall allowing plenty of light & ventilation in the stalls & we really like it.

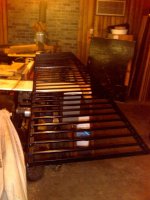
I painted the whole thing black before installation & only had to touch up a few places after I installed it.
 

Attachments

  • 060922 IMG_0094 Welding Grills (450 x 600).jpg
    060922 IMG_0094 Welding Grills (450 x 600).jpg
    59.4 KB · Views: 306
  • 060922 IMG_0096 Wleding Grills (600 x 450).jpg
    060922 IMG_0096 Wleding Grills (600 x 450).jpg
    61.7 KB · Views: 218
  • 060923 IMG_0097 Painted Grill (450 x 600).jpg
    060923 IMG_0097 Painted Grill (450 x 600).jpg
    72.1 KB · Views: 219
  • 060924 100_0535 Grills up (600 x 450).jpg
    060924 100_0535 Grills up (600 x 450).jpg
    60 KB · Views: 274
   / WKY Horse Barn
  • Thread Starter
#102  
Rob: Thanks for the feedback. It was a ton of work for about 3 yrs after work & weekends.. when you use it every day all the attention to details & the sweat (& some blood of course) really feel like they paid off.

Your place looks truly fantastic. Thanks for posting the build photos.

Tom
 
   / WKY Horse Barn #103  
Tom,

Very impressive!!! Nice to see your updates and progress. It's an amazing project and one you should be very proud of.


Thanks,
Eddie
 
   / WKY Horse Barn #104  
I didn't read the entire thread so forgive me if you stated somewhere earlier - but where did you find the tack rack? Or did you design it yourself?
 
   / WKY Horse Barn
  • Thread Starter
#105  
Russ - THe tack rack came from Dry Creek - in post 98 there's some blue underlined test - it's the link to their website, click it & you'll see more about the system.
 
   / WKY Horse Barn
  • Thread Starter
#106  
Eddie,
Many thinks for all the kind words, it's sure the biggest building project I've ever personally taken on.

I need to get some photos posted showing my first time ever installing a pocket door - it is for access between the tack room & main hallway..

This coming spring/summer I'll be installing a concrete floor in the storage room along with a set of stairs up to the low loft along with finishing the storage room w/framing, insulation, walls & the like..

I like your projects & innovation - the hot tub enclosure was/is very cool & the stepped roof is very nice!.

Tom
 
   / WKY Horse Barn
  • Thread Starter
#107  
During the holidays we got a lot done on the tack room trimout.

A while ago we bought some 9 to 10 ft lengths of random width S2S 3/4" Red Oak (FAS grade) to use as siding on the hallway side of the tack room and for general door/room trimout of the tack room. I was able to get the mill to give me one straight edge which allowed me to run the stock thru my table saw & get the 2nd edge straight.

We used boiled linseed oil as the finish on the red oak for the stalls so we decided to use the same again. I cut boards to trim around the pocket and exterior doors to cover the rough framing & attached all w/trim screws.

Attached are some photos of the process

(sorry for the yellow cast on some of the photos - my camera does not do well on flash).
 

Attachments

  • 23 TR hall linseed oil RO.jpg
    23 TR hall linseed oil RO.jpg
    55.1 KB · Views: 237
  • 26 TR RO coming in.jpg
    26 TR RO coming in.jpg
    70 KB · Views: 190
  • 28 TR RO.jpg
    28 TR RO.jpg
    76.2 KB · Views: 168
  • 31 TR RO clamping.jpg
    31 TR RO clamping.jpg
    60.2 KB · Views: 163
  • 33 TR Pocket door RO trimmed.jpg
    33 TR Pocket door RO trimmed.jpg
    47.3 KB · Views: 209
  • 36 TR ext door RO trim.jpg
    36 TR ext door RO trim.jpg
    60.2 KB · Views: 222
   / WKY Horse Barn #108  
TwinWillows,

I'm interested in your rolling doors. I'd like to put a set of rolling doors on my 12' opening. Can you provide some more detail on how those were made and installed?

Jim H.
 
   / WKY Horse Barn
  • Thread Starter
#109  
Megado Here's a step by step on how I built our big doors. I hope the detail is not too much but I'm going to presume you have never done doors like this - just skip the parts you already know about.

First a little about the door frame materials I bought everything from my metal building supplier. They sell the round door track & extruded alum door frame pieces along with the metal siding so that's what I used. The door frame pieces come in 3 different ways a bottom piece along with a male and female vertical side pieces. The web of the extrusion for the sides is 1.5 wide allowing them to fit over your siding girts and top board.

Door track first - The round door track hangers need to be installed on a 2x4 that's against your doorway header. The 2x4 thickness is needed to keep the door(s) off the metal siding when opened & worked with the metal door jamb trim I used. The track needs to be 2x the width of the opening and LEVEL (I used a surveyors level to make sure it was good along it's entire length). My supplier had track in different lengths that I pieced together w/factory splices to end up the needed total length.

Doors First tip: A friend who builds metal buildings told me the secret to building big doors is to do it hanging in place This because there is no real good way to build a big door panel flat & square on the ground & lift it into place. The siding metal is actualy what squares the door frame up. You may find otherwise but I did it that way & was very pleased w/his approach & the following is all based around that method.

The most important part of building a good flat door panel is to start by selecting a dead flat & straight top piece. If this isn't straight & flat the door panel will end up w/a twist & rack that will annoy you forever. I used pressure treated 2x6 SYP for my top piece even though others told me a 2x4 was ok I always overbuild. Cut this top piece 1/2 the width of the opening plus 2" The 2" is needed for the overlap on the outside edges to allow the door to pull-up tight against the metal door jam when you latch it shut. My track rollers used a metal threaded rod to support the door panel via holes thru the top 2x6. The second most important thing is to drill the holes for these hanger rods dead center straight thru the top piece I used a guide & a spotter to keep me on track drilling thru the 6" The third most important thing is to get these top pieces dead level when you put them on the hanger rods by adjusting the nuts on the hanger rods as needed..

Once the top peice is hung next is to cut the alum framework pieces to length.. Cut the bottom piece the exact length as the top board. Cut the sides (don't forget to keep the locations of the M & F pieces right) the length you want. Mine were cut so that I had about 1" below the round track so that I could have a little ventilation thru the gap. While they were on the ground & easy to work on I figured out where my siding girts were going & predrilled the screw holes on the inside flanges.

Now hang the sides on the top piece & screw them to it thru the inside flange. It only takes 1 screw in each corner as the screws thru the siding will go into the top piece & really carry the weight of the door. Slip the bottom piece up into place & screw each corner again using 1 screw thru the inside flange. I next cut my 2x4 girts to length & slid them into the channel & screwed them down.

Now we have to decide if the door will be insulated I used double bubble w/foil on both faces all the way around our barn & the doors were no exception. You may or may not be doing the same although I'd highly recommend it. If insulating w/DB tack it into place on the outside so it's between the siding & the wood of the girts.

Metal siding goes on last & is actually what squares up the door panel. Set the first sheet into place getting it good & tight into the corner against the bottom & side rail. Screw it down as needed & install any other sheets as needed to fully fill the frame. Install door handles on the outside & closure latches on the inside (one to pull the panels together in the middle & 1 @ each outer end to pull the door panel tight against the building). Install a door stop @ the bottom outside of each panel to keep it from coming off the track.

I ended up having to fiddle a bit with the nuts on the hanger bolts to get the doors to come together parallel - no big deal as that's what the adjustment nuts are there for.

I installed door guides along the building to keep the doors from blowing out w/the wind & a heavy duty center guide to keep them from blowing inwards.

I'll try & get some photos posted of the door panels to give you a better idea of what the finished install looks like.

Since they were significantly smaller, I built the upper 6x6 doors on sawhorses on the ground using the same process as described above & then hoisted them up onto the hanger rods.

All I can offer is that this process worked well for me on 6 door panels on our barn & I'd do it the same way again although probably a little quicker the next time.
 
   / WKY Horse Barn #110  
Thanks for such a detailed report. Look forward to seeing the pics when you have an opportunity to post them.

By the way...impressive barn you've built! I've enjoyed reading through and following your thread.

Jim H
 

Tractor & Equipment Auctions

2005 HACKNEY AND SONS, INC. BEVERAGE TRAILER (A53843)
2005 HACKNEY AND...
2007 DRAGON PRODUCTS 150BBL VACUUM TRAILER (A53843)
2007 DRAGON...
2014 MACK CHU DAY CAB (A53843)
2014 MACK CHU DAY...
2013 MACK CXU613 (A53843)
2013 MACK CXU613...
Mitsubishi FG35 Forklift - 8,000lb Lift Capacity, LP Gas (A53473)
Mitsubishi FG35...
2007 INTERNATIONAL MA025 (INOPERABLE) (A52472)
2007 INTERNATIONAL...
 
Top