Backhoe Woods Subframe: Installation on CT230

   / Woods Subframe: Installation on CT230 #1  

DaveK OR

Silver Member
Joined
Nov 14, 2016
Messages
122
Location
Mill City, OR
Tractor
Bobcat CT230
The fun begins!:cool2:

Well, not so much fun yet, as all I've done so far is to move the backhoe assembly into my unheated shop, separate the subframe assembly from its shipping pallet, and do a very quick bolt-up of one subfame bracket/arm to verify that it is, indeed, a straight bolt-up with no adapters or modifications being "obviously" required.

The "kit" comes with a big bag of nuts, bolts, and washers, metric and SAE, some grade-5, some the metric equivalent, and some just standard grade, so an initial task was to dump them all out on a table, then sort through them to match the pieces that go together, and mark them according to the Woods assembly instructions. That's going to save me a lot of frustration when I'm crawling around on my back under the tractor fitting things up.

For anyone who does this in the future, there is a possible pitfall you should be aware of... There are a number of places where metric 14-2 bolts are used, and I discovered that you can use (by mistake) a 1/2-13 (same as 1/2 NC) bolt in that pre-tapped metric 14-2 hole. The threading is close enough, with the slightly smaller diameter of the 1/2" bolt, that it will thread into place nicely. Unfortunately there isn't really enough thread engagement for it to be even remotely secure, and will create a dangerous situation if you actually assemble the subframe to the tractor in this way. You might even strip them out when torquing the bolts when you finish up.

Anyway, I'm waiting for a little warmer weather without risk of snow (need to be able to plow my 1000' driveway) before I do the serious work. I'll get photos when I start with that.
 
Last edited:
   / Woods Subframe: Installation on CT230 #2  
Always more fun when you don't have to deal with the cold.
 
   / Woods Subframe: Installation on CT230 #3  
I can't wait to see it completed. We still have 8" of snow here and more coming. It wont be a big deal if it stays this warm.
 
   / Woods Subframe: Installation on CT230 #4  
It won't be to bad , I put my Wallenstein hoe on an subframe myself.
 
   / Woods Subframe: Installation on CT230
  • Thread Starter
#5  
It's not so much the cold, as the fact that I need to be able to plow my driveway if it snows. My 1000' driveway has 15% grade in places, so even 2-3 inches can be a problem, and with the tractor out of service I either have to do it by hand (Huff Puff!!!), or pay some big bucks for somebody else to clear it.

The good news is that snow isn't likely to be much of a problem if we get through the next day. The forecasters seem to be a little gun-shy after the last snow-ice storm, so have been predicting snow while at the same time predicting temperatures in the high-30s.

Anyway, the subframe installation is looking like a fairly simple thing at this point. I was worried that I'd have to modify or adapt the "stock" subframe, and even small changes to that should not be attempted without understanding what you are doing. The backhoe will transfer significant forces onto the subframe, and if you get it wrong it could be very, very messy.
 
   / Woods Subframe: Installation on CT230
  • Thread Starter
#6  
Oh, as an aside, the light-bulb in my brain finally flashed on, and I think I understand the confusion about subframe mounting issues for the Bobcat tractor.

It appears that on some versions of the CT200 series with FEL, the front hanger brackets are not an integral part of the FEL mount/frame. In other words, you have to add your own hanger bracket if it doesn't exist already on your tractor. On my tractor, the front hangers are there, so I do not need to fabricate that plate with all the bolt-holes needed.
 
   / Woods Subframe: Installation on CT230
  • Thread Starter
#7  
I started on the subframe installation today, took a few pix along the way. Here are my first notes and comments:


  • The instructions from Woods say to jack up the tractor, put the rear axle on stands and remove the wheels. This isn't necessary, as there is just enough room to do the work with the wheels on. It isn't as convenient, and makes bolt alignment a little more fussy, but it saves you from having to manhandle those heavy wheels. If you do go to the trouble of taking the wheels off, you might as well take the ROPS off as well, because there are clearance issues with its mounting bolts.
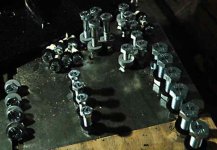
  • I sorted through and marked all the various bolts for the installation. I used the numbers that correspond to the assembly instruction sheet from Woods.

    NutsNBolts.jpg

    This will help you to quickly find the hardware you need at each step, and to NOT make this mistake: The two bolts that insert vertically to secure the subframe to the rear axle are metric 14-2. Also included in the bag of hardware from Woods are a couple of 1/2" NC bolts that will most definitely thread fully and easily into those tractor bolt-holes. The SAE bolts are slightly smaller diameter than the metric, so thread engagement is minimal. They would probably strip the threads in the tractor axle when you torque them down, or (worse) strip out when the backhoe puts them under load.
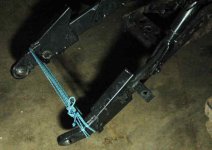
  • The very first step is to remove the anti-sway bars from the 3-point hitch, lower the hitch, and tie them together.

    3PointTied.jpg Swaybar1.jpg

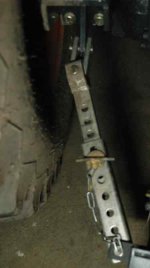
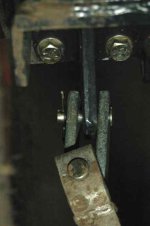
    This isn't absolutely necessary, but it does keep them out of the way while you are working. There's also a small "trap" here that could cause you grief in the future, if you don't take care of it now. The pins that attach the anti-sway bars to the tractor need to be checked for their insertion direction. If they are left inserted in the wrong direction, you'll have to remove the backhoe subframe in order to pull the pins out. The Subframe arm will end up to the right of this anti-sway bar flex-link, with only about 1/4 inch to spare. It's a simple thing to reverse the pin to avoid this problem in the future.

    Swaybar2.jpg
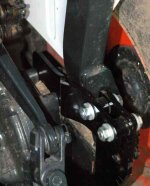
  • Place a subframe arm under the tractor, then lift the front of the arm and secure it LIGHTLY to the front hanger with JUST ONE bolt and nut.

    SubframeBracketFront1.jpg
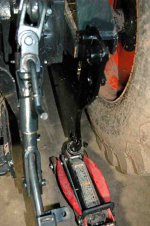
  • At the rear of the subframe arm, use a floor jack and raise the arm into place.

    SubframeBracketRear.jpg
  • There are two sets of bolts that secure the rear of the subframe arm. Two bolts are metric 14-2 and are inserted vertically into the axle housing. The other two bolts are metric 12-1.25, and are inserted horizontally. I found that it was nearly impossible to install the horizontal bolts if the vertical bolts were installed first (even very loosely). The fine-thread horizontal bolts required near-perfect alignment, and with the vertical bolts holding the subframe arm in place I simply could not get the threads to engage. This may simply be a tolerance issue related to my tractor, but by doing the horizontal bolts first, the alignment was much easier, and I then had no problems with the vertical bolts. I suppose that if I had taken the wheels off the tractor, I could probably have been able to make it work either way, but that would still have been a lot more work than fussing with bolt alignment in the way I did. I would include photos of these bolt-ups, but without removing the tractor wheel, it's difficult to get a good picture.
  • Once the rear attachment is lightly bolted up, go back to the front and install the remaining two bolts there. Again, these should be lightly bolted to allow for "wiggle room" with the initial hook-up of the backhoe itself. All the bolts get torqued AFTER the hoe is secured to the subframe.
  • Next come the smaller support brackets that bolt to the rear of the subframe and wrap around to connect on top of the axle.

    SubframeTopBracket.jpg

    Again, these bolts that connect to the axle are fine-thread m12-1.25, and for some reason getting the bolts started is a challenge. With the tractor wheels on, you have to do this mostly by feel, in very tight quarters. If you have an appropriate tap to chase and clean out the threads , it would probably make bolt insertion and starting just a bit easier (I think it's factory "crud" in the threads that makes initial insertion and turning of the bolt a little difficult). Also, unless you remove the ROPS, access to these bolts is restricted by the ROPS bolts, and you cannot fit a socket over the bolt head, so even with the wheel off, you will be faced with using an open-end wrench, 1/6 turn at a go, to bring the bolts up snug but not tight. Just be patient, and you will get there!

You do the same for the other subframe arm, and at the end be sure to leave the bolts a little loose. After you mount the hoe on the subframe, only then do you torque ALL of them to specs.

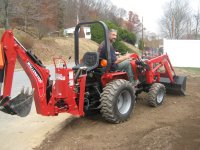
And that completes the basic mounting of the Woods subframe onto the Bobcat CT230 with 7TL Front End Loader!
 
Last edited:
   / Woods Subframe: Installation on CT230 #9  
That's not a pic of the Wood's subframe. Which GroundbreakerX did you get and how's it perform? Have you had the opportunity to try the 7BH
 
   / Woods Subframe: Installation on CT230
  • Thread Starter
#10  
I got the Woods BH75, but with our wet spring I haven't been able to do much. I ended up building a dolly for it so mounting only takes about 10 minutes.
 
 
Top