Worklight wiring; I'm asking for 3016 advice again

/ Worklight wiring; I'm asking for 3016 advice again #1  

Tkblacktail

Gold Member
Joined
Feb 13, 2011
Messages
298
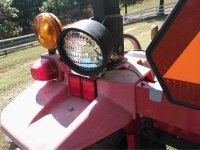
I mounted a work light on the 3016 frame to the left side of the traffic triangle, I plan an "engine on" or "key-on" power supply like the headlights have.

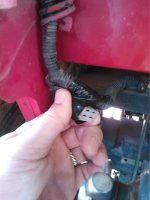
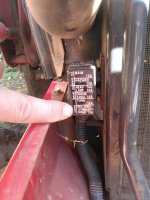
Without much thought, I figure I can splice into the headlights or probe under the dash for a hot wire, but I'm reluctant to cut the loom, and I want to stay "factory", and professional as possible.

The light is grounded through the mount & tractor body and to the chassis, I have a quality toggle switch (interrupter), and an inline fuse ready to go.

I'm wondering if anyone would like to share how they wired their "engine-on" or "key-on" work light.

Thanks.
 
Last edited:
/ Worklight wiring; I'm asking for 3016 advice again #2  
I think you will put too much load on the head light fuse by adding the work light to it.
 
/ Worklight wiring; I'm asking for 3016 advice again #3  
I think you will put too much load on the head light fuse by adding the work light to it.

I doubt it, most manufacturers would anticipate such a scenario, and probably have an additional work light as an option on the tractor when you order it new. Worst case, you could always go L.E.D. lights which use very little power if that were a concern. Trace out your lighting circuit, you just might find a pigtail already there waiting to be used for such an option.
 
/ Worklight wiring; I'm asking for 3016 advice again
  • Thread Starter
#4  
DT 86: "I think you will put too much load on the head light fuse by adding the work light to it."

I doubt it, most manufacturers would anticipate such a scenario, and probably have an additional work light as an option on the tractor when you order it new. Worst case, you could always go L.E.D. lights which use very little power if that were a concern. Trace out your lighting circuit, you just might find a pigtail already there waiting to be used for such an option.

10-4, I'll do the math and make sure the load doesn't exceed the circuitry; where ever I tap into an existing app. Thanks.

The only pigtail I can see so far is is a circuit for a PTO lever activation which I'm not currently using; it apparently activates when the PTO lever is engaged, it is situated right under and in front of the cross-over where I mounted the work light.

The nearest fuse bus I have found (so far) is mounted above the alternator.

Thanks again; I'll post what I end up with.
 
/ Worklight wiring; I'm asking for 3016 advice again #5  
DT 86: "I think you will put too much load on the head light fuse by adding the work light to it."


10-4, I'll do the math and make sure the load doesn't exceed the circuitry; where ever I tap into an existing app. Thanks.

The only pigtail I can see so far is is a circuit for a PTO lever activation which I'm not currently using; it apparently activates when the PTO lever is engaged, it is situated right under and in front of the cross-over where I mounted the work light.

The nearest fuse bus I have found (so far) is mounted above the alternator.

Thanks again; I'll post what I end up with.

Keep in mind you don't "have to" use the headlight circuit even though that is most logical. Most any wire that is supplied power after the key is turned to the on position will work just fine. If you do tap into an existing wire, don't cut the wire to put in the splice and definitely don't use those so-called splicing connectors! Find a wire that will work for you. Then carefully strip the insulation off that wire (without cutting it, a sharp utility knife works best) for about an inch, maybe an inch and a half tops. Then take a small pointed object (I use the tip of my test light) to "carefully" separate the stranded wires that you just exposed in to two groups so it basically looks the the eye of a needle with half of the strands on each side of the hole. Take your feed wire headed to your work light switch and strip off about an inch and half of insulation from the end. Take that end you just stripped and thread it through the "eye" you created in the factory wire. Once threaded through (up to where the insulation starts on your feed wire) take the bare part of your feed wire and wrap it around both halves of the "eye" you made in the factory wire . Be sure to wrap it around the entire length of the area you stripped off of the factory wire. Next, zip tie the insulated sections of the wires together starting roughly 3/4 inch from where the splice is made so there is no chance they could vibrate apart. Lastly thoroughly cover the spliced area (allow at least an inch overlap on both ends) with a good electrical tape. Doing it this way all but guarantees a solid connection that will never come apart unless you take it apart! It also is the best way to protect the integrity of the factory wire because you never physically cut it in order to splice in. You could take it a step further and solder the splice in place as well, but honestly between the intertwining and the zip ties it isn't going anywhere! Good luck.

P.S. I'm sure I don't have to tell you this, but don't use that pigtail in the P.T.O. circuit!
 
/ Worklight wiring; I'm asking for 3016 advice again #6  
I think you have 2 bullet type connectors at the rear of your tractor. I believe they are marked light and horn. I have a multipin connector on my 3215 which provides 12 volt from the light fuse and ignition switch. I added a rear light with a built in on/off switch. I also found an unused 10 amp fuse in my engine compartment marked for work light/horn. I do not have a horn but I traced this wire to an unused terminal in the plug for my light switch. If I ever add auxillary lights on the front I probably will tap into this and then add a switch below my existing light switch.
 

Attachments

  • image-257679537.jpg
    image-257679537.jpg
    526.7 KB · Views: 283
  • image-4116192275.jpg
    image-4116192275.jpg
    566.9 KB · Views: 458
  • image-1228965713.jpg
    image-1228965713.jpg
    583.5 KB · Views: 284
/ Worklight wiring; I'm asking for 3016 advice again #7  
I think you have 2 bullet type connectors at the rear of your tractor. I believe they are marked light and horn. I have a multipin connector on my 3215 which provides 12 volt from the light fuse and ignition switch. I added a rear light with a built in on/off switch. I also found an unused 10 amp fuse in my engine compartment marked for work light/horn. I do not have a horn but I traced this wire to an unused terminal in the plug for my light switch. If I ever add auxillary lights on the front I probably will tap into this and then add a switch below my existing light switch.

There you go, I figured they would have planned for a work light.
 
/ Worklight wiring; I'm asking for 3016 advice again
  • Thread Starter
#8  
Thanks everyone!

I took the power from the left/rear tail lamp (yellow wire).
The work light pigtail at the PTO has a 3 amp limit; 3 amp LED in the future.
I ran my toggle out of the back of the work light (rubber housing, facing downward) and everything works fine.
That is a better way to splice Chemteck and I will try that next time.

The work light will pay off I'm sure.
 
Last edited:
/ Worklight wiring; I'm asking for 3016 advice again #9  
Max 22_25 headlight from drivers seat.jpgMax 22_25 headlight dally flood from drivers seat.jpg

LED lights are very cool. Check out these shots. Left side headlights only. Right side headlights are still on with a pair of Dually LEDs. Same camera settings and exposure.
 
/ Worklight wiring; I'm asking for 3016 advice again
  • Thread Starter
#11  
View attachment 320031View attachment 320032

LED lights are very cool. Check out these shots. Left side headlights only. Right side headlights are still on with a pair of Dually LEDs. Same camera settings and exposure.

Yes, very nice; more info on the lights please? Were they installed in the stock headlight bank?

Why is there a rectangular shadow between the lights? :D
 
/ Worklight wiring; I'm asking for 3016 advice again #12  
That darker section is the OEM lights!
 
/ Worklight wiring; I'm asking for 3016 advice again #13  
Max 22.25 dually mount (4).jpg
Yes, very nice; more info on the lights please? Were they installed in the stock headlight bank?

Why is there a rectangular shadow between the lights? :D

These were mounted off the base of the ROPS, using existing bolts. One forward and one back on each side, so 4 lights total. The purpose for this tractor was mainly snow removal. You can sort of see the front mount blower in the previous post. If we mount them up high on the canopy or out front on the grill guard you get less shadow.

Here is the bracket we used on this particular installation. The best setup is up high on the canopy for general use, but in snow removal we wanted him to also see some of the back edges of the blower. You can tip them up or down, or spin them in or out a little.

At this level of light you can run without a relay. Just go to the battery with an inline fuse and to the switch, etc. The next level up, the D2's suggest a relay. And relays are super easy once you figure out what they do and how they work.
 
/ Worklight wiring; I'm asking for 3016 advice again
  • Thread Starter
#14  
View attachment 320075

These were mounted off the base of the ROPS, using existing bolts. One forward and one back on each side, so 4 lights total. The purpose for this tractor was mainly snow removal. You can sort of see the front mount blower in the previous post. If we mount them up high on the canopy or out front on the grill guard you get less shadow.


Here is the bracket we used on this particular installation. The best setup is up high on the canopy for general use, but in snow removal we wanted him to also see some of the back edges of the blower. You can tip them up or down, or spin them in or out a little.

At this level of light you can run without a relay. Just go to the battery with an inline fuse and to the switch, etc. The next level up, the D2's suggest a relay. And relays are super easy once you figure out what they do and how they work.

Awesome! My trees reach in and pluck tools off my equipment (Wizard of OZ forest) as I drive by, so I will opt for the inside/lower locations. Thanks for all the info on all the posts.
 

Marketplace Items

2024 CATERPILLAR 306CR EXCAVATOR (A60429)
2024 CATERPILLAR...
SEMI AUTOMATIC QUICK-CHANGER FOR MINI EXCAVATOR (A58214)
SEMI AUTOMATIC...
KNOW BEFORE YOU BID - DO YOUR HOMEWORK AND BE HAPPY WITH YOUR PURCHASE (A60432)
KNOW BEFORE YOU...
Year: 2015 Make: Ram Model: 5500 Chassis Vehicle Type: Truck Mileage: Plate: Body Type: 2 Door Cab; (A55852)
Year: 2015 Make...
2022 Polaris Ranger 900XP 4x4 Utility Cart (A55853)
2022 Polaris...
UNUSED IRANCH IRTPL 10000Ib TWO-POST CARLIFT (A60432)
UNUSED IRANCH...
 
Top