It's time; either get started or....

   / It's time; either get started or....
  • Thread Starter
#41  
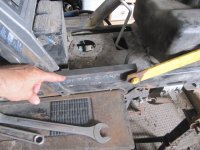
If you've got room, add the gusset.

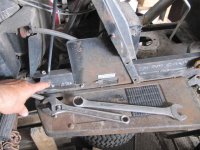
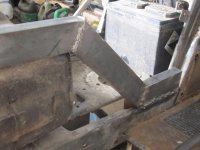
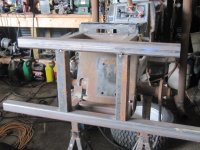
That will be the rub! I'll drop the fenders and console back in place today and take a look at what will fit behind it.

There's gonna be a hangin' before the sun goes down!!!...:D
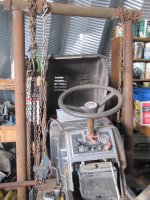
:laughing::laughing: Some of the "engineering" I was doing while on the road yesterday involved getting the tractor up in the air so I don't have to get down on the ground so much. So, I'm going to "swing" that thing! I have all that 3"x1/8" pipe laying there in a pile and I'll cut it up and weld it into something to hang the tractor from.:thumbsup: Photos once it's done.:cool:
 
   / It's time; either get started or....
  • Thread Starter
#42  
Well, it's a good thing I didn't say which day the sun would not go down before there would be a hangin':laughing:!! Like another poster said recently while commenting on how long it took to get some projects done :"life got in the way". But I did get it done and it's a lot easier to get at the bottom of the tractor.:thumbsup:

Photos: 1): Shows the front end of the tractor"swingin'". 2,3 + 4): the reinforments on the left side of the tractor. Note the yellow link. I had to do it that way to allow for the fuel tank. 5): Right side support. I can add gussets if needed. 6): The platform for the pivot and hydraulic controls tack welded in place to make sure it all lines up. Next step is to fill all the welds after I remove the frame from the tractor. I don't weld overhead if I can avoid it!!:D 7): This is the upper mount using a 3/4" bolt. I'll be tack welding these to minimize movement. I can always grind them off if I need to remove the hoe for some reason.

Yeah, I know the upprights in #6 look off square. I saw it too and went out to check it with the square.:laughing::laughing: It's the way I took the picture that makes it look closer together at the bottom.:eek:
 

Attachments

  • IMG_0941.JPG
    IMG_0941.JPG
    144 KB · Views: 347
  • IMG_0932.JPG
    IMG_0932.JPG
    132.6 KB · Views: 276
  • IMG_0933.JPG
    IMG_0933.JPG
    128.7 KB · Views: 265
  • IMG_0934.JPG
    IMG_0934.JPG
    143.2 KB · Views: 283
  • IMG_0935.JPG
    IMG_0935.JPG
    99.1 KB · Views: 302
  • IMG_0937.JPG
    IMG_0937.JPG
    128.6 KB · Views: 284
  • IMG_0938.JPG
    IMG_0938.JPG
    94.7 KB · Views: 289
   / It's time; either get started or.... #43  
looking good. Hope yours works out better than mine did. :thumbsup:

Now that I see the rest of the tractor. It's exactly like the sears one I have.

Chad
 
   / It's time; either get started or....
  • Thread Starter
#44  
looking good. Hope yours works out better than mine did. :thumbsup:

Now that I see the rest of the tractor. It's exactly like the sears one I have.

Chad

Well, if you are considering your Sears unit for a backhoe add-on, any goofs I make can be instructive.:laughing: Any idea what year your tractor would be? I got mine as part of a package deal when I bought this farm yard and I never could find out what year it is.:(
 
   / It's time; either get started or.... #45  
Any idea what year your tractor would be? I got mine as part of a package deal when I bought this farm yard and I never could find out what year it is.:(

I'm not sure. But I assume it could be a 87 or 88 model. I wish I still had the original engine to it then I could decode the date of mfg.

Although that would be the date of mfg of the engine but it would be close.

I'll have to look around on it tomorrow and see if I can find any numbers.

My dad bought it for me and my brother from a friend back in 98 "could have been 99"

I know I was around 10 or 11 at the time. (lol just realized that rhymed) lol


I'm now thinking if I would have put the backhoe on the sears it might have worked out better. Because it had a better trans axle, and a better built frame.

But then again, it might not have been better since I think I over built the backhoe using too heavy metal. "The square tube" I'm sure they weigh at least 30 pounds a piece. The box they shipped in said the weight was 100 pounds and I bought 3.

And boy was that box heavy. Then add 3 cylinders and I'm guessing those are around 20 lbs each.

So I think the weight was just too much for the flimsy frame to handle it. Maybe if I would have used lighter material and smaller cylinders.

Oh well at least I tried.

Chad
 
   / It's time; either get started or....
  • Thread Starter
#46  
I'm not sure. But I assume it could be a 87 or 88 model. I wish I still had the original engine to it then I could decode the date of mfg.

Although that would be the date of mfg of the engine but it would be close.

I'll have to look around on it tomorrow and see if I can find any numbers.

My dad bought it for me and my brother from a friend back in 98 "could have been 99"

I know I was around 10 or 11 at the time. (lol just realized that rhymed) lol
Chad

Ha!!:laughing: You're a poet and don't know it!:cool:

I never once thought of trying the engine number. I think mine is still the original. Do you have the decoding info handy? I'll have to see if I can get at the number on mine and record it.
 
   / It's time; either get started or.... #47  
Ha!!:laughing: You're a poet and don't know it!:cool:

I never once thought of trying the engine number. I think mine is still the original. Do you have the decoding info handy? I'll have to see if I can get at the number on mine and record it.

That's true. I don't know that I'm a poet sometimes. It just automatically flows out.:)
---------
To decode the date of mfg look for the numbers below which says code.

For example on one of mine.

code
88110712

The first 2 numbers are the year, the 2nd 2 numbers are the month and the 3rd 2 numbers are the day.

So for example. This engine was made on the 11 month 7th day of 1988

And if I remember correctly the last numbers (12) is the number of the plant it was made in.

Hope that helps.

Chad
 
   / It's time; either get started or....
  • Thread Starter
#48  
That's true. I don't know that I'm a poet sometimes. It just automatically flows out.:)
---------
To decode the date of mfg look for the numbers below which says code.

For example on one of mine.

code
88110712

The first 2 numbers are the year, the 2nd 2 numbers are the month and the 3rd 2 numbers are the day.

So for example. This engine was made on the 11 month 7th day of 1988

And if I remember correctly the last numbers (12) is the number of the plant it was made in.

Hope that helps.

Chad
In that case, mine's a 1982.

In the meantime, my welder took a powder today. I was filling in the work I had spotwelded and the welder just up and quit.:mad::mad: It's an old Clarke wire feed and I doubt there is any hope for it. The cooling fan turns and all I get when I pull the trigger is a click.:confused2::(
 
   / It's time; either get started or.... #49  
In that case, mine's a 1982.

I'm sure mine is too then. I couldn't find any numbers on the tractor itself. I'm sure it had some numbers somewhere. Though I think I might have painted over them at one time.

Chad
 
   / It's time; either get started or....
  • Thread Starter
#50  
Well, with the help of a few wiser minds, Dr. NormL has his welder back!:thumbsup: It turned out to be a part of the circuit board that failed. The reason it failed, we think, is that the ground cable had some poor connections and resistance was way too high.:eek: Maintenance, man, Maintenance!!:(:ashamed::mad:... I patched up the burnt out bit of circuit board with a light gauge wire jumper, put it all back together, and WOO-HOO!!, it's working again!:D And I don't have to replace the welder - for now. That had threatened to scuttle the project for several months. There is a wedding coming up this summer and I MAY NOT go over budget!

Memo to self - Always make sure the welder and the work are ready for the extra current that's involved. The smoke you see rising may be coming from expensive sources!!:shocked:
 
 
Top