Homemade ROPS

   / Homemade ROPS #1  

svcguy

Gold Member
Joined
May 30, 2005
Messages
362
Location
West Kootenays, British Columbia
Tractor
Yanmar YM240D / Massey Ferguson 135 / New Holland TN75F / Pasquali 988 and 997 / Goldoni 20A, 226 and Maxter 70RS / Ferrari 76 and 85 / Holder A50 / Valpadana VMC 180 / Long 610 4WD
While understanding that it is never recommended to make your own ROPS, I recently purchased a nice YM240D without any protection. Using 3/16 tube and flat plate, I welded up a quick and dirty solution to prevent a roll. Attachment uses the four bolts at the rear of the tractor (PTO guard) and top of axle attachment. This gives a bi-directional attachment at 90 degrees with large fasteners and distributes the stress over a large part of the tractor. I also fabricated a new PTO guard out of 1/8 plate, using it to reinforce the rear attaching plate. Attached are a couple of pictures before painting. I will add some more once painted and installed.
 

Attachments

  • ROPS 001.jpg
    ROPS 001.jpg
    152.3 KB · Views: 5,421
  • ROPS 003.jpg
    ROPS 003.jpg
    150.7 KB · Views: 5,795
  • ROPS 004.jpg
    ROPS 004.jpg
    150.6 KB · Views: 8,469
   / Homemade ROPS #2  
Well, I don't know how well it will protect you, but it is about the prettiest welding I have ever seen. Correction-- it IS the prettiest welding I have EVER seen.
 
   / Homemade ROPS #4  
Somebody will probably hop in here to moan about the ROPS not being certified, but to those i say i'd volunteer to just buckle me up in the seat and roll the tractor.

Nice work, looks like you know your welder ;)
 
   / Homemade ROPS #5  
ok, is this for real? I agree, whether it works or not, that is some sexy looking welds!!!! Am I weird for saying sexy looking welds or just a TBN'oholic? Of course jealousy also kicks in, then there's the lonely nights with my welder having those one on one talks, and how I wish I could become a master welder, and blah blah blah.....

Awesome job and I'd sit in the seat of that tractor anyday with that ROPS!

Steve
 
   / Homemade ROPS
  • Thread Starter
#6  
Thanks everyone. I appreciate the feedback. I think there is good reason for people not to build their own ROPS, as they may not understand the limitations of design, their welds or the steel. Once you venture out on your own, you definately are on your own. I have built ROPS for cats and other equipment and they have been tested in the field and held up fine, including a multiple roll over on a track unit. I am confident this will do what it's designed to do, which is to prevent a flop from turning into a roll. It isn't as nice looking as a commercial bar, but then I'm not a stylish type of guy. Thought it may be of interest, but I do appreciate that there are many people who would not feel comfortable using a homemade ROPS.
 
   / Homemade ROPS #7  
Can you tell us about your welding setup? Those are really good looking welds.
 
   / Homemade ROPS
  • Thread Starter
#8  
I have three welding setups, a 295 AMP AC buzz box, a 225 AMP AC/DC Miller gas driven on wheels and a Lincoln wire feed. In this particular case, I used the AC machine. Those are AC stick welds, a root pass of 6011 for deep penetration and a finish pass of 7014 run slightly hot. I often use 7018 for both or the finish pass, but to be honest I was just being lazy and didn't want to trailer the DC unit over to where I was working. (The 7018 likes DC reverse, where the 7014 is fine with AC). A 7018 DC bead would be looking better than what you see there.

The 6011 root is old school, but I prefer it when welding for strength. The fast freeze characteristic and deep penetration allows all position welding with no slowing down. Being a bit impatient, it also means I don't have to be flipping everything around all the time to get into position.

The 7014 is like writing with crayons, but admittedly it leaves a smooth weld. I run it hot so it flows nicely and use a very slight side to side whip to ensure a nice smooth margin at the side. I also watch the puddle closely to ensure for good fill. Don't know what else to say, it certainly isn't my best welding but am glad everyone liked it.
 
   / Homemade ROPS #9  
svcguy said:
...Don't know what else to say, it certainly isn't my best welding but am glad everyone liked it.

If that isn't your best welding, I'd like to see pictures of your best welding.

I'd be ecstatic if my best welds looked somewhat close to your less than best as seen in the pictures.
 
   / Homemade ROPS #10  
Thanks for being brave enough to post this.:D The drilled holes at the top of the ROPS are for mounting something like lights? I look forward to seeing pics of it on the tractor. Great job!

Mike
 
   / Homemade ROPS
  • Thread Starter
#11  
Actually the holes were a late edition to the top tube. Thought I would add them while it was easy to use the drill press. Perhaps to add a lightweight canopy or to create a couple of rounded wood end extensions to split and take some impact if it dropped on its side. We live in the mountains of British Columbia and it's steep everywhere, quite easy to tip a tractor. One of the most efficient uses of land here is terracing; which is bad ju-ju when driving along the edge. In fact, one of the few places on earth where a person could fall to their death from the garden (well, not quite that bad, but it is steep).
 
   / Homemade ROPS #12  
Ah yes, the magic rods! I have mentioned before that 7014 is a favorite of mine. Great for horizontal welds, not much on out of position, but it makes a weld look really good. One of my friends comes over to help with a lot of my projects and can weld a lot better than me. The current project was a rock crawler bumper and we had just welded a piece of half inch plate on the face of it. The owner came by and watched as I laid the root pass with 6011 and compared it to the 7018 welds my buddy had done. I was welding rusty metal and the piece he had welded was cleaned. He told me that I should leave the welding to my buddy so I grabbed a 7014 and ran it at the end of his weld and the owner asked me why I didn't make them all look like that. I told him because that 6011 would be stronger on rusty metal than 7014 ever thought of being. He didn't listen because he bought a buzz box and the only rods he purchased were 7014.
You can lead a horse to water but you can't make him drink.
David from jax
 
   / Homemade ROPS #13  
I'm jealous now, that looks strong. I was welding or should I say trying to weld today with little luck. Kept sticking. I only have a small A/C stick welder. Any suggestions on the easiest to work with rod? Maybe you could give us online classes :)
 
   / Homemade ROPS #14  
jimgerken said:
Well, I don't know how well it will protect you, but it is about the prettiest welding I have ever seen. Correction-- it IS the prettiest welding I have EVER seen.

Afternoon svc,
Im with Jims' comments, thats a beautiful job, and BTW Jim is one heck of a good welder and fabricator !!!

I would say your ROPS is safer than a factory job ! ;)
 
   / Homemade ROPS #16  
svcguy said:
While understanding that it is never recommended to make your own ROPS, I recently purchased a nice YM240D without any protection. Using 3/16 tube and flat plate, I welded up a quick and dirty solution to prevent a roll. Attachment uses the four bolts at the rear of the tractor (PTO guard) and top of axle attachment. This gives a bi-directional attachment at 90 degrees with large fasteners and distributes the stress over a large part of the tractor. I also fabricated a new PTO guard out of 1/8 plate, using it to reinforce the rear attaching plate. Attached are a couple of pictures before painting. I will add some more once painted and installed.


svcguy,

Your welds look great.

How thick is the material you used for the Axle attachment points, I would think 3/8" material would be the best choice, if not 1/2". With all of the gusseting and reinforcements you have done on that thin plate , it looks like that may be the stress point / bolt pulling through the thin material in a roll over.

just my 2 cents, but then all of my friends call me captain overkill when it comes to building things.

Dan
 
   / Homemade ROPS
  • Thread Starter
#17  
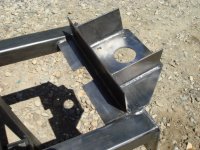
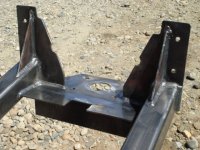
I agree that 3/8 or 1/2 would be stronger than 1/4, the question will be the actual bolts that come with the tractor that are used to secure rops on all YM240's. I think the fasteners will fail before anything else. I upgraded everything to grade 8 with large flat washers. The four rear bolts I replaced with full depth fasteners. The tubing has full length gussets at the base in front, as well as the sides and the axle plates are welded directly to the rear mounting plate. It's surprisingly stiff. As the YM240D only weights 1700 lbs, I think it will easily stop a roll. I agree though that more is probably better, as long as the weight of the ROPS doesn't roll it.

As far as the questions on the AC welding rod goes, I am a big believer in the 6011 rod for root passes, especially for out of position welds. It does tend to leave a rougher bead and first time users find it a bit frustrating to hold the short arc necessary for best results. It is a hot weld for root passes and you soon learn not to lift your helmet too soon when using it. You also can't hesitate too long with it, because it will dig right though if held in one place, but you can't rush either, or you get an ugly bead. Not all AC machines have a high enough striking voltage to handle the 6011. If not, it will almost always handle the 6013, a similar rod but easier to strike and maintain the arc. If your AC machine is not up to the 6011, you will probably find it can handle the 6013, another good general purpose rod.

The 7014 or 7024 rods leave a beautiful looking weld, but are not my choice for anything but a finish pass. That's not to say they are not a good rod, it's just they can fool a beginner with a beautiful looking bead that has virtually no penetration or holding power. And I support Sandman, never to be used on dirty metal. When used for a root pass on a fillet weld for example, it is not uncommon to suffer slag inclusion, even with clean metal. I have seen fillet welds having virtually no penetration except at the very edge, with slag underneath and on top. One trick to help avoid this is to tilt your work at 10 or 15 degrees, so you are welding 'uphill'. They also work well with stringer beads. You can assess your weld easily after cooling, because often the slag lifts by itself and sheds on a perfect bead. The 7014 or 24 needs a steady hand to avoid slag inclusion. I have used both for stringer beads and when cut and polished for inspection resulted in flawless fill. So they are good in the right application.

I really like the 7018. It is a great rod, versatile because it's low hydrogen, but not best for AC. Some machines do fine with it, but DC reverse supports the 7018 well. With the 7018 though, dry rod is critical. If you aren't getting good results with a 7018, suspect flux contamination. I use the 7018 on any suspect metal and it has all the characteristics of a nice looking weld with good strength and good penetration. Use it for welding growsers on cat tracks and that's a tough application.

To be honest, I think 90 percent of good welding is preparation. Before welding, I grind every surface that will take a bead. No dirt, oil, rust or oxidation allowed. I bevel every edge at about 30 degrees to ensure for good penetration and fill. When I run a bead, I don't worry about anything because I know I prepared it as well as possible. There are times when cleaning is out of the question and that's where 6011 shines. It may not be pretty, but the arc is brutal and blows through rust and paint.

Not sure about on line classes, but will offer the following recommendations for those interested:

Always make sure you are comfortable when welding, your bead will be smoother.

For flat welding, the general rule is your rod should tilt at the top about 20 degrees in the direction you are welding. A bad habit to pick up is welding at a 45 degree angle. For fillet welding, the rod should be at 45 degrees (splitting the 90) but again, the top tilting 20 degrees in the direction welding.

Try to keep the arc about 1/16 to 1/8 inch long. That isn't really very long. A bad habit to get into is holding a long arc (to provide more light) to see what's going on. Concentrate on keeping your arc short and lenses clean to observe it. Generally, if you are getting a lot of splatter, question your arc length. Some rod definately splatters more than others, but a long arc results in more splatter.

Don't rush the bead. A common mistake is moving to quickly, resulting in a thinner, weaker bead. Relax, watch the puddle, let the rod melt into it while maintaining your short arc and move ahead easily. Expect a finished bead to be about 3/4 the length of the rod when welding. This is a general rule, but works pretty well when assessing speed. 12 inch rod = 8 inch bead.

A good weld will appear slightly higher in the middle and taper nicely to the edges, about 1.5 times the width of the rod. If the edges are undercutting, amperage is too high, if the weld is round, amperage is too low. The ripples should be evenly tapered back, but not too long.

Make sure your rod is up to task. The first two (or three) digits represent the strength of the weld deposit. Third digit will usually be a 1 or 2. When 1, it means all position welding, flat, horizontal, vertical and overhead, when 2, it means only flat and horizontal. The last number has to do with specific properties of the rod and is generally not worried about. A 6011 rod is rated at 60,000 lbs per square inch holding power and an all position rod. A 7024 is 70,000 and should only be used on the flat or at horizontal.
 
   / Homemade ROPS #18  
Great post Svcguy! Hats off to you. (or maybe my shield?)
David from jax
 
   / Homemade ROPS #19  
Thanks for the welding article svcguy!! It was a good read and reminder. Thanks.:cool:

Mike
 
   / Homemade ROPS #20  
What size a box you got?

I have a cheapy campbel hausfield 70a buzzbox and use 1/16 and 5/64 'easystrike' rods with it. i swear you could strike an arc on a piece of wet cardboard with one of them. Not a supurb welder.. but was good to learn on.. and i still use it for thin gauge sheet metal..

My other buzzbox is a hobart stickmate xl 235.. nice machine even if AC only..

Soundguy

KubotainNH said:
I'm jealous now, that looks strong. I was welding or should I say trying to weld today with little luck. Kept sticking. I only have a small A/C stick welder. Any suggestions on the easiest to work with rod? Maybe you could give us online classes :)
 

Tractor & Equipment Auctions

2012 KOMATSU PC360LC-10 EXCAVATOR (A60429)
2012 KOMATSU...
EXCAVATOR QUICK DISCONNECT (A58214)
EXCAVATOR QUICK...
2019 Caterpillar 259D Compact Track Loader Skid Steer (A59228)
2019 Caterpillar...
2017 CATERPILLAR 420F2 BACKHOE (A60429)
2017 CATERPILLAR...
PowerBoss Admiral Plus 38C Ride-On Floor Scrubber/Sweeper (A59228)
PowerBoss Admiral...
2002 Bobcat 863 High Flow Compact Wheel Loader Skid Steer (A59228)
2002 Bobcat 863...
 
Top