chim
Elite Member
Although this is a "Build it Yourself" forum, I didn't do any of the welding on this project and the design was mostly based on builds by Paul Short and TractorNH. Our Weld Shop at work was pretty much out of things to do. With that opportunity, it made sense to let someone with a lot of experience burn some wire. When we get a snow, I travel about 1.5 miles each way for snow removal at the church. If something up front decides to come loose when I'm moving at 18 MPH, it's a bad deal.
I watched Paul's explanation a few times, plus several of his plowing videos. With the solid mount, it looked like the joystick required a lot of attention. The build was almost started on a mount that would match his. However, I read about a few people having problems with their plates fitting so I brought my newly acquired SSQA plate home to check it before starting. It didn't fit. Titan made it right by sending me a much better one, but that delayed me by about a week.
During the wait, I saw TractorNH's underslung build. Turns out the wait was a blessing in disguise. The chain lift should allow the blade to ride the surface without needing to fiddle with the joystick. It also keeps the weight of everything but the plow and A-frame on the tractor's wheels for the benefit of traction and control.
The parts I used are from a "spare" 8 foot Fisher plow we had at work. It'll be interesting to see how the L4240 will handle it. Looks like a lot of blade after seeing it all together. The plow was loaded onto a utility trailer at work yesterday (paint still wet) with a telehandler that was handy. On the way home I figured it would be easy to grab a chain and take it off with the L4240's FEL. Then it dawned on me to just drop the loader bucket and snatch it with the SSQA tabs. Worked fine.
One thing I thought about was to get the original hydraulic fluid out of the cylinders and replace it with Kubota juice. Seemed easy enough. Put the hoses - less couplers - on the cylinders and pull the piston with the end of the hose submerged in UDT and it would work like a soda straw in a Coke. The pistons needed to be held for quite a while to get the thick fluid into the cylinder. Raising the hose out of the fluid allowed the vacuum in it to yodel the fluid and clear the 5 feet of hose. Drop the hose in again and push the piston so it blew bubbles and came against the fluid it sucked in from the last pull. Repeated this till the cylinder and hose were full. Installed the coupler and then the cylinder and then filled the second one.
Turned the ignition switch ON, pressed the button the activate the third function system. Then asked BIL to push on the blade to compress the cylinder while I held one of the TF buttons on the joystick. That let the fluid into the tractor's reservoir. Next, took the second cylinder and installed the one end. It was then (intentionally) too long to get the other end pinned on. With the end of the hose in the fluid jug, I compressed it enough to get it pinned in place. Then the coupler was installed and connected to the the tractor. Fired the tractor up and we had left/right movement.
I did put a flow restrictor in one line (good) and the first jug of UDT I grabbed was really used motor oil (not good). The latter was addressed by filling and flushing the cylinder and hose thoroughly.
Pictures below:
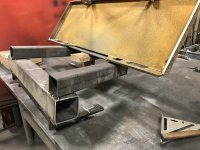
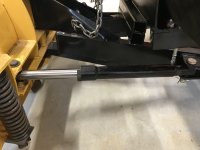
Mockup of the mount.
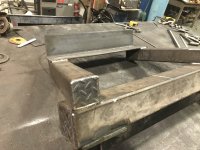
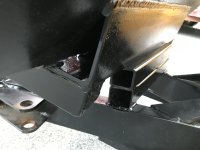
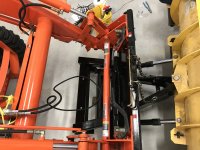
Main frame welded and waiting for the SSQA plate.
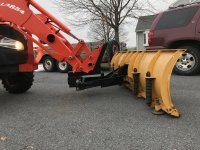
The plow just after it came off the trailer (no cylinders at that time).
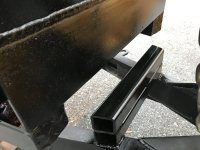
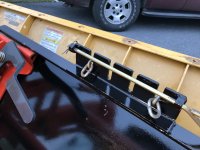
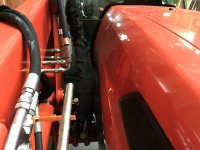
A "bumper" for the SSQA plate to press down if needed on packed-down snow.
Another shot of the bumper with the plate bearing down on it.
I watched Paul's explanation a few times, plus several of his plowing videos. With the solid mount, it looked like the joystick required a lot of attention. The build was almost started on a mount that would match his. However, I read about a few people having problems with their plates fitting so I brought my newly acquired SSQA plate home to check it before starting. It didn't fit. Titan made it right by sending me a much better one, but that delayed me by about a week.
During the wait, I saw TractorNH's underslung build. Turns out the wait was a blessing in disguise. The chain lift should allow the blade to ride the surface without needing to fiddle with the joystick. It also keeps the weight of everything but the plow and A-frame on the tractor's wheels for the benefit of traction and control.
The parts I used are from a "spare" 8 foot Fisher plow we had at work. It'll be interesting to see how the L4240 will handle it. Looks like a lot of blade after seeing it all together. The plow was loaded onto a utility trailer at work yesterday (paint still wet) with a telehandler that was handy. On the way home I figured it would be easy to grab a chain and take it off with the L4240's FEL. Then it dawned on me to just drop the loader bucket and snatch it with the SSQA tabs. Worked fine.
One thing I thought about was to get the original hydraulic fluid out of the cylinders and replace it with Kubota juice. Seemed easy enough. Put the hoses - less couplers - on the cylinders and pull the piston with the end of the hose submerged in UDT and it would work like a soda straw in a Coke. The pistons needed to be held for quite a while to get the thick fluid into the cylinder. Raising the hose out of the fluid allowed the vacuum in it to yodel the fluid and clear the 5 feet of hose. Drop the hose in again and push the piston so it blew bubbles and came against the fluid it sucked in from the last pull. Repeated this till the cylinder and hose were full. Installed the coupler and then the cylinder and then filled the second one.
Turned the ignition switch ON, pressed the button the activate the third function system. Then asked BIL to push on the blade to compress the cylinder while I held one of the TF buttons on the joystick. That let the fluid into the tractor's reservoir. Next, took the second cylinder and installed the one end. It was then (intentionally) too long to get the other end pinned on. With the end of the hose in the fluid jug, I compressed it enough to get it pinned in place. Then the coupler was installed and connected to the the tractor. Fired the tractor up and we had left/right movement.
I did put a flow restrictor in one line (good) and the first jug of UDT I grabbed was really used motor oil (not good). The latter was addressed by filling and flushing the cylinder and hose thoroughly.
Pictures below:
Mockup of the mount.
Main frame welded and waiting for the SSQA plate.
The plow just after it came off the trailer (no cylinders at that time).
A "bumper" for the SSQA plate to press down if needed on packed-down snow.
Another shot of the bumper with the plate bearing down on it.