My very own grapples!

   / My very own grapples! #121  
Adding a radius to what would be a square corner (or adding a fillet to a butt joint) will certainly add strength to a part by distributing the stress that would otherwise focus at the corner.

It's also safe to say that certain holes won't weaken a part if they are properly done.

And isn't a radiused corner just a part of a hole?

In that case, since a partial hole can strengthen, and a whole hole won't weaken, then partial holes really can strengthen a part...

And the Chinese Tool Store has a special on partial drills this month! I'm going to buy some and start adding partial holes to all of my projects so they'll be stronger.

I'd better quit while I'm still just an impartial observer...

- Just Gary
 
   / My very own grapples! #122  
Hi Folks I found this thread and skimmed through it. A very interesting project.

I have a ford 4000 that needs a new bucket on it and am thinking that will be this winters project for this year. After reading your grapple project I would like to add some to the new bucket.

At this time I have a question that was probably answered already and I missed it. So here goes, how thick is the material that you made the grapple from?

I won't be drilling any lighting holes in mine as I would guess once they are in place they will stay there and the tractor is big enough that the weight of the grappel will not be a factor.

Very nice build, you should be proud.
 
   / My very own grapples! #123  
Hi kc,
Welcome to TBN! Glad you like the grapple build too.
The material I used is 3/8" thick hot roll plate. The lightening holes were to keep the weight down for my wife's smaller tractor, but if you don't need that, it's certainly not necessary.

Are you going to get a toothbar on that bucket? I would highly recommend you do, because the bucket grapple like this works great with a toothbar. After several hundred hours using bucket grapples on this tractor and my other one, I wish I would've made the jaws long enough so they reach out all the way to the end of the toothbar teeth.

I originally designed these jaws to meet the edge of her bucket without the toothbar on. So what happens is when trying to grab stuff with a horizontal bucket, sometimes the toothbar pushes the object away a little bit and I can't grab it. So I have to make sure I'm under the object enough to grab it that way. I'm talking mostly boulders, bigger rocks and some stumps. Once I get them over the toothbar it's fine. Plus, no problem with shrubs, branches and stuff like that at all. You can see a toothbar would act like a rake or root bucket a little to make it easier to pick up stuff. With that in mind, having the jaws long enough to reach to the end of the toothbar is important.

There is another technique I use to overcome this drawback though. It's the clamshell technique where I raise the bucket up over the object in full dump mode. Then with the grapple wide open, I lower over the object making sure the toothbar tips and the grapple jaw tips touch the ground to swallow up the object into the bucket. I use that technique more for getting smaller plies of brush. Another way I use is to drive up with the bucket horizontal and the toothbar slightly lowered so the tips are even or just under the bottom of the object. Driving into it like trying to pick it. As I do that, I simultaneously start to lift and dump the bucket until it rolls the object with the roll of the bucket. Then set the grapple jaws to capture it. I use that technique more for boulders that tend to roll out of the way or if they are so big that I need the curl power to get it up after I've grabbed it. Both ways work real well, but like I said, a toothbar will make those bucket grapples work wonders.

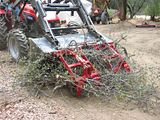
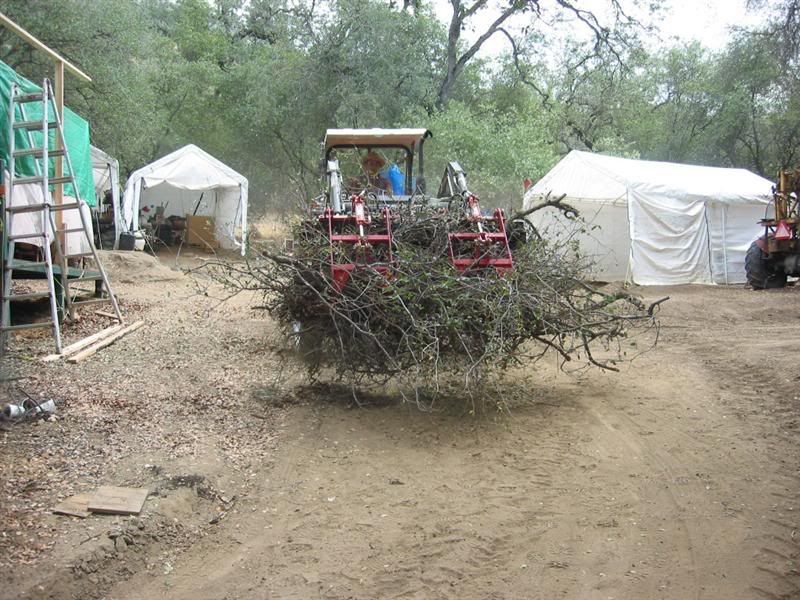
For example, I took these pictures using my other tractor to show the technique. Here is a small pile that would scoot forward of the tractor if I just dove into it. So clamshelling the pile keeps it from getting away, it crushes it down and allows you get almost all of it neatly and cleanly.
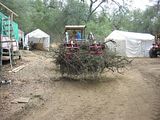
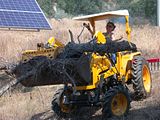
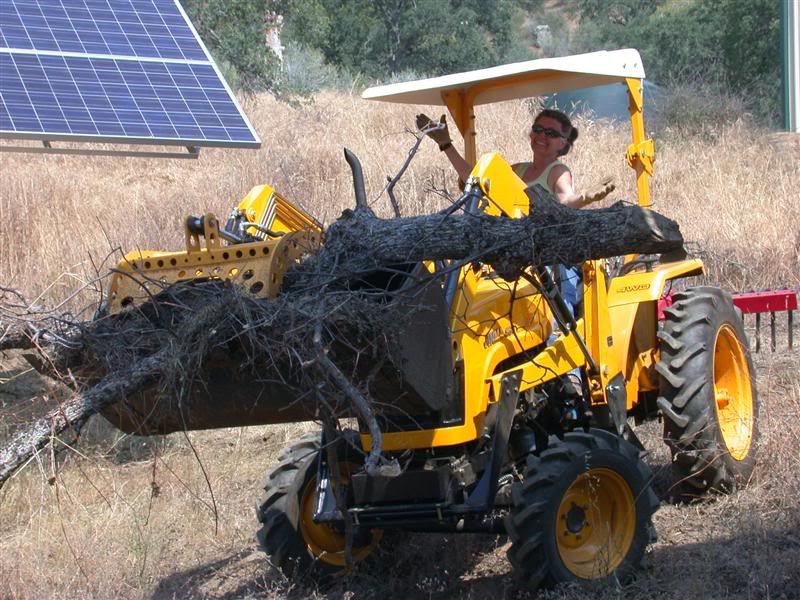
Other stuff you can get easily like Loretta is doing with her tractor.

 
   / My very own grapples! #124  
3RRL, I had not considered making a tooth bar for the bucket up to this time.
I don't think that I would really need a tooth bar although it would be nice at times.
A set of grapples for picking up the tree limbs after pruning is what I would be looking for.
At present, I think that I have enough steel that I could recycle into a set of grapples.
The first thing that I need to do is rebuild the bucket. Some where in a previous life the bucket had the cutting edge tore off and the metal tore away from the side of the bucket.

Who ever welded it should never have been left alone with the welder.
 
   / My very own grapples! #125  
3RRL, I had not considered making a tooth bar for the bucket up to this time.
I don't think that I would really need a tooth bar although it would be nice at times.
A set of grapples for picking up the tree limbs after pruning is what I would be looking for.
At present, I think that I have enough steel that I could recycle into a set of grapples.
The first thing that I need to do is rebuild the bucket. Some where in a previous life the bucket had the cutting edge tore off and the metal tore away from the side of the bucket.

Who ever welded it should never have been left alone with the welder.
Good luck with fixing your bucket ... first things first of course.
But I'm telling you the grapples will certainly work better, grab the limbs and stuff better with a toothbar. Although a bucket grapple will certainly do what you want, a key to successful grappling with a bucket grapple is the toothbar.
It takes the smooth edge out of play which tends NOT to help pick up limbs, cuttings and such. The tooth bar is what makes the bucket grapple act just like a real grapple that has teeth for sliding under the limbs, brush, rocks and logs much better than a solid edge. It's the slight bit of extension from the sides of your bucket that lets you get and hold those logs and stuff.
I'm saying this since you need to repair your bucket anyway, you might consider doing it all in one shot? You could make one or get one from Markham like I did. I think they are under a couple hundred bucks.
Plus you could always take it off.
 
   / My very own grapples! #126  
Rob, I have not decided aginst the tooth bar as I can see where it could be a help.
I would have to make it so that it would be removeable but than again maybe it would not. I will see when I get to that point.
You might find this interesting. It is some pictures on photobucket of things that I have done.

kcprecision - Photobucket - Video and Image Hosting
 
   / My very own grapples! #127  
OK, that's good to know. lol ... I probably sound like a nut about the toothbar:).
Mine is removable but I've never had it off in over 3 years now.

I didn't go through your entire album because my Internet is very slow at the property. I did see your boat. What is that, what kind of engine?
I also see you make a lot of your own stuff like I do. So all this tractor stuff will be duck soup for you. And man, it's been a long time since I ran a horizontal boring mill. Looks like you got a couple of them? We used to do all our pocket work on horizontal mills back in the day. Chips fel out so you don't cut them twice and stuff is easy to measure.
Is that your shop in that photo then? I see an Elk and Mule deer antlers above what looks like your Bridgeport in the background. Too bad about your buddy's lathe! Where's yours?
 
   / My very own grapples! #128  
Now that you mention it I don't have a picture of my lathe on there.:eek: The lathe is a jet 13X40 with a anilan DRO on it. Yes the building is my shop the enclosed area is 32X48 ft.
The boat is steam. I machined the engine from a set of castings that a friend had purchased and never completed. The engine is a 3X5X4. The hull is from a WW2 liberty ship. The boat sure draws the looks when we are launching or pulling out. People can't believe that it runs on wood.

The horizontal mill is a Nichols, kind of a neat little mill. Went to an auction and started the bidding at $50 and it was mine. The Bridgeport is a Taiwan copy but it has been a good piece of machinery.It also has a anilan DRO on it.
 
   / My very own grapples! #129  
Rob -

Another silly question as I (slowly) continue my own grapple work. I have a length of 1" water hardening drill rod that I had planned to use for pins, but when I looked into zinc plating them (for a little rust control) I realized that alloy steels do not plate well (something about hydrogen embrittlement). I don't think that I can get away with chromate dipping them without zinc plating them first.

Anyway, I suspect that you used a milder steel for your pins. What did you use, and what have you done for the rust that will form on the ends (other than rub grease on them)?

Down here in Florida even the rust rusts. Plated and chromated parts tend to last much longer, so I want to do what I can to slow down the process.

Regards,

- Just Gary
 
   / My very own grapples! #130  
Rob -

Another silly question as I (slowly) continue my own grapple work. I have a length of 1" water hardening drill rod that I had planned to use for pins, but when I looked into zinc plating them (for a little rust control) I realized that alloy steels do not plate well (something about hydrogen embrittlement). I don't think that I can get away with chromate dipping them without zinc plating them first.

Anyway, I suspect that you used a milder steel for your pins. What did you use, and what have you done for the rust that will form on the ends (other than rub grease on them)?

Down here in Florida even the rust rusts. Plated and chromated parts tend to last much longer, so I want to do what I can to slow down the process.

Regards,

- Just Gary
Hi Gary,
Actually, I used case hardened H-13 leader pins and bushings for her grapples.
They are left overs when I do P&M on the plastic injection mold bases. Sometimes I use Nitrided ejector pins which have a super hard surface. They all make great pins.


No rust preventative.
I figure a good amount of grease on the working surfaces should be good enough. Don't forget to make the pins so they are greasable and will lubricate the entire inner surface of the bushings. The photos below show some of what I did to do that, like add grease holes and flats on the pins. I recessed the zerk fitting to reduce the chance of snapping them off.
If I were you, I'd just heat treat that water hardening drill rod after putting the grease grooves and such in and not worry about plating them. I'd think the grease will prevent any rusting for a long time.


Tractor & Equipment Auctions

2009 IC Corporation PB105 School Bus (A48081)
2009 IC...
2023 Case IH 4412F 12 Row 30 In. Row Spacing Folding Corn Head (A50657)
2023 Case IH 4412F...
2006 Land Rover Range Rover Sport 4x4 SUV (A48082)
2006 Land Rover...
2013 Fiat 500 Hatchback (A48082)
2013 Fiat 500...
2 Vintage Metal Signs (A48082)
2 Vintage Metal...
2018 INTERNATIONAL 4300 24FT NON CDL BOX TRUCK (A51222)
2018 INTERNATIONAL...
 
Top