TuffTorq K46 Repair Guide with Pictures

   / TuffTorq K46 Repair Guide with Pictures #181  
I was wondering the same thing. If you look at the exploded parts diagrams, they appear to be identical, with the exception of the CR which is the only one I know of with the auto-locking diff. The previous poster is probably right about different shaft lengths, though they are all 3/4" dia. The other likely difference is the orientation of the wedge the motor runs on. The wedge can be installed two ways which determines the direction of axle rotation v. pedal lever input. That's something that you can change if necessary by a simple "surgery". One additional variation is the upper case. Most have what they call "internal reservoir" which amounts to enough room for the oil to expand and contract safely. There are two or three part numbers that have a different upper case without the vent, and come equipped with a plastic reservoir that fits onto the fill opening. And there is at least one variant that has the drains in the lower case. They may be the same ones with the external reservoir, but I'm not sure. That's the extent of my insight into all the variants.

It's entirely possible that there are only a few unique assemblies. It wouldn't surprise me that each of the OEMs would insist on their own K46xx nomenclature just to distinguish a JD K46 from a Husq K46 (etc.), even though the assemblies may be otherwise identical. In fact, I'd go so far as to say that this is highly likely.

I suggest that you find the IPL for each variant you're dealing with, then compare them. It would be really helpful to report back what you find.
 
   / TuffTorq K46 Repair Guide with Pictures #182  
Thanks to LotsofGreenGrass for posting this awesome repair guide, GixxersRevolt for the excellent YouTube visual tutorial on the rebuild process, and everyone else for their insight, pictures, and advice/comments!!!!

Last week after reading all of this I found out the issue I was having with my JD L118 transaxle not being able to move up and down my small inclines were due to the Transaxle needing to be repaired. About twice a week I mow our yard which is about 3/4 acre, the tractor has 334 hrs on it and was purchased new in 2006 from the local John Deere dealer.

I had done some checking on the internet and found a conversion for my unit to switch over to the K66 Trans, but with a price of $1,698.00 which was a close to the price I paid for the tractor in the first place was a bit too pricy for my taste. ;) I mentioned the cost of the conversion to one of my co-workers and he also did some searching via Google and found this great thread you all have posted. I've read it all word for word, reviewed all the pictures, watched the YouTube videos at least three times :laughing:, and then after reading bobH1's comment "Anyone who is hesitant to try this themselves, please know that if I can do it, you can too!" that convinced me to go for it.

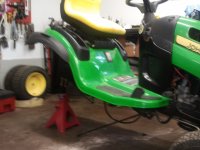
I contacted TuffTorq and ordered the complete rebuild unit which showed up about 3 days later with three quarts of 5W50 Synthetic Oil which I had ordered. As soon as I arrived home from work I started the process of pulling the trans out of the tractor. I pulled the deck off the tractor just to give me more room for the jack stands to support the tractor. All total w/, removing the mower deck and transaxle, I think it about 20 mins to get the unit off the tractor. Due to the current Midwest heat wave, I took the transaxle down into my basement shop to work on it where it was nice a cool. :D I opened both the sealing cap as well as the vent cap and drained all the old oil out of the unit. It was pretty dark in color and the magnet located below the sealing cap was covered in metal flakes. I cleaned the magnet, which took quite a bit to get it clean, while the case drained.

Once the case was drained of all the oil I could get out, I split the case open and found the second magnet in almost the same condition as the first. (Someone else mentioned in the thread it wouldn't be bad when purchasing a new unit to drain and refill the oil after about the first 50 hrs just to make sure any contaminates are removed. It would be a bit of a job but could provide additional life to the trans.)

Due to all the great information in this thread, I didn't drop the small pin or any other parts. I swapped out both the trans engine and pump, put in the additional internal bracket and magnets on to the unit, cleaned all the old gasket material off the housing flanges and got the unit ready to put back together. I used the RTV gasket sealer which TT sent me in the rebuild kit and sealed up the unit. I left the case to sit 24 hrs for the gasket to cure completely. I noticed the sealing cap had a few minor cracks started in it so I contacted Tuff Torq to purchase a replacement sealing cap as well as a vent cap. I found out they had a $25 minimum order and since the parts were only about $ 6.00 I wasn't going to pay the additional amount. TT provided the JD p/n so I contacted our local JD dealer and ordered them. It worked out due to JD's markup to cover shipping and all to be about $19.00. Even though I wasn't happy about the mark up for JD I went ahead and placed the order. :( If I would have known about the minumum order and needed the additional parts I would have odered them with the rebuild kit. :(

While waiting for the gasket to cure completely, at lunch the next day, I decided to re-read the thread posts just to make sure I didn't miss anything before adding the oil and putting the unit back on the tractor. (I know, I should have done that first before closing up the trans housing.) Well, you guessed it, I missed the washer on the bottom of the motor so I had to pull the housing back apart and pull the motor just to put that darn washer from the old motor onto the bottom of the new motor. Well, as it turns out, it was a good thing I had to split the case apart again. I found the gasket wasn't sealing as well as I had hoped. It had a lot of oil mixed into the gasket areas of the flange when I split the unit. I realized why this happened, it was because after sealing the unit up and prior to the gasket curing I didn't think and turned the unit back upright rather than leaving it in the upside down orientation. There must have been just enough left over oil on the gearing which worked into the gasket when I turned over the unit the night before. (Live and learn)

Since I had to reseal the case, I elected to go to the local auto parts store and purchase the black RTV, as suggested here in the thread, which is better for oil and gas environments. I brought it back home and used it rather than the aluminum RTV from TT. It did a much better job when sealing up the housing. This time I also didn't flip the transaxle back to the upright position until after 24 hrs when I knew the gasket was completely cured. :thumbsup:

Last night when I returned home after picking up the new seal and vent cap I checked all the bolts in the housing to make sure they were tight. I then turned over the trans to start the oil fill process. I put in the ~2.3 L of oil and after working out all the air bubbles I sealed the caps down and brought the trans back out into our shed to reattach to the tractor. (I think the reattachment went faster than when I pulled it off plus it was much cooler this day to work out there.) ;)

After reconnecting everything, excluding the backup safety switch (which I wouldn't recommend leaving disconnected), I ran the transaxle through the purge process. It really didn't seem to need it but I figured I'd do it just to be on the safe side. The transaxle seemed to work perfectly but just in case I figured before reattaching the mower deck I would take it out for a spin. All worked flawlessly and I quickly took the tractor back in to the shed to reinstall the mowing deck. :D 10 minutes later I was back out and mowing. :cool:

The tractor mowed like it did the first day I got it home 5 yrs ago! I was so happy!!!!

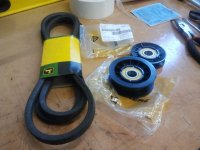
BTW, while the transaxle was off the tractor I also replaced the drive belt. I was glad I did since there were two major nicks/cuts partway through the belt. The only issue with replacing the drive belt is, you have to remove the steering column to put the new belt on as it passes around the steering column. Make sure you don't have the belt twisted, it will try to, and end up with a figure eight in the belt. If the twist in the figure eight is on the engine side of the steering column you will be taking the steering off again to fix it. How do I know.... Well, lets just say I've lived and learned a few things on this tractor in the past week or so... :laughing:

So, after mowing the lawn for about 45 mins or so, the tractor acting like it's old self and me grinning the entire time I was a happy camper/John Deere owner!!! :D :thumbsup: :cool:

I can't thank you all enough for this great thread! You guys are the best! Thank you again, and again, and again!!! I'm now going to mow off into the sunset sharing my new found knowledge and expertise with all in our area on how to fix this issue. I know at least 4 other people in our neighborhood who are at some point going to be in the same boat as the rest of us all were. ;)

Hummm, maybe I can do this for them in my spare time for $$$ ;) LOL!
 
   / TuffTorq K46 Repair Guide with Pictures #183  
Glad you were ultimately succesful in your re-build effort. Do you have the means to check the transaxle case temp after you do your mowing ?
 
   / TuffTorq K46 Repair Guide with Pictures #184  
Glad you were ultimately succesful in your re-build effort. Do you have the means to check the transaxle case temp after you do your mowing ?

No I don't currently have a way to check the temp of the transaxle case. :( I need to pick up a IR temp gauge and then check it. I'm not sure if that would provide the most accurate internal temp of the oil but it would be better than nothing. I also would need to know what the correct temp range would be so I have an idea if I'm in the correct temp range for long term durability of the Trans. ;)

I know when I was done mowing I put my hand on the bottom of the Transaxle and it was warm to the touch but not to the point I couldn't leave my hand there. To me I would think that would be in the low 100's but not sure. (I need to get my hand/touch sensor calibrated. LOL!) :laughing:

One little note/comment someone made in one of the thread post which I didn't know about was to always run the engine in full throttle when moving the tractor, ie. mowing, hauling, plowing, etc. I guess I never thought of that but with the engine running in full throttle it makes the fan blades over the transaxle move faster thus pushing more air over the fins on the trans keeping it cooler. :cool:

- Jeff -
 
   / TuffTorq K46 Repair Guide with Pictures #185  
I need to pick up a IR temp gauge and then check it.

If you have a Harbor Freight in your area, they have a serviceable IR thermometer with laser pointer that's usually available for under $30. Sign up for their emails and within a few weeks they'll probably have a promo for it. I have had one of these for a couple of years. It's okay. It's within a couple of degrees on objects where I knew the temperature. IR thermometers have a built-in error due to the IR emissivity characteristics of the surface (bare dull aluminum will read a little low) but we're not talking about lab-quality requirements here.

My 4-hour K46 reads about 115-120F on the bottom of the case and 122-126F at the top immediately after mowing with ~85F ambient temperature. I can hold my hand on the bottom of the case. It's a little uncomfortable, but not hot enough to redden the skin at all. So your "hand calibration" is probably in the ballpark.

Finally, the "RTV" you used.... There are all kinds of "RTV". Different chemistries for different applications. If you used one that's labeled for gasket-making and approved for aluminum (like those made by Permatex) you're good to go. However, if you got a tube of generic "RTV" from Lowe's and it smells like vinegar.... Not a good thing at all. That vinegar smell is acetic acid and it will attack and corrode the aluminum. If that's the type you used, you should seriously think about pulling that transaxle out again and replacing the gasket material with non-acidic type. I wouldn't use anything but the material from TT or Permatex self-forming gasket material in this application, for example:
http://www.permatex.com/products/Au..._Oil_Resistance_RTV_Silicone_Gasket_Maker.htm
 
   / TuffTorq K46 Repair Guide with Pictures #186  
Awesome write-up! John Deere says its a sealed unit and not servicable. Thanks to you, it is servicable. I just got off the phone with Derrick. I ordered the parts. Looking foward to making my tractor new again. Thx again for an awesome post!!
 
   / TuffTorq K46 Repair Guide with Pictures #187  
If you have a Harbor Freight in your area, they have a serviceable IR thermometer with laser pointer that's usually available for under $30. Sign up for their emails and within a few weeks they'll probably have a promo for it. I have had one of these for a couple of years. It's okay. It's within a couple of degrees on objects where I knew the temperature. IR thermometers have a built-in error due to the IR emissivity characteristics of the surface (bare dull aluminum will read a little low) but we're not talking about lab-quality requirements here.

My 4-hour K46 reads about 115-120F on the bottom of the case and 122-126F at the top immediately after mowing with ~85F ambient temperature. I can hold my hand on the bottom of the case. It's a little uncomfortable, but not hot enough to redden the skin at all. So your "hand calibration" is probably in the ballpark.

Finally, the "RTV" you used.... There are all kinds of "RTV". Different chemistries for different applications. If you used one that's labeled for gasket-making and approved for aluminum (like those made by Permatex) you're good to go. However, if you got a tube of generic "RTV" from Lowe's and it smells like vinegar.... Not a good thing at all. That vinegar smell is acetic acid and it will attack and corrode the aluminum. If that's the type you used, you should seriously think about pulling that transaxle out again and replacing the gasket material with non-acidic type. I wouldn't use anything but the material from TT or Permatex self-forming gasket material in this application, for example:
http://www.permatex.com/products/Au..._Oil_Resistance_RTV_Silicone_Gasket_Maker.htm

OK, Now you gave me a reason to purchase a new tool. :thumbsup: Like any of us need a reason.... ;) I'll be looking up Harbor Freight and joining their e-mail list. :cool:

As for the RTV, I forgot to list in my posting I used Permatex gasket sealer. (I wondered why it didn't have the smell of the stuff you get from a Home Depot. Never even thought of the vinegar smelling stuff reacting with the aluminum, but you're exactly right about that. I could see where someone would pickup a tube of the home center stuff and try and use it. That would be bad) Fortunatly I knew enough, or didn't even allow myself to think about hardware store RTV and only thought of automotive gasket sealer, to use the product you suggested;

http://www.permatex.com/products/Automotive/automotive_gasketing/gasket_makers/auto_Permatex_Ultra_Black_Maximum_Oil_Resistance_RTV_Silicone_Gasket_Maker.htm

I couldn't have asked for a better seal on the housing! :thumbsup:

So now that the JD tractor is back up and working as good as new, I need to hook up my trailer to it and start trimming hedges between mowing and the recent rain falls we finally have been getting in our area. I'm sure the grass will start growing quickly now that we've had a few rains, plus the lawn service guy was out yesterday treating the lawn to help me use my tractor more... :tractor:
 
   / TuffTorq K46 Repair Guide with Pictures #188  
i got my john deere L111 tuff torq k46 pulled apart. the main parts i take to a machine shop are the cylinder blocks and the center case. am i right?
 
   / TuffTorq K46 Repair Guide with Pictures #189  
No I don't currently have a way to check the temp of the transaxle case. :( I need to pick up a IR temp gauge and then check it. I'm not sure if that would provide the most accurate internal temp of the oil but it would be better than nothing. I also would need to know what the correct temp range would be so I have an idea if I'm in the correct temp range for long term durability of the Trans. ;)

I know when I was done mowing I put my hand on the bottom of the Transaxle and it was warm to the touch but not to the point I couldn't leave my hand there. To me I would think that would be in the low 100's but not sure. (I need to get my hand/touch sensor calibrated. LOL!) :laughing:

One little note/comment someone made in one of the thread post which I didn't know about was to always run the engine in full throttle when moving the tractor, ie. mowing, hauling, plowing, etc. I guess I never thought of that but with the engine running in full throttle it makes the fan blades over the transaxle move faster thus pushing more air over the fins on the trans keeping it cooler. :cool:

- Jeff -

Cheapest way to check the temp is buy an "Ideal" Model #:61-310 brand digital multitester w/ k type thermocouple for $21.32 at Lowes. I attached the probe the top of the tranny with a bracket and presto instant tranny temp gauge.I am going to get another probe for the rear tranny also. I leave the thermocouples in place and I remove the tester and know can use it for all my other electrical needs.
 
   / TuffTorq K46 Repair Guide with Pictures #190  
I am all set to begin the K46 rebuild, just waiting on parts. I have the trans removed and cleaned. I also drained the oil by removing the filler cap (vent valve?). Only thing is I wrecked the cap taking it off. The rubber was cracked. No big deal, John Deere has one locally. To the people that will do this repair, I would order this inexpensive part along with the rebuild parts.

I also found out one of my drive belt idler wheels had a seized bearing. The belt had worn through the plastic wheel, and was rubbing against the bearing itself. I had to use a claw puller to get the idler wheels off.

Anyway, I will take some pics along the way.

I am a little concerned about the 'purging' process I read here. I don't quite understand the directions. But, I'll figure it out. Some people said they didn't need to do this.
 

Attachments

  • K46 dirty(640x480).jpg
    K46 dirty(640x480).jpg
    182.4 KB · Views: 1,825
  • k46 clean (640x480).jpg
    k46 clean (640x480).jpg
    189 KB · Views: 1,424
  • tractor (640x480).jpg
    tractor (640x480).jpg
    172.1 KB · Views: 997
  • new parts (640x480).jpg
    new parts (640x480).jpg
    194 KB · Views: 907
   / TuffTorq K46 Repair Guide with Pictures #191  
I am a little concerned about the 'purging' process I read here. I don't quite understand the directions. But, I'll figure it out. Some people said they didn't need to do this.

You will do yourself a huge favor by downloading and studying the K61 repair manual. I posted the link to it a couple of pages back. Among a wealth of other relevant information on rebuilding this thing, it describes the purging process very clearly. You should pay particular attention to the description of procedures and techniques for motor and pump reassembly. Torque specs and tightening order are useful too.

Purging ought to be easy to accomplish on the bench, using a drill to turn the input shaft. That way you can top off the oil level easily if it's necessary. If there's a lot of trapped air that you purge when it's installed in the tractor, adding oil is much more difficult.
 
   / TuffTorq K46 Repair Guide with Pictures #192  
HEADS UP, GUYS


If you have a candidate K46 for repair, think twice about it. You can buy a BRAND NEW K46CR (the one with the auto-locking differential) for $436 at Sears Parts. Here's the link:

http://www.searspartsdirect.com/partsdirect/part-number/426121/0071/917

But WAIT! If you call right now (and you know we can't do this all day), you can apply a 10% off coupon code to any Sears Parts order!! Folks, this is a Really Good Deal. For $392 (plus ~$15 shipping and whatever tax you have) YOU GET A BRAND NEW COMPLETE TRANSAXLE WITH AUTO-LOCKING DIFF. The Hilliard differential alone is $252!

Note that the description of the part is a little sketchy, but if you Google the part numbers, you'll see what it is. Don't take my word for it, try it for yourself.

The coupon code is: Px11xSPNGEMAILLG

I tried it. It works. It expires 30 Aug.

While you're there, I suggest that you check out the prices for supplies like blades and oil filters. I found my Kawasaki OEM oil filters for $2.39 ea. You can't beat that with a stick.

Ok, now I'm feeling a little sick. I probably would have purchased the new auto-locker for $392. Thats only $100 more than I spent on the parts to fix my non-locker. I should have read a little deeper into these posts. I wonder if Tuff Torq takes returns?

When I drained the oil from my K46, I back-lit with an LED light, and there was a significant amount of metal shining. Not the worst I've seen, but not the best either.

Shoot! Now I don't know what to do!
 
   / TuffTorq K46 Repair Guide with Pictures #193  
You will do yourself a huge favor by downloading and studying the K61 repair manual. I posted the link to it a couple of pages back. Among a wealth of other relevant information on rebuilding this thing, it describes the purging process very clearly. You should pay particular attention to the description of procedures and techniques for motor and pump reassembly. Torque specs and tightening order are useful too.

Purging ought to be easy to accomplish on the bench, using a drill to turn the input shaft. That way you can top off the oil level easily if it's necessary. If there's a lot of trapped air that you purge when it's installed in the tractor, adding oil is much more difficult.

Thx GenElec! I saw your post and downloaded the K61 pdf. Good stuff. Thx!
 
   / TuffTorq K46 Repair Guide with Pictures #194  
back-lit with an LED light, and there was a significant amount of metal shining.

Hmmm. That's interesting. It would be nice to know what metal that is, and how come it isn't stuck to the magnets. I don't know all what metals are in there, but for sure a variety of ferrous materials for the mechanics and aluminum for the case. You wouldn't expect a lot of aluminum floating around unless something very very bad, like a spun bearing, happened. Possibility for some brass or bronze I suppose. This, BTW, would explain the use of motor oil instead of the comparable 75W-90 gear oil that you'd sort of expect to find in there.

Do you still have the used oil? Any chance you'd be willing to send it into Blackstone for (~$25) analysis? That could potentially add a lot of new useful data to this thread.

If you want to feel even worse, look at the other non-locking K46s. I don't know what those variants are, exactly, but based on what you said above, you could have gotten a whole new one for about the same price as the repair parts.
 
   / TuffTorq K46 Repair Guide with Pictures #195  
Hmmm. That's interesting. It would be nice to know what metal that is, and how come it isn't stuck to the magnets. I don't know all what metals are in there, but for sure a variety of ferrous materials for the mechanics and aluminum for the case. You wouldn't expect a lot of aluminum floating around unless something very very bad, like a spun bearing, happened. Possibility for some brass or bronze I suppose. This, BTW, would explain the use of motor oil instead of the comparable 75W-90 gear oil that you'd sort of expect to find in there.

Do you still have the used oil? Any chance you'd be willing to send it into Blackstone for (~$25) analysis? That could potentially add a lot of new useful data to this thread.

If you want to feel even worse, look at the other non-locking K46s. I don't know what those variants are, exactly, but based on what you said above, you could have gotten a whole new one for about the same price as the repair parts.

I just went and looked at the oil again. I poured the oil through a screen/paper towel thing I made and it had moderate shavings. Looked about what I see in the boat motors I have done.

The rebuild parts arrived today. I am going to talk to Tuff Torq tomorrow about returning - box is untouched. If no go on that, I'll just continue with the rebuild.

I am re-tasking this tractor for snow-only. (44" blower, weights, tire chains), so the locker diff is something I am very interested in. The drive is 70' with about a three car area in front of the garage... no hills. Pretty simple, but lockers are nice.

I'll give an update on the parts return tomorrow. Otherwise, pics of the rebuild this weekend.

Thx Guys! Awesome Thread!
 
   / TuffTorq K46 Repair Guide with Pictures #196  
K46BE upgrade to K46CR (locking diff model) Update:

I just talked with Tuff Torq and they said that the CR model is only installed on tractors with 20" tires. I have 22" inch tires. They said the CR model will not 'fit' my tractor, and they wouldn't go into further detail.

I am trying to understand what tire size has to do with this??? Both models have 3/4" axle shafts and the casing depicted in the exploded diagrams appear to an exact match.

Tire size???
 
   / TuffTorq K46 Repair Guide with Pictures #197  
Update 2:

Talked to a pretty knowledgable guy at John Deere (pre-sales, at Corporate). He said the K46CR will fit, but the additional tire size will put more strain on the locking mechanism than it was designed for. 22" tires are only 10-percent larger than the 20", seems insignificant, but maybe he is right. The locker would be nice, but now I am thinking it may be just one more thing to fail, and I don't know the cost of those parts.

I told him I was putting on 80-pounds of Suitcase weights and tire chains, then he really started to not like the idea.

I am thinking I may just rebuild my BE model. I am not normally this indecisive... believe me!!
 
   / TuffTorq K46 Repair Guide with Pictures #198  
Ehhh, I'm not so sure these opinions are well grounded in physical principles. Cutting to the bottom line, a given torque at the differential will yield 10% less drawbar force with 22" tires than it does with 20" tires. Where does all this "extra" torque come from that's supposedly going to destroy the differential? From the same motor and reduction gearset, that's where. IOW, the motor and gearset is going to deliver 123 lb-ft into the drive axle of a stalled vehicle whether the tires are 8" in diameter or 28" in diameter. Only the maximum drawbar force will vary with tire size. The capability of the transaxle to deliver torque is a function of the transaxle, not of the tire size. Tire size dictates merely the motive force v. output torque scale factor.

Now, you *could* look at this another way: For a given load on the vehicle (e.g. shoving a snowblower into a pile of snow), the larger tires will demand more torque from the transaxle for a given amount of push, thus the internal loads on the moving parts will be higher (everything else equal) and presumably wear will increase and lifetime will decrease. Of course, this is true for a continuum of tire sizes. The thing will last X hours with 22" tires, 1.2X hours with 20" tires, and 1.5X hours with 18" tires under the same use model.

If you put high quality synthetic oil in there and change it every 100 hours, there will be no problem with the larger tires, IMO. You have the added advantage of using the machine mainly in cold weather which will also have a favorable effect on oil breakdown and wear, though with a high quality synthetic, that will probably not amount to much. If you added an external oil circuit with filtering, it will probably last much longer even without the 100 hour oil changes.

My new K46CR now has 4.1 hours on it, with the factory 10W-30 API-CD mineral oil fill. As soon as the miserable hot/humid weather here lets up it's coming out for draining and refill with Amsoil 15W-50 synthetic racing oil. It's going to be interesting to see what, if any, metal is floating around in the oil with this little use on it.
 
   / TuffTorq K46 Repair Guide with Pictures #199  
One thing: it's possible that the transaxles intended for 22" tires use a different gear ratio than those intended for 20" tires. Short of disassembling a variety of transaxles and counting gear teeth, I'm not aware of any way to determine this with any certainty. If this is true, then I'd have to agree that you're probably better off with the intended gear ratio. Also, the maximum rated output torque, which is widely quoted at 123 lb-ft (IIRC) would be proportionally different for 20" applications than for 22" applications.

It would be helpful, but not definitive, to see if the part numbers of the intermediate gear or the ring gear on the differential are different for transaxles intended for the two tire sizes. Maybe some of the readers here can post up their K46 variant along with the tire size so we can compare internal part numbers.
 
   / TuffTorq K46 Repair Guide with Pictures #200  
GenElec,

Appreciate the info and the contribution to this thread! I've decided to go forward with rebuilding my existing K46BE. I am still relatively new to tractors, and this definately won't be my last. I've learned alot about the tractor business and about what I would want in my next one. These things are Great Fun!

I run Amsoil in my other toys, and will add the 15w - 50 Synthetic when I do the re-build this weekend.

This whole K46 issue has been a great exploration, and I met some cool people along the way!

Congrats on the new machine, sounds really nice.

The Pics of the rebuild are coming this weekend! Yeah!!
 

Marketplace Items

TANK MANIFOLD (A55745)
2007 Capacity TJ6500T Wet Kit T/A Yard Dog Toter Truck (A55973)
2007 Capacity...
2019 Dodge Charger Sedan (A59231)
2019 Dodge Charger...
2010 BENSON/WABASH ALUMINIUM FLATBED (A59905)
2010 BENSON/WABASH...
2007 Ford F-150 4x4 Ext. Cab Pickup Truck (A59230)
2007 Ford F-150...
1992 Talbert 70 Ton Lowboy Trailer with Removable Gooseneck (A61306)
1992 Talbert 70...
 
Top