RippySkippy
Silver Member
Last spring, I had a hair brained thought about trying to get more use out of my KK box blade. Given the spring time, I thought about a lawn de-thatcher. Here's what I came up with... (since I don't have a welder yet, my neighbor welded what I needed.)
I found the type and style of baler pickup teeth that I wanted. I mounted the teeth to some scrap metal. The teeth are about 2-1/4 inches wide with the front and back off-set one half that distance. I ran a cable through the center of each coil with a loop of recycled cable so if a tooth breaks, I'll capture the broken piece rather than find it with the mower.
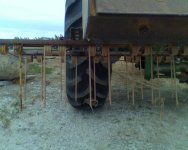
There are four struts fastening the leading to the trailing tooth bar. Two are on the outside of the BB sides, they keep the tooth bar from going side to side. The inside rear cutter is below the sides by 3/8" of an inch, and I use this to "push" the tooth bar through grass/dirt. The box blade is 5', and the teeth extend beyond the sides by roughly 8 inches on each side. It's wide enough that the tooth bar will remove the tractor tracks when making a tight corner.
Inside the BB there are two iron struts in the shape of an upside down "T". They are fastened up to the BB struts that connect the 3 point mount to the back of the BB. I over thought this attachement and would make it much simpler if I were to do it again. You might be able to see that I have threaded shackles on the top and bottom, over kill, but it does allow adjustment if needed.
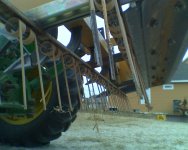
The tooth bar works pretty well as a de-thatcher...the hardest thing being depth (height) control as you might imagine as the tractor moves up and down with the casual ridges in the lawn. My plan is to drill holes in the side of the BB, 2 on each side, to attach my finish mower wheels on each end as height adjustment. If you can keep the depth set where the teeth are just about perpendicular, the teeth do a nice job of brining up the thatch.
The un-expected bonus was just discovered the past day or so. I'm in the process of seeding some new grass and have a dirt pad for the future shop (couple of years out) that needs to be seeded. The dirt was placed this spring and was EXTREMELY wet. It sat barren all summer. (My neighbor added onto his house, and I got the crawl space waste for $0, saved him $6K to haul off and me $6+K for fill; win/win) I didn't want to tear up the clay with the tiller, as this clay has a high sand content and the slopes of the pad wash easily.
That's when I thought of using the the tooth bar, the ground was dry and and after 2 to 3 passes, the soil is ready to seed.
Here's the difference between no pass and 1 pass.
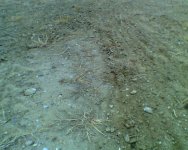
Here's the same area after 3 passes.
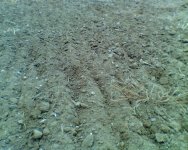
And the finished pad....
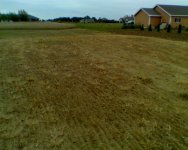
I think this will have additional functionality and will add the wheels this winter when I have a chance to get the holes drilled.
Darwin
I found the type and style of baler pickup teeth that I wanted. I mounted the teeth to some scrap metal. The teeth are about 2-1/4 inches wide with the front and back off-set one half that distance. I ran a cable through the center of each coil with a loop of recycled cable so if a tooth breaks, I'll capture the broken piece rather than find it with the mower.

There are four struts fastening the leading to the trailing tooth bar. Two are on the outside of the BB sides, they keep the tooth bar from going side to side. The inside rear cutter is below the sides by 3/8" of an inch, and I use this to "push" the tooth bar through grass/dirt. The box blade is 5', and the teeth extend beyond the sides by roughly 8 inches on each side. It's wide enough that the tooth bar will remove the tractor tracks when making a tight corner.
Inside the BB there are two iron struts in the shape of an upside down "T". They are fastened up to the BB struts that connect the 3 point mount to the back of the BB. I over thought this attachement and would make it much simpler if I were to do it again. You might be able to see that I have threaded shackles on the top and bottom, over kill, but it does allow adjustment if needed.

The tooth bar works pretty well as a de-thatcher...the hardest thing being depth (height) control as you might imagine as the tractor moves up and down with the casual ridges in the lawn. My plan is to drill holes in the side of the BB, 2 on each side, to attach my finish mower wheels on each end as height adjustment. If you can keep the depth set where the teeth are just about perpendicular, the teeth do a nice job of brining up the thatch.
The un-expected bonus was just discovered the past day or so. I'm in the process of seeding some new grass and have a dirt pad for the future shop (couple of years out) that needs to be seeded. The dirt was placed this spring and was EXTREMELY wet. It sat barren all summer. (My neighbor added onto his house, and I got the crawl space waste for $0, saved him $6K to haul off and me $6+K for fill; win/win) I didn't want to tear up the clay with the tiller, as this clay has a high sand content and the slopes of the pad wash easily.
That's when I thought of using the the tooth bar, the ground was dry and and after 2 to 3 passes, the soil is ready to seed.
Here's the difference between no pass and 1 pass.

Here's the same area after 3 passes.

And the finished pad....

I think this will have additional functionality and will add the wheels this winter when I have a chance to get the holes drilled.
Darwin
