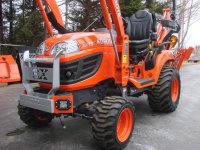
BX25D. Mod #1 and continued.

   / BX25D. Mod #1 and continued. #221  
Paul, you are an artist in what you do. We are the fortunate ones who get to appreciate the "works of art" you share with TBN'ers. For that I say, thanks. It is also very clear that you are having FUN and that is infectous to your followers. HAVE FUN :thumbsup:
 
   / BX25D. Mod #1 and continued.
  • Thread Starter
#222  
Wow, 4shorts, I have been up since 6 am and have just finished reading your journey on the mods to your BX. I have to agree with all the comments, great work, fantastic fabrication, and excution. I hope someone from Kubota is following this thread because they need to.

I only wish that I had 1% of the talent you have, and by the sounds of things your whole family is the same.

The pride you take in your work, comes through loud and clear through the pictures and the write-up, don't stop, it's like a good book you never want to end.

Keep her comin.

Thank you Scotty. I appreciate your comments. It might appear smart but I can assure you there are times that if you took my brain and put it in a bird the poor thing would fly backwards :laughing: I think the rest of the family is way smarter than I am and I'm sure they'll appreciate your kind words as well. More photo's coming up shortly. :thumbsup:

Paul, as you can see, LOTS of folks really enjoy following your projects, so please, don't stop cold in posting stuff! I imagine you are like me, in one way, in that when you get going on these little projects (or not so little, like you welder trailer) you get so involved and have so much "fun" that you almost lose track of time. Sure, they absorb a lot of time, but how else would you get what you wanted? You often simply can't just go out and buy whatever.

Yes varmint I'm starting to realize there is a lot of interest in this type of work on here and I really do appreciate everyone's encouragement. If no one was posting I would have stopped pages ago. Lets face it. If there are no posts on the subject matter one could only assume no one is interested but I know It's not the case here and I thank you and the rest for posting. You are correct again about the way I work. I can tell your the same way. When I have a job to do it takes over my whole mind set. I get so focused I don't see anything except the job ahead. When I'm working I'm at a certain portion of the job but my mind is at least three steps ahead. I seldom stop to think about what I'm doing, I just dive in. In the case of this new BX. I wanted to do everything I wanted to do with it at once so that when I take it out to work it's the way I want it and it's completed.

Phenomenal work! Not to mention your efforts to keep us apprised of what's going on. We are all delirious with envy dreaming of what our tractors could like like & do with your incredible imagination & skill!!

Thank you sir. I'm happy to hear your enjoying all of this. I realize everything I'm doing isn't what everyone would like but if It gives each of you some ideas then my objective worked. By showing this stuff I'm basically showing everyone that it indeed can be done and if there's something that you have in mind you should try it.
Thanks for posting and your kind thoughts. Much appreciated :)


Now its time to put scratches and dirt on your newly modded BX. :eek::thumbsup: We can't have you having your BX look better then mine ..:eek:

:shocked: Your kidden right :confused: :laughing:

4shorts,

What is your preferred method of drilling the holes you have in your bucket?

The ones for the plate under your Level Indicator look like they could have been somewhat tricky to do.

Well my preferred way to make a hole is with the iron worker but that's because I'm just lazy :laughing: Actually in the case your referring to I just basically used a 3/8th drill and drilled a small pilot hole first and low RPM then finished up with the final size that I needed. I used some cutting fluid and it actually went very well and only took about ten minutes to do all of them. Great question. Thanks. :thumbsup:


Paul, you are an artist in what you do. We are the fortunate ones who get to appreciate the "works of art" you share with TBN'ers. For that I say, thanks. It is also very clear that you are having FUN and that is infectous to your followers. HAVE FUN :thumbsup:

Wow. When I read this I had to go see if your name was on the payroll :laughing:
I thank you kindly for your nice words. They actually made my day. It's nice to hear that you guys are enjoying this stuff. It's really not that complicated. I have some pretty good tooling here to work with and I've had plenty of practice over the years and then there's the fact that I occasionally get lucky with my designs so all of that combined makes me look good :D
Thank you again for this. :thumbsup:


Uploading more photo's of the day. :)
 
   / BX25D. Mod #1 and continued.
  • Thread Starter
#223  
OK. I'm happy to report that I've completed all the wiring on the BX25D.


Yep. It took all day and most of this evening but it's done. I snapped some photo's for you all to look at. As you'll see I installed an auxiliary 6 cavity fuse panel. It's relayed so that power will only be on the fuses when the key is on.
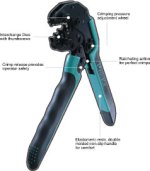
I also snapped a few photo's of some GM weather pack solder-less terminals that I used. Some might not have see these used before so I wanted to include them in the photo's. You'll notice there's a special crimping tool that's need to crimp the little pins but I like these and use them a good bit. 95% of all the wiring was soldered and heat shrinked. I am not a fan of stab loc connectors but I do use butt connectors where it's dry and away from water.

I used waterproof switches for everything. I also installed a horn, reverse alarm with a by-pass switch so it could be deactivated when ever I didn't want it on. I installed the horn switch towards the said of the instrument panel due to lake of space but it's easy to reach there so I'm OK with it. I put in an extra accessory outlet and the tactical light on the ROPS is working now as is the 20" LED light bar. The ditch lights are absolutely awesome now that they are working. I also got the back hoe lights wired in and they are very nice as well. The 6 cavity fuse panel was just enough to get it done. I put a disconnect on the back hoe with harness because when I go to let the hoe go from the back of the tractor I'd need to be able to split the wiring.

Anyway I hope you enjoy the photos. I'm using a new camera and it's taking some getting used to so bare with me. :eek:


   / BX25D. Mod #1 and continued. #225  
4shorts there is more then one kind of smart. You are the kind of smarts that are working for you. Take the praise with grace and smile.

The other thing you have going for you is ambition. There are a lot of people in the world that could accomplish much with their smarts and talent. Yet they do nothing.

I doubt there are many days when asked what you did today that you say nothing.

Keep it up.
 
   / BX25D. Mod #1 and continued. #226  
Paul,

A friend of mine that worked on a lot of marine stuff used to fill the butt connectors with RTV silicone before he inserted the wires and crimped the connector. He claimed he never had any problems with corrosion after that. Messy while you're working at it, but trouble free afterwards.

Sean
 
   / BX25D. Mod #1 and continued. #227  
Just a simple modification that I am sure you Paul(4shorts) could improve on:
I found here in Ontario like I imagine on Atlantic coast, I found myself slipping on tractor floor board when getting up into tractor, with muddy or snow covered boots.
I had a piece on 1 inch square tubing, that I welded a handful of nuts to upper face and then bolted the piece to outer edge of left side floor board. Just a safety modification that has saved me landing on my butt and elbows this winter...see pic attached, maybe 4shorts or others can improve for your machine.
 

Attachments

  • DSC00313.jpg
    DSC00313.jpg
    1,013.4 KB · Views: 470
   / BX25D. Mod #1 and continued.
  • Thread Starter
#228  
4shorts there is more then one kind of smart. You are the kind of smarts that are working for you. Take the praise with grace and smile.

The other thing you have going for you is ambition. There are a lot of people in the world that could accomplish much with their smarts and talent. Yet they do nothing.

I doubt there are many days when asked what you did today that you say nothing.

Keep it up.

Ha. You could be right. I don't sit back much. A few years ago the wife wanted a patio put on the front of the house. Well we put one on and she laid chairs on it so one evening last summer wifey says to me " let's go sit on the front patio" I reluctantly said "OK". That lasted four minutes when I said " I think I'll go mow the grass". I just don't see the point of sitting around :confused3:


Paul,

A friend of mine that worked on a lot of marine stuff used to fill the butt connectors with RTV silicone before he inserted the wires and crimped the connector. He claimed he never had any problems with corrosion after that. Messy while you're working at it, but trouble free afterwards.

Sean

Ya. I do that in high corrosion areas but I use dielectric grease. RTV is OK until you need to get it apart again. Good tip though :thumbsup:


Just a simple modification that I am sure you Paul(4shorts) could improve on:
I found here in Ontario like I imagine on Atlantic coast, I found myself slipping on tractor floor board when getting up into tractor, with muddy or snow covered boots.
I had a piece on 1 inch square tubing, that I welded a handful of nuts to upper face and then bolted the piece to outer edge of left side floor board. Just a safety modification that has saved me landing on my butt and elbows this winter...see pic attached, maybe 4shorts or others can improve for your machine.

Ha. That was the very first mod I did with the BX. If you look at the BX above you'll see I used grip tape in that same area. You'll notice it in the attachment as well. Works for me. Thanks for that tip :thumbsup:
 

Attachments

  • image.jpg
    image.jpg
    246.9 KB · Views: 446
   / BX25D. Mod #1 and continued. #229  
Paul,

A friend of mine that worked on a lot of marine stuff used to fill the butt connectors with RTV silicone before he inserted the wires and crimped the connector. He claimed he never had any problems with corrosion after that. Messy while you're working at it, but trouble free afterwards.

Sean

In theory a crimp should be air tight but that is hard to do with the style of crimpers 4shorts is using. A ratchet crimpper has better dies and is adjusted for a repeatable crush.

500ratchet-erg.jpg

I think I paid about $50 for the set I have. But I don't see where the RTV would harm anything and may help when the crimp is less then perfect.
 
   / BX25D. Mod #1 and continued.
  • Thread Starter
#230  
In theory a crimp should be air tight but that is hard to do with the style of crimpers 4shorts is using. A ratchet crimpper has better dies and is adjusted for a repeatable crush.

View attachment 313052

I think I paid about $50 for the set I have. But I don't see where the RTV would harm anything and may help when the crimp is less then perfect.

I have many different types of those crimpers but I never use them under a dash or a dry area. In a high corrosive area I'll solder then use the heat shrink with the sealant in it. It's expensive but it will last almost forever without issues. The crimp tool you see in my post is strictly for solder less terminals and for the weather PAC systems that you see on all the newer vehicles.
 

Tractor & Equipment Auctions

2009 Trail King TK110HDG-523 RGN 66 Ton Tri-Axle Lowboy Trailer (A49461)
2009 Trail King...
1997 EZ S/A Spool Trailer (A49461)
1997 EZ S/A Spool...
2020 J&M 1151-22T Classic Grain Storm Grain Cart (A50657)
2020 J&M 1151-22T...
2021 Ver-Mac PCMS-3812 Solar S/A Towable Trailer Message Board (A49461)
2021 Ver-Mac...
2012 Case IH Patriot 3330 Self Propelled Sprayer (A50657)
2012 Case IH...
PORTER CABLE 150 PSI AIR COMPRESSOR (A50854)
PORTER CABLE 150...
 
Top