Amulet excavator thumb

   / Amulet excavator thumb
  • Thread Starter
#11  
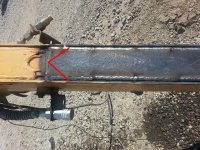
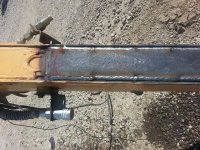
Picked up the thumb at the freight terminal this afternoon. Looking forward to putting it on tomorrow.


ForumRunner_20140404_184306.png

Brian
 
   / Amulet excavator thumb #12  
Curious as to why/how the install of the thumb would cost $3K?! How much does the actual thumb cost?
Please take lots of pics of the install, thanks.
 
   / Amulet excavator thumb
  • Thread Starter
#13  
It may not be $3000, having never seen or installed one of their thumbs before I didn't know what to expect for installation time, so I quoted what I hoped would be a cushion. The thumb retails for $2395. The quote also includes the hoses, fittings, and flat-face quick couplers that aren't included with the thumb. You add in what will be over $200 in sales tax it won't be far from $3000.

I plan on taking plenty of pics for sure.

Brian
 
   / Amulet excavator thumb
  • Thread Starter
#14  
There are some pics.

ForumRunner_20140406_182618.png

Because the width of the mount and the arm were neatly the same I had to add a filler plate so the mount had a solid surface to mount to.

ForumRunner_20140406_182818.png


ForumRunner_20140406_182833.png

Here it is mocked up.

ForumRunner_20140406_182959.png


ForumRunner_20140406_183019.png

Here's the mount clamped down and then welded on.

ForumRunner_20140406_183228.png


ForumRunner_20140406_183257.png

Here's a few with it all attached and with the hoses made.

ForumRunner_20140406_183415.png


ForumRunner_20140406_183432.png


ForumRunner_20140406_183446.png

The last one is with the cowling off so I could adjust the overload relief.

ForumRunner_20140406_183555.png

Brian
 
   / Amulet excavator thumb #15  
We may never know, but it would be interesting to see in the future if there is going to be an issue with you using 90-degree corners on that filler plate?
You see V-shapes, or radius cut fish plates used on excavators all the time. A good idea with V-shape fish plates is to tail out the welds like this guy did.
 

Attachments

  • Brain55.JPG
    Brain55.JPG
    101.6 KB · Views: 134
  • Brain55 A.JPG
    Brain55 A.JPG
    101.9 KB · Views: 130
  • Brain55 B.JPG
    Brain55 B.JPG
    101.7 KB · Views: 159
  • Fish plate tail out.jpg
    Fish plate tail out.jpg
    63.7 KB · Views: 215
   / Amulet excavator thumb
  • Thread Starter
#16  
I wish there had been more room. The mount was the length of the arm if I had fishtailed the filler plate I wouldn't have been able to weld the ends of the mount. I guess I could have made smaller fishtails concentric with the ones on the mount.

Brian
 
   / Amulet excavator thumb #17  
Good looking install. That is one heck of a thumb.

Does it have it's own dedicated hydraulic valve/circuit?
 
   / Amulet excavator thumb #18  
I wish there had been more room. The mount was the length of the arm if I had fishtailed the filler plate I wouldn't have been able to weld the ends of the mount. I guess I could have made smaller fishtails concentric with the ones on the mount.

Brian
Well you gotta do, what you gotta do for the install!:thumbsup: It's just interesting to me, more for a learning experience than anything else.;)
 
   / Amulet excavator thumb
  • Thread Starter
#19  
Does it have it's own dedicated hydraulic valve/circuit?

Yes, it uses the auxiliary circuit on the excavator. All I had to do is make some short hoses from the existing quick couplers to the thumb cylinder. There was also a selector valve to switch the auxiliary from uni-directional to bi-directional. Even though the cowling came off to get to the valve bank, adjusting the overload relief was a bit of a challenge. It was tough to get to with all of the hoses in the way. The overload pressure was way off. It was at least 6000 psi and Amulet wanted it to be 2100 psi. The overload relief is what keeps the machine from bending or breaking the thumb or hydraulic cylinder when curling the bucket into the thumb.

Brian
 
   / Amulet excavator thumb #20  
Cool! Looks good. Couple of questions from one who knows less than nothing about metals/welding/hydraulics...
The existing QD's on the dip stick were already there? For a thumb?
You welded the filler plate in between the sides of the dipper stick. When I installed my thumb, albeit much smaller scale, on my tractor, I was given a plate/cylinder bracket for the cylinder top mount which spanned the dipper and was welded at the side plate edges of the dipper and not across the dipper at the top and bottom of the plate. And I was told to bring the thumb to the bucket, and not to bring the bucket to the thumb, even though the cylinders have the same pressure ratings. My circuit(s) for the thumb/bucket don't have overload pressure reliefs built in, or adjustable to my knowledge, could this account for the bringing bucket to thumb method on the ex?
How long did it take to do the job, and what was the final cost, if you don't mind saying?
One last Q: your username is brain55, but your name is Brian? I'm confused, was that intentional?:confused3:

Thanks for any answers you care to share:thumbsup:
 

Tractor & Equipment Auctions

2021 Chevrolet Silverado Pickup Truck (A51039)
2021 Chevrolet...
2012 PETERBILT 388 SLEEPER TRUCK (A51222)
2012 PETERBILT 388...
2009 JACK COUNTY 130 BBL VACUUM  TRAILER (A50854)
2009 JACK COUNTY...
2011 TROXELL 140BBL TRI AXLE VACUUM TRAILER (A50854)
2011 TROXELL...
2006 Ford Crown Victoria Sedan (A50324)
2006 Ford Crown...
New Holland B95 Backhoe (A50490)
New Holland B95...
 
Top