Adding an Adjustable 4 Way Wedge

   / Adding an Adjustable 4 Way Wedge #1  

Fxfymn413

Platinum Member
Joined
Sep 3, 2021
Messages
567
Tractor
Kubota 4060; Kubota BX2660
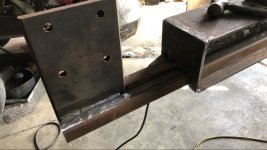
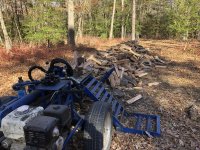
I recently added a hydraulically adjustable 4 way wedge to my home built wood splitter. I bought the splitter many years ago for around $200.00 and over the years I have replaced everything but the I beam, basic chassis, and the oil tank. I added a 13 HP HF engine, high flow pump, auto return valve, and a log loader.

I bought the hydraulics and I have access to the drops at a friend's steel fabrication shop. I think I'm all in for right around $250.00 for this project.

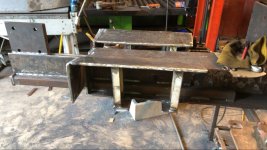
The wedge is 1" plate, the brace behind the wedge is 1/2" plate and the actuator is made from 3/8 plate. I cut the 1/2 and 3/8 using a Milwaukee steel cutting circular saw. The rough vertical cuts on the 1" were made with a torch and cleaned up with a cut off wheel.

I was looking at adding a box wedge, but after doing some research I wasn't sold on it so I decided to add a the adjustable wedge instead. I had three concerns as I researched the idea; what were the measurements for the actuating mechanism?, how could I cut the slot at the bottom of the wedge?, and how could I get a sharpened edge on the wedge?

I looked for the measurements on-line without success, although I'm sure they are out there somewhere, so I ended up freezing a video of an adjustable wedge which allowed me to use dividers to measure the one known given dimension of the hydraulic ram. In turn I used that measurement to figure out the distance between the holes on the actuator and with a little math I came up with what I figured would be a good starting point. I then mocked up the actuator using MDF and plywood and much to my surprise the dimensions worked. The dimensions are in the picture below. As the saying goes "Past performance is no guarantee of future success.", but here is what I used.

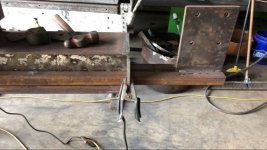
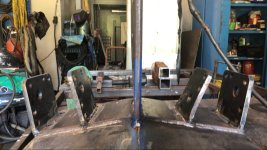
Point "A" is where the pin goes through the slot at the bottom of the wedge, "B" is where the hydraulic cylinder connects, and "C" is where the actuator connects to the bracket mounted on the bottom of the beam. A to B is 13 1/2", B to C is 6", and A to C is 12" (All dimensions center to center). The bracket is 7 5/8" from the beam bottom to the hole center. The distance from "B" to the mount for the cylinder will vary with each cylinder, but you want the pin in the wedge slot to be about 1 1/2" from the front edge of the slot with the piston fully retracted and the wedge at the full up position. This in turn sets where the bracket gets mounted. The wedge was 5" wide before sharpening and the slot is 3 3/4" wide.

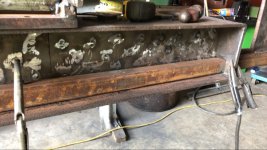
I was able to cut the slot by drilling holes in each end of the slot and than connecting them with a 4 1/2" cut off disc. A little filing and it worked. I initially made the slot 5/8" diameter, but that proved too tight, so I widened it to 3/4".

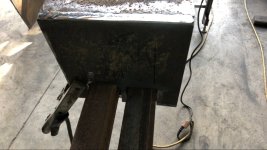
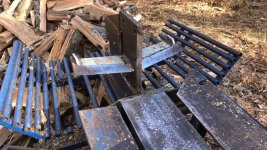
The wedge 5" x 30"x 1"with a 12" vertical range of motion. The horizontal wedges are mounted 12" above the beam resulting in the ability to cut a 24" log into quarters and was cut from 1" thick stock by a friend who is much better than I ever was or will be at using a torch. I then finished them using a 4 1/2" grinder equipped with 36 grit sanding discs. I filled any deep slots with weld to speed up the process, but it still took several hours of grinding. The vertical wedge is ground to a "V" and the horizontal wedge is a flat bevel to prevent the wood from binding under it. This also allows wood to slide up over it with the wedge in the lowest position.

Overall I'm pleased with they way it came out, but I made a couple of mistakes that needed fixing. The big boo-boo I made was initially cutting the slot in the beam that the wedge rides through too long. This resulted in allowing the wedge to move front to back and put all of the force on the brace behind the wedge which failed from that and the improper weld from using too cold a setting to weld it initially. I ended up cutting a "Dutchman" in the top of the beam and welding it in to close the gap up. I also added plate to the beam bottom positioned against the wedge to hold it in alignment. Once I re-welded the brace properly the wedge does not move under full pressure. My advice is to cut that slot a precisely as you can so the wedge just fits length wise.
20211014_082549.jpg20211022_083233.jpg20211022_083248.jpg20211024_125324.jpg20211023_095445.jpg
 
   / Adding an Adjustable 4 Way Wedge #2  
Pretty interesting project !! I can see a lot of thinking and time went into that. When you are running it do you find yourself setting it to center often or do you mostly leave it in one position until you have a drastic change in your wood size ?

gg
 
   / Adding an Adjustable 4 Way Wedge
  • Thread Starter
#3  
Thanks; I just finished it up, so the only wood I have split with it is what I used to try it out. But, since we do not buck up our logs until we are ready to split them my guess is that we will not need to re-set the height too frequently since the pieces we feed to it should be of similar size.
 
   / Adding an Adjustable 4 Way Wedge #4  
Thanks; I just finished it up, so the only wood I have split with it is what I used to try it out. But, since we do not buck up our logs until we are ready to split them my guess is that we will not need to re-set the height too frequently since the pieces we feed to it should be of similar size.
Cool...I like that but i'm wondering why you cut out the beam like that and not just add the slide parts to the end of the beam. Oh I just went back and reread your first post. I can see that now because you would have to move the cylinder forward to make it work. It just looks like to me that you would lose a lot of strength that way because of the loss of the beam web right where it matters most. But who cares if it works keep on splitting.
 
   / Adding an Adjustable 4 Way Wedge
  • Thread Starter
#5  
Cool...I like that but i'm wondering why you cut out the beam like that and not just add the slide parts to the end of the beam.
You have to have some beam behind the wedge to support the wedge backing piece and having a longer stretch of beam beyond the wedge let me add a longer brace to the top of the beam. If it were at the beam's end it would be "floating" and would be pushed over by the ram without splitting the wood.

You are correct in that this is the weak point which is why the beam is boxed at this point to reinforce it.
 
   / Adding an Adjustable 4 Way Wedge #6  
That makes sense I guess but there are ways to do that without having to cut the web out. I'm not saying it won't work like you did it I was just wondering is all. I just finished mine last fall and I'll post a couple pics of the way I did mine. My first try with the box wedge didn't work out to good. All I had laying around was some 3/4 material and that proved to be not strong enough. It probably would have been ok if I had not ran those pieces through that were pretty much all knots. I had split a couple cords of decent wood then got to a pile of knots I had set aside to split with another splitter. My gut was telling me not to try it but I went ahead anyway. It twisted that 3/4" steel like it was tin. Three days of my life was spent building that setup and it went away pretty quick. It did slice through a few pieces but one big ol knotty hickory stump got the best of her.
here is how I did mine....
 

Attachments

  • IMG_0477.JPG
    IMG_0477.JPG
    599 KB · Views: 250
  • IMG_0478.JPG
    IMG_0478.JPG
    561.4 KB · Views: 226
  • IMG_0479.JPG
    IMG_0479.JPG
    632.3 KB · Views: 229
  • IMG_0480.JPG
    IMG_0480.JPG
    703.5 KB · Views: 238
  • IMG_0485.JPG
    IMG_0485.JPG
    853.8 KB · Views: 242
  • IMG_0486.JPG
    IMG_0486.JPG
    726.4 KB · Views: 232
   / Adding an Adjustable 4 Way Wedge #7  
Here is what's left of the box wedge.. And I thought I had pics of the 4 way I built that is on it now but they are not on this computer if you want to see that I'll try to get pics off my old computer
 

Attachments

  • IMG_0554.JPG
    IMG_0554.JPG
    687.2 KB · Views: 217
   / Adding an Adjustable 4 Way Wedge
  • Thread Starter
#8  
Nice work, but I don't see how you made the wedge adjustable.

As I said my initial attempt also failed when I ran a stump through that I knew would not split which allowed me to put full pressure on the wedge to test it The new design/repair has not failed under full pressure.

One other change I wished I had made was to use a larger diameter cylinder to adjust the wedge so it would move a little slower. I have a flow restrictor in the line, but it is still very quick. I used a 1" cylinder and I should have used a 1 1/2" cylinder.
 
   / Adding an Adjustable 4 Way Wedge #9  
Nice work, but I don't see how you made the wedge adjustable.

As I said my initial attempt also failed when I ran a stump through that I knew would not split which allowed me to put full pressure on the wedge to test it The new design/repair has not failed under full pressure.

One other change I wished I had made was to use a larger diameter cylinder to adjust the wedge so it would move a little slower. I have a flow restrictor in the line, but it is still very quick. I used a 1" cylinder and I should have used a 1 1/2" cylinder.
Right now it's not adjustable I had to get to work splitting next years wood so I put that part on hold. I just drilled several holes through the wedge and one in the two horizonal pieces of 1/2" that made up the slide. If I need to lower or raise it I just pull a pin and raise or lower it. Not the best but it works pretty well.

You probably wouldn't notice that much difference using a larger cylinder. There are several ways to cut down on the speed of the cylinder. reducing the line size to about half of what you have now would maybe help some you could do that with the line itself or with adapter fittings at the valve.

Something like this works very well and is what I used on my lift table to slow it down. It's adjustable and fairly cheap, about $25.00 I think. 1/4 NPT 5 GPM Prince WNV-400 Needle Valve.... from surplus center.

I found a few more pics of mine and I'll post them for you.
 

Attachments

  • IMG_1102 (2).JPG
    IMG_1102 (2).JPG
    1.2 MB · Views: 241
  • IMG_1100.JPG
    IMG_1100.JPG
    5.1 MB · Views: 244
  • IMG_1099 (2).JPG
    IMG_1099 (2).JPG
    1 MB · Views: 235
   / Adding an Adjustable 4 Way Wedge #10  
Do you have any trouble with the backwards lean on the 4 way? I had one like that and it was useless. All the wood wanted to slide off sideways.
 
   / Adding an Adjustable 4 Way Wedge #11  
Pretty interesting project !! I can see a lot of thinking and time went into that. When you are running it do you find yourself setting it to center often or do you mostly leave it in one position until you have a drastic change in your wood size ?

gg

I use the size adjustment on mine a lot. I don’t really use it to change the wood size but to reduce making so much trash. The pieces coming off the bottom of a big piece are too big and need split in half again. If you push them through at the same height the wedge pulls splinters off them. If you raise the 4 way so it doesn’t contact the pieces going through the bottom it’s a cleaner job. There’s also smaller diameter pieces that don’t need 4 ways just in half and I raise the wedge to push them under.
 
   / Adding an Adjustable 4 Way Wedge #12  
Yeah it can be a pain sometimes. That is the problem with using stuff you have laying around. I had those two pieces laying on the floor and all I had to do was cut the bevel and before I knew it they were welded on. I had seen wedges like that but never tried it before. Now I do wish I had just made them from scratch. The vertical piece is only 3/4 and my thinking was at the time it might be easier on the whole thing if they were slanted back a little. Still most wood passes on through with no problem but there is always that problem child to deal with.

I built this one just to get a feel for all the extra things that went into it to see what works and what don't. I plan on building another one that hopefully I can be happy with and building this one helped a lot with laying it all out and getting all the parts in just the right spot. I thought a lot about just how to go about fabricating the adjustable wedge part and came up with what i ended up with. I almost went the way you did but I got tired of looking and thinking and started welding pieces until I ended up there. That part is plenty strong I just wish I had made the gap to fit a 1" piece of medal because now it would require re-fabricating the whole front end and it's not worth that to me.

That piece of 3/4" material is strong enough for the 4 way wedge not sure about a 6 way though. It's plenty fast with the 4 way, actually too fast when I'm splitting by myself which is most always how I roll because I spend more time clearing split wood out of the way that I actually do splitting.

I learned a lot building my old one but this was a whole new ball game witch help a lot for when I do my other one. Hopefully I can sell this one when I'm ready, so as to fund some of the new one I really want. I really wanted to build a processor with a saw, live deck and all the trimmings but don't think I need that any longer because all I need it for is my own use as I don't sell wood anymore. I collected parts for years for that build and have a lot of the stuff needed to do it. Ive been thinking about selling all the saw stuff that I got off an old log delimber/slasher machine I picked up years ago. That thing had a 5' bar so you could cut just about anything with it.
 
   / Adding an Adjustable 4 Way Wedge #13  
I use the size adjustment on mine a lot. I don’t really use it to change the wood size but to reduce making so much trash. The pieces coming off the bottom of a big piece are too big and need split in half again. If you push them through at the same height the wedge pulls splinters off them. If you raise the 4 way so it doesn’t contact the pieces going through the bottom it’s a cleaner job. There’s also smaller diameter pieces that don’t need 4 ways just in half and I raise the wedge to push them under.
Yeah those 4/6 way wedges do make a lot of trash wood and one that is adjustable is a lot better. I may add another cylinder for the lift this winter just don't know if I want to spend the time though. I made all the brackets and have a cylinder, I even cut the notch in the bottom of the wedge for the cylinder pin to slide into. I even have another valve I could use. There is a couple things I would need to change but I could probably get it going in a day or two.
 
   / Adding an Adjustable 4 Way Wedge #14  
Yeah those 4/6 way wedges do make a lot of trash wood and one that is adjustable is a lot better. I may add another cylinder for the lift this winter just don't know if I want to spend the time though. I made all the brackets and have a cylinder, I even cut the notch in the bottom of the wedge for the cylinder pin to slide into. I even have another valve I could use. There is a couple things I would need to change but I could probably get it going in a day or two.

Mine just lifts about 2 inches. It’s not as good as it could be but it was a simple mod and really cut down on making splinters. February 19, 2019
 
   / Adding an Adjustable 4 Way Wedge
  • Thread Starter
#15  
reducing the line size to about half of what you have now would maybe help some you could do that with the line itself or with adapter fittings at the valve.
I already have a 1/32 inch flow reducer in the line and I'm running 1/4 inch lines. Going to a 1 1/2 inch cylinder more than doubles the surface area the fluid acts on so it will slow it down. Right now I'm too cheap to change it, but if it becomes a real issue I'll swap it out.
 
   / Adding an Adjustable 4 Way Wedge #16  
I already have a 1/32 inch flow reducer in the line and I'm running 1/4 inch lines. Going to a 1 1/2 inch cylinder more than doubles the surface area the fluid acts on so it will slow it down. Right now I'm too cheap to change it, but if it becomes a real issue I'll swap it out.
Ask a hundred different people how to slow down a cylinder and you'll get a hunnard different answers.LOL On stuff like this I have always had better luck with an adjustable flow valve. With a fixed orifice sometimes it's a hit or miss kind of deal and you will never know until you try one size or another. If it was too small you could always drill it out a little larger. If it ended up to large you could always braze it shut then drill it out one drill size at a time until you get the desired results. Of course you could do the same thing with just a nipple, braze the end shut and drill to size.

My log table would shoot the logs four feet up and over the table at first. I could feather the control and it helped but was a pain to deal with. My cylinder for the lift table is 3" X 10" with a 1/12" rod. I reduced the line size from 1/2" to 1/4" which didn't help much. I tried a couple different restrictor valves that I had on hand but still couldn't get it slowed down to where I wanted then I bought a 0 to 5 gpm adjustable valve and I found that I almost had to shut it almost shut to get the job done. With a 16 gpm pump a lot of oil will still flow through tiniest hole imaginable.

I also found out that sometimes you can get better results to check the flow on the output side of the cylinder and sometimes in some cases you might check the flow on both the in and output side. You don't have to worry about heat buildup on a log lift or wedge lift because they are not used that much to cause a problem with that.

An yeah, I know the cheap route trick that's the story of my life lol......
 
   / Adding an Adjustable 4 Way Wedge #17  
   / Adding an Adjustable 4 Way Wedge #18  
   / Adding an Adjustable 4 Way Wedge #19  
A cylinder on the back side.
Oh, I couldn't see it in the link. I've seen them done like that before but it looks like to me something would always be in the way. I was wondering how tough pieces of wood would split with the blunt edge that is on your wedge. Though sometimes a really sharp point will cause problems too because if you get a piece of wood that don't want to split by the time you figure out it won't split the wedge is stuck and it's a bear to get it out.
 
   / Adding an Adjustable 4 Way Wedge
  • Thread Starter
#20  
I looked up this post to help out an OP on another post when it occurred to me that I never added a critique of how this worked out after we used it to split wood this past fall.

Combined with the neighbors we split around 15 cords over six or seven days this year which is an average amount for us. If we hustled with four or five of us working along with the L4060 we could do two or more cords a day including bucking up the logs and stacking the split wood into IBC cages. In addition to the splitter improvements I also used a full chisel chain on my MS390 saw to buck the logs which also sped the process up.

Overall we were really pleased with the adjustable wedge as it sped the splitting process up considerably. We did adjust the wedge much more than I anticipated; changing the height for almost every log, but the time spent doing the adjusting was more than made up for by the increased productivity of splitting logs into four pieces instead of two. A 16 inch diameter log would be split with three strokes instead of six with a single wedge for example. I like the split wood to be small so that is one reason for the number of adjustments.

I did not notice an increase in the number of logs the splitter could not split because of the four way wedge and if it balked we would simply lower the wedge and try to split it into two pieces instead. There were still some stump pieces, mostly over 24 inches in diameter, it could not get through without the logs being cut in half vertically. I did notice that there were far fewer logs that flew off of the wedge than before since the four way held them down and seemed to allow the internal stress in the log to be relieved.

The wedge wore the slot I made in the beam a bit which in turn caused the wedge to start leaning to the side and forward a bit. I welded a small strap to the wedge around the upright support behind the wedge which solved that problem.

As I anticipated the wedge adjustment is a bit finicky since it is too fast. Once you get used to it you can slow it down by careful manipulation of the valve, but I think I'll do something this summer to fix the issue by either adding a bigger cylinder or a more restrictive flow restrictor, or both.

Was it worth the time and money? Absolutely! If you are splitting more than a couple of cords a year I highly recommend either buying this as an option on a new splitter or adding it to the splitter you have.
 

Tractor & Equipment Auctions

skeleton / rock bucket (A56857)
skeleton / rock...
Poly Fuel Tank with Electric Pump (A55851)
Poly Fuel Tank...
2010 MULTIQUIP 25KW GENERATOR (A58214)
2010 MULTIQUIP...
John Deere XUV825E (A56438)
John Deere XUV825E...
Massey Ferguson 92” PTO-driven rear-mount snowblower
Massey Ferguson...
2024 MECO M-Y 4-Passenger Electric Car (A59231)
2024 MECO M-Y...
 
Top