Importing and modifying a new mini excavator from China

   / Importing and modifying a new mini excavator from China
  • Thread Starter
#1,351  
As long as I run it just above idle it's very smooth.
Nice looking paver job. Aren't you concerned about frost heave where you are?
 
   / Importing and modifying a new mini excavator from China #1,352  
Agree that's a nice patio/fireplace install. As far as frost heave not a lot you can do as it goes down 3-4'. As long as you have a 6" or so gravel base, then 2" compacted tillings/stone dust and sand on top it's about all you can do. Appears he excavated about a foot or so..

It will freeze and flex - you just need enough uniform material to allow for movement - our brick walkways will heave a bit in the winter, but the main patio 20 x 40 area doesnt appear to move much at all.
 
   / Importing and modifying a new mini excavator from China #1,353  
Nice looking paver job. Aren't you concerned about frost heave where you are?
Yes, the frost line is around 4 feet here. It will freeze and move some but the key is to excavate the black dirt and organic material then add 4-6 inches of class 5 and compact it as you go. Then screed 1 inch of bedding sand and lay pavers. I also do not use polymeric sand for the joints as it's not good at flexing.

I have a few single family rental homes and my next excavator project is replacing an old retaining wall at another house. That machine is really paying for itself.

Pic is after the black dirt was out and crushed limestone was in.
 

Attachments

  • IMG_20240604_160937296_HDR.jpg
    IMG_20240604_160937296_HDR.jpg
    3.6 MB · Views: 146
   / Importing and modifying a new mini excavator from China #1,354  
Thanks, that is some very good info. Mine looks the same only it's branded as a Miva VA15. I would love to get a part number for the return filter inside the reservoir. I do plan to change it to an external spin on in the future but that may be at the same time I install a new lower output pump. From the specs listed, it looks like the existing pump is 10.6GPM. I would love to have something around 8GPM.

I have about 13 hours on it so far and I'm very happy with it. As long as I run it just above idle it's very smooth. On to the next project!
The filter inside the reservoir is not a return filter but rather a coarse oil pickup screen. You normally don't need to change these much. A return oil filter is a good idea. I'm waiting on a few fittings to do an oil filter and cooler install. Jury is still out as to where I move the return line manifold (currently right at the behind the hydraulic reservoir). I can either move the manifold to connect to the output of the blue safety solenoid (but it would be supported by the pump body which is exposed to the engine's vibration) or move the solenoid and manifold between the valve body and battery under the left step board (it would then hang from the valve body and be isolated from the engine's vibration).

EDIT: I just checked my EM15 and it does have both a return filter as well as a supply screen in the tank. If you install a 25micron return filter on the return line, I would leave the return filter in the tank. It probably helps the oil from foaming and would never get dirty if a 25 micron filter is installed before it. If you install a coller, you want to put it between your external filter and the tank so it sees the least amount of pressure.
 

Attachments

  • EM15 Return manifold.jpg
    EM15 Return manifold.jpg
    1.7 MB · Views: 158
  • EM15 Safety solenoid.jpg
    EM15 Safety solenoid.jpg
    1.4 MB · Views: 166
  • EM15 Valve body.png
    EM15 Valve body.png
    850 KB · Views: 159
Last edited:
   / Importing and modifying a new mini excavator from China #1,355  
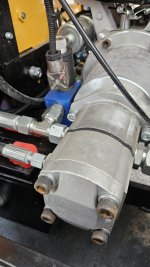
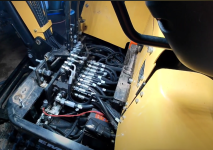
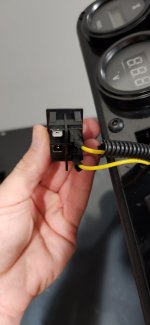
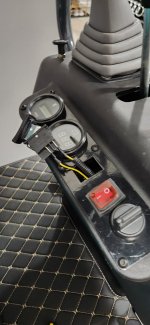
When looking closely at the machines the FF15 seems to be a different beast altogether: shorter tracks (180x72x37 and two bottom idler rollers for the FF15 vs. 180x72x41 and three bottom idler rollers for the EM15), boom is not the same design (FF15 has similar designs as other FF Industrial and AGT machines), foot controls are different, left joystick console does not lift (safety cutoff is a manual toggle switch instead of being integral to the lift of the console on the EM15), FF15 has less ventilation holes as the EM15, electrical cut-off switch mounted on the left joystick console instead of the the kickplate under the seat (better design IMO), different front blade, different roof and support structure, comes with a manual thumb while the EM15 has none as standard issue, no aux. lines shutoff valves on the dipper, etc...

I honestly don't know who manufactures the FF15 but it doesn't look like its a standard product from LeKing or SDJG.
I also have a FF15 and would like to find an operation manual. Is your FF15 made by FF Industrial? There doesnt seem to be any website for FF Industrial and when looking for information I always end up @AGT?
 
   / Importing and modifying a new mini excavator from China #1,356  
I also have a FF15 and would like to find an operation manual. Is your FF15 made by FF Industrial? There doesnt seem to be any website for FF Industrial and when looking for information I always end up @AGT?
Sorry, I don't own a FF15 but instead a Diggit EM15. I talked about the FF15 as one user commented that they looked the same...same metal cowling but when you compare the FF15 and the EM15 (AKA the OEM's JG-15), we can note significant differences. I unfortunately don't know who manufactures the FF Industrial machines but I also note always seeing them at auctions in the company of AGT machines.
 
Last edited:
   / Importing and modifying a new mini excavator from China #1,357  
I've been slowly modifying and improving my little excavator. I recently wondered if it was possible to have the light switches illuminate when in the ON position. I popped a switch out of the dash and disassembled it and was surprised to see an LED and resistor installed. I'm not an electrical person and have no idea how I would get this work or if it's even possible?

Can anyone help me?
 

Attachments

  • 20230930_211142.jpg
    20230930_211142.jpg
    596.1 KB · Views: 130
  • 20230930_210914.jpg
    20230930_210914.jpg
    647.6 KB · Views: 134
  • 20230930_205640.jpg
    20230930_205640.jpg
    984.2 KB · Views: 139
   / Importing and modifying a new mini excavator from China #1,358  
I've been slowly modifying and improving my little excavator. I recently wondered if it was possible to have the light switches illuminate when in the ON position. I popped a switch out of the dash and disassembled it and was surprised to see an LED and resistor installed. I'm not an electrical person and have no idea how I would get this work or if it's even possible?

Can anyone help me?
one of the terminals prolly needs 12v applied to it for it to light up
 
   / Importing and modifying a new mini excavator from China
  • Thread Starter
#1,359  
I recently wondered if it was possible to have the light switches illuminate when in the ON position. I popped a switch out of the dash and disassembled it and was surprised to see an LED and resistor installed.
First, you have to find out what you have.

Looks like a 4-terminal switch. Is the diode/resistor connected only to the 2 unused terminals, and only to them?

If that is the case, you need to connect both unused terminals to the other side's terminals (respectively). It will only work in one of the 2 possible configurations. Since you have a diode in the circuit, current only goes one way.

Try that and report back.
 
   / Importing and modifying a new mini excavator from China #1,360  
I've been slowly modifying and improving my little excavator. I recently wondered if it was possible to have the light switches illuminate when in the ON position. I popped a switch out of the dash and disassembled it and was surprised to see an LED and resistor installed. I'm not an electrical person and have no idea how I would get this work or if it's even possible?

Can anyone help me?
Using your existing switch and having it illuminate when turned on requires another terminal that you don't have and a wire connected to ground for the LED current.

Maybe the easiest, although not the cheapest, way to accomplish this is to just get a different switch. I quickly found one on Amazon that has some options for when the LED is lit and one of the pics has an easy to follow wiring diagram. You will have to add a wire from the switch to ground to provide a return current path for the LED though.

At $25 It's not cheap but you do get 8 of them for future use and it comes with some easy to use jumper wires, cool overlays, and other stuff.

The third pic is what I think you have now and how you could mod your switch, that seems impractical but not impossible.

Getting a different switch is just one option.
 

Attachments

  • IMG_20240702_074829351.jpg
    IMG_20240702_074829351.jpg
    2.8 MB · Views: 105
  • IMG_20240702_074748980.jpg
    IMG_20240702_074748980.jpg
    2.3 MB · Views: 119
  • IMG_20240702_083519284 (1).jpg
    IMG_20240702_083519284 (1).jpg
    1.1 MB · Views: 109

Tractor & Equipment Auctions

2022 Club Car Tempo Golf Cart (A48082)
2022 Club Car...
2022 Club Car Tempo Golf Cart (A48082)
2022 Club Car...
2009 Ford F-250 Pickup Truck, VIN # 1FTSX21Y49EA41686 (A48836)
2009 Ford F-250...
2025 Swict 78in Bucket Skid Steer Attachment (A49346)
2025 Swict 78in...
(1) 10ft Tarter Livestock Panel (A48837)
(1) 10ft Tarter...
2005 International 4300 15yd Dump Truck (A48081)
2005 International...
 
Top