Good evening, fellow JD owners --
I have a 4300 CUT with 4WD and HST. The range shift lever has always been stiff going into the 3 different ranges but this is always aided by hitting the right RPMs -- right off of idle.
Anyway, today I was doing some fork lift to trailer work and tried to shift from "C" range to "B" range. When I felt the range lever give, I knew exactly what had happened -- the shift rod had broken somewhere along its length.
My initial reaction was "I seem to remember this problem being discussed on TractorByNet and I remember splitting the tractor was necessary." Hopefully, my memory is faulty and I'm thinking of something else.
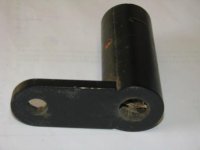
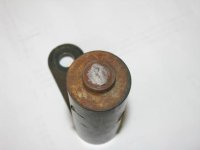
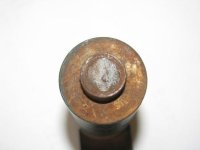
When I looked under the tractor, sure enough, the rod had snapped about 1/8" or so into the case. After removing the shift linkage coupler down there, I looked at the stubby piece of the shaft that was hanging out of it. Evidently, there is a portion of the shaft near that lever (maybe right inside the case) that is smaller in circumference than the rest of the shaft. That is where the shaft broke and it certainly appears that rust was a contributing factor to the failure.
Anyway, I immediately came home and looked carefully through the factory technical manual and the on-line parts catalog and it *seems* that there may be a possibility that the rockshaft cover can be removed to access the shaft inside (which is attached by a spring pin) -- and, if that is correct, then I should be able to slide the shaft out of the case once the left wheel is removed.
My questions to those familiar with the part:
1) Can the shaft indeed be replaced w/o splitting the tractor?
2) If so, how much time for the job? If not, how much time for the split and subsequent replacement?
3) If this failure possibly indicative of a shifting problem internally? [Note: I don't *think* so, because it has always shifted fine (albeit a little stiffly at times) prior to the shaft breakage.]
Finally, I know what I am certainly going to do when the repair is complete -- I will heavily coat that shaft area on the outside of the case with a heavy duty grease so that there is no way that moisture can penetrate it -- and I will check that area regularly.
In advance, thanks for any advice/assistance provided.
Richard Easley
I have a 4300 CUT with 4WD and HST. The range shift lever has always been stiff going into the 3 different ranges but this is always aided by hitting the right RPMs -- right off of idle.
Anyway, today I was doing some fork lift to trailer work and tried to shift from "C" range to "B" range. When I felt the range lever give, I knew exactly what had happened -- the shift rod had broken somewhere along its length.
My initial reaction was "I seem to remember this problem being discussed on TractorByNet and I remember splitting the tractor was necessary." Hopefully, my memory is faulty and I'm thinking of something else.
When I looked under the tractor, sure enough, the rod had snapped about 1/8" or so into the case. After removing the shift linkage coupler down there, I looked at the stubby piece of the shaft that was hanging out of it. Evidently, there is a portion of the shaft near that lever (maybe right inside the case) that is smaller in circumference than the rest of the shaft. That is where the shaft broke and it certainly appears that rust was a contributing factor to the failure.
Anyway, I immediately came home and looked carefully through the factory technical manual and the on-line parts catalog and it *seems* that there may be a possibility that the rockshaft cover can be removed to access the shaft inside (which is attached by a spring pin) -- and, if that is correct, then I should be able to slide the shaft out of the case once the left wheel is removed.
My questions to those familiar with the part:
1) Can the shaft indeed be replaced w/o splitting the tractor?
2) If so, how much time for the job? If not, how much time for the split and subsequent replacement?
3) If this failure possibly indicative of a shifting problem internally? [Note: I don't *think* so, because it has always shifted fine (albeit a little stiffly at times) prior to the shaft breakage.]
Finally, I know what I am certainly going to do when the repair is complete -- I will heavily coat that shaft area on the outside of the case with a heavy duty grease so that there is no way that moisture can penetrate it -- and I will check that area regularly.
In advance, thanks for any advice/assistance provided.
Richard Easley

") --
--


