Another Gauge Wheel Build Post

   / Another Gauge Wheel Build Post #31  
Runner said:
mjncad - the holes in my Frontier blade are located at the top of the blade and I still can't figure out what they're for.

Your guess is as good as mine as to their purpose. They could be part of the manufacturing process and serve no other purpose. Or it could be that Frontier is using the same moldboard for other implements where the round hole does useful things. It's cheaper to punch the hole for all the moldboards, without the logistics headache of figuring out how many need round holes and how many don't.
 
   / Another Gauge Wheel Build Post #32  
Red Dirt,

I like that set-up. If you take it easy there is no reason you should destroy those wheels, not in the short run, at least.

Being able to swivel your blade 360 is a nice feature, also, that long length will benefit you by giving more of a grader effect, minimizng and bumps and depressions.

The on thing I am mindful of, is to lower my 3PH gently, so i don't stress the wheels and torque the arms as they make contact with the ground.

Can't wait to hear how make out with your first few runs!!

Looking good.
 
   / Another Gauge Wheel Build Post #33  
The silicone dust covers on the HF wheel pivot bearings finally cured enough to move the two parts. It took a few days. The portion that was greased (for release)still wanted to stick so I had to use a thin narrow blade to gently release the silicone from the moving race. The cover is softer than I thought it would be. Perhaps it will just take more cure time in this cool weather. It doesn't seem like the covers will hold up very long...time and use will tell. I used GE brand "Silicone I". Perhaps a different brand/product would be stiffer.

SkunkWerX,
Thank you for the compliments. I do hope the wheels will last the first project which is a fairly good sized one planned for the spring. After that expected use will be minimal, periodic road maintenance. My initial trial worked great. I've only tried pulling and not yet pushing. I do have my lowering speed set quite slow. Maybe two to three seconds from full up to resting on the ground.

mjncad,
Thanks again for the photos and follow up comments. I'll try my side plates first without additional bracing. I can always add bracing later if it seems the plates are getting too much stress.
 
   / Another Gauge Wheel Build Post #34  
RedDirt said:
I just got mine done tonight and anxious to try it out tomorrow. I really like the trailer jack idea but after buying steel for 6 projects I needed to keep cost down and I had the all-thread and bushing stock on hand.

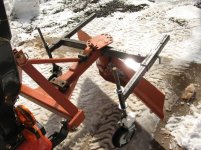
Here's the end result. Still have to bore a couple of holes but want to try it out first; maybe there are different locations that aren't apparent now. This is set at furthest extension so I can swivel the blade 360 degrees.

View attachment 93514

Parts
I used 2x3x3/16 for the outriggers
2x2 "receiver stock" (not 2 1/2 x 2 1/2 x 1/4 standard which has the internal seam that has to be ground down) Receiver stock is a little more money but worth it.
2x2x3/16 extension arms
1" dia all-thread with 1"ID x 1 3/8"OD bushing stock
1/4" plate wheel foot
HF 8" pneumatic wheel - I'll silicone the ball bearing pivot race like someone here suggested (for a dust cover) and hope for the best.

Here are parts for one side

View attachment 93515


One of the most difficult process was jigging up to weld the outriggers onto the RB pivot. Lots of alignments to look at.

View attachment 93516


This was a very tight welding spot (below the blade pivot plate). Can't say I got any penetration because my angle was so low but I was able to get a bead in here. Other welds are 6011 1/8" root and 7018AC 1/8" over that.

View attachment 93517


This is the hight adjuster

View attachment 93518


And the wheel detail. The bushing was welded and gusseted to the 1/4" plate then the all thread was plug welded to the plate.

View attachment 93519


Welding done w/old Lincoln AC tombstone and Lincoln Weld Pack 100 HD wire feed, rosin core.

BTW - I too have a HF bandsaw. I've cut a fair amount of steel the past year. Motor is still OK. But I do have trouble getting it to cut (down) square with the table. I normally have to place my stock on the table shimmed 1/8"+/- (side to side) to get a plumb cut. This is especially noticeable once the blade has any wear. New blades are better but I can't replace them as often as it seems to need.

I like your design, but I'm curious why you couldn't have attached the square tube to the top edge of the blade. That way you could have a bead along the whole length of the tube. It's darn cold outside to go look at mine but dont these things come apart. That would have been my other suggestion was to take the blade apart before doing the weld.

Just my 2 cents.

Wedge
 
   / Another Gauge Wheel Build Post #35  
wedge40 said:
I like your design, but I'm curious why you couldn't have attached the square tube to the top edge of the blade. That way you could have a bead along the whole length of the tube. It's darn cold outside to go look at mine but dont these things come apart. That would have been my other suggestion was to take the blade apart before doing the weld.

Just my 2 cents.

Wedge

There are many different methods of mounting gauge wheels illustrated on TBN. I liked this one for the flexibility it allows.

I wanted to retain the ability to rotate the blade 360 degrees. The top of my blade is a tad less than 2" from the bottom of the 3PH arms so there isn't room to mount the receiver on the blade itself unless I notched into the top of the blade.

My blade does not come apart. The rotation indexing plate is welded onto the rotating shaft.
 
   / Another Gauge Wheel Build Post
  • Thread Starter
#36  
RE: attaching the wheels to the top of the blade - mine are that way, and I was surprised to see how much the blade flexed when supported by the wheels. I'm actually a little concerned about bending it.

RE: 360 degree rotation - I too was concerned about that, and that is why I limited the lentgh of my receiver tubes - they would have been longer and perhaps worked better, but I needed them to clear the rest of the frame when spinning the blade.
 
   / Another Gauge Wheel Build Post #37  
I couldn't wait until spring to try out the wheels. Used them for plowing the driveway. They worked great. Set the blade angle reversed (backwards) at one notch and the wheels offset to match. Set the wheels so blade was about 1 1/2 inches off the floor when tractor was on shop concrete. Only scalped the gravel drive in a few spots; very minor.

(in this photo the 3PH is in raised position)
wheels set for snow.JPG


Plow Driveway2.JPG
 
   / Another Gauge Wheel Build Post #38  
I got my wheels done before the weather turned bad, but I did sneak in some grading when it was in the 50's earlier this week, then back to hibernation for me.

Good looking dog, too.
 

Tractor & Equipment Auctions

2014 VOLVO VN SERIES DAY CAB (A50854)
2014 VOLVO VN...
2010 L3 GENERATOR SET (A51222)
2010 L3 GENERATOR...
2003 FONTAINE TL50-NGB TRI AXLE RGN TRAILER (A51222)
2003 FONTAINE...
Allis Chalmers Disk (A50515)
Allis Chalmers...
1973 CATERPILLAR 988 LOADER (A51222)
1973 CATERPILLAR...
2015 DODGE RAM 1500 CREW CAB TRUCK (A51406)
2015 DODGE RAM...
 
Top