RedDog59,
Thanks /forums/images/graemlins/smile.gif I look forward to seeing your design.
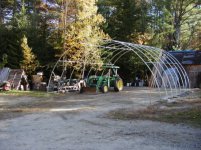
Now to answer your building ?'s I also have a couple of picture of the assembled pipe frame . It's like a huge erector set.
Please understand that I put this together all alone. A 2nd set of hands will make it a little easier. Also get your site AS LEVEL as possible.
</font><font color="blue" class="small">( was it easy to put up )</font>
In general. Yes, although it had some challenges. I found that I had to file the inside edges of most of the rafter pipes in order to get the swaged ends into the unswaged ends.
Getting the first two assembled rafters stood up, connected, square, plumb etc. was a pain. But it is also quite important for the rest of them will reflect and multiplie any irregularities. Trust me. Mine aren't perfect. /forums/images/graemlins/tongue.gif Having the FEL to assist in supporting the rafters as I stood them up and tied things together was a huge help. Alot of creative thinking is required here in coming up with ways to keep things held in place etc. while your clamping the purlins in place etc.
As has always been said. Necessity is the Mother of invention.
It wasn't to hard in getting the end walls put up, I had a 10' step ladder and it sure saved a lot of time. Laying out the main covering was a challange. There is a assembled pipe that goes into a hem on each side, this pipe is used to sinch the main cover down to the rafters. I tied 3 lengths of rope to the pipe, threw them up over the rafter purlins and then little by little, working my way back and forth between the 3 pulled the cover up, over and down the other side. I had to do this twice because the first cover they sent was to long. /forums/images/graemlins/mad.gif
</font><font color="blue" class="small">( did you put in any kind of floor )</font>
No at present it is still just the plain ole ground I started with. I did set each rafter end on 16" sq. patio blocks (had them on hand) to keep the pipe ends from sticking down into the ground.
</font><font color="blue" class="small">( how is it mounted to the ground? )</font>
This was slick. The Farm Tek company sells what they call a DuckBill anchor with a piece of cable already attached and all necessay hardware included. You can buy the drive rod but I made my own by grinding and tapering the end of a piece of re-bar to fit into the duckbill. You slide the duckbill on to the drive rod, drive it down into the ground as far as you can, yet leaving enough cable to work with. Mine vary in depth. Remove your drive rod. I then inserted my drive rod into the end loop of the cable and PULLED. This flips the duckbill so its now kinda cross ways in the ground. You then clamp the cable to a rafter with the provided clampso the cable is nice and tight. The duckbill anchor kits come in differant sizes for variying strengths. I believe I used 6 anchors with a capacity of 1200 lbs each. they were like $6 a piece.
It was a challange to put together, yet it was alot of fun and actually very rewarding is several ways. The adds for the garage says it can be assembled in a day. YAH RIGHT !!!
It took me a tleast a couple of weeks, putting in a few hours here, a couple of hours there and weekend time.
It is honestly the best $1500 I ever spent. I have two full size trucks in it. One of them is leaving Monday when my dad returns from wintering in NV. Then the tractor will go in that side. The 6' clear srip at the ridge and the white interior makes the inside very bright. The 26'W x 24'L is plenty big enough for 2 vehicles but doesn't allow a whole lot of room for various other cosmic debris. Which is fine by me, it keeps the clutter down.
If I can tell you anymore or help explain anything else or take any pictures for you to see. Just ask.