You are using an out of date browser. It may not display this or other websites correctly.
You should upgrade or use an alternative browser.
You should upgrade or use an alternative browser.
Barn Renovation
- Thread starter Bob_In_MN
- Start date
- Views: 2507
More options
Who Replied?
/ Barn Renovation
#1
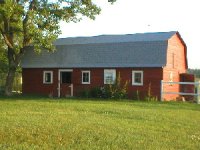
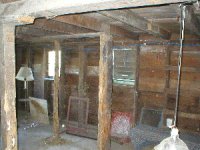
I leveled out the doors on the west side of the barn and removed a partition that divided the north and south half of the west side of the barn. The doors will remain in place and will get new covering (wire). This area will have dog kennels roughed in and will only be used in extreme weather. The rest of the barn will be multi use.
It's hard to tell from the pics, but I have stripped away a lot of wood that was nailed to the wall. I used this would to strenghten the upstairs studs/rafters. Last summer when I was taking off the old shingles, I notice the upper half of the barn to be slightly unstable--the new braces took care of it.
It's hard to tell from the pics, but I have stripped away a lot of wood that was nailed to the wall. I used this would to strenghten the upstairs studs/rafters. Last summer when I was taking off the old shingles, I notice the upper half of the barn to be slightly unstable--the new braces took care of it.
Attachments
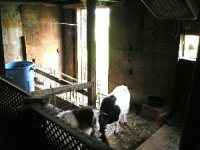
It's hard to tell from the pics, but I spent quite a few hours just taking off old wood and removing partitions. The new owners of the goats picked them up Monday night so now I can start the general cleaning process.
That's all for now.
Bob
That's all for now.
Bob
Henro
Super Member
- Joined
- Jul 4, 2003
- Messages
- 5,007
- Location
- Few miles north of Pgh, PA
- Tractor
- Kubota B2910, BX2200, KX41-2V mini EX
Bob,
Renovating is a lot more work than building new. Keep your energy up!
And the pictures coming too... /forums/images/graemlins/smile.gif
Renovating is a lot more work than building new. Keep your energy up!
And the pictures coming too... /forums/images/graemlins/smile.gif
rancar
Veteran Member
- Joined
- Jan 26, 2002
- Messages
- 1,719
- Location
- Cambridge, New York
- Tractor
- JD425 lawn tractor; JD4710 CUT; JD JX75 Walk Behind
Thanks for re-posting Bob. Hopefully, this will be the last time you're starting this thread. /forums/images/graemlins/wink.gif Look forward to your story and pics as the project proceeds.
...Bob
...Bob
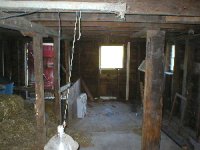
Well--this weekend while being hot and humid was free of other plans so I spent most of Saturday removing the rest of the straw and remaining partitions.
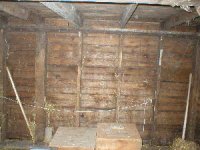
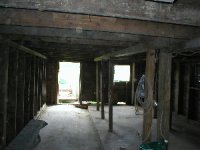
This pic (facing east) shows a number of support posts. There's more posts on this side of the barn than the other. I believe some of them were used to create stalls for the cows and I'd like to remove one of them, but they all appear to be providing support so I will have to give it some more thought. I was even thinking of running a new support beam and using 2 metal posts to replace some of the wood. Still trying to decide if the additional work is worh the space I would gain.
This pic (facing east) shows a number of support posts. There's more posts on this side of the barn than the other. I believe some of them were used to create stalls for the cows and I'd like to remove one of them, but they all appear to be providing support so I will have to give it some more thought. I was even thinking of running a new support beam and using 2 metal posts to replace some of the wood. Still trying to decide if the additional work is worh the space I would gain.
Attachments
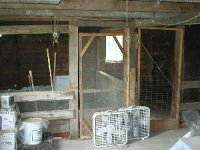
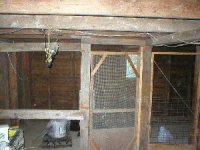
Here's a shot of the other side of the barn. I rebuilt the two doors that will be part of the indoor kennel. The door on the left is off the hinges as it had to be completely rebuilt and I need one of those adjustable brackets that attaches to either side of the door and supports the side of the door without hinges.
The other reason I stopped hear is that just as I was finishing up attaching the grates to the door, I had a slight mishap with my stapler. I was holding a thin piece of wood in my left hand and as I brought the stapler (air driven 1.5 inch staples) across the wood, the stapler slipped, the contact hit the wood and gravity pushed the trigger into my trigger finger sending a staple through the wood and through the knuckle on my left trigger finger. Needless to say, I'm impressed with the power of the stapler. I pulled the staple back out and other than not having full function (it appears to be getting better with time) it's none the worse for wear.
More pics after next weekend.
Bob
Attachments

rancar
Veteran Member
- Joined
- Jan 26, 2002
- Messages
- 1,719
- Location
- Cambridge, New York
- Tractor
- JD425 lawn tractor; JD4710 CUT; JD JX75 Walk Behind
<font color="blue"> I was holding a thin piece of wood in my left hand and as I brought the stapler (air driven 1.5 inch staples) across the wood, the stapler slipped,...sending a staple through the wood and through the knuckle on my left trigger finger...I pulled the staple back out and other than not having full function (it appears to be getting better with time) it's none the worse for wear.</font>
OUCH!!!!! /forums/images/graemlins/shocked.gif Be careful there Bob. You're doing a fine job with this building renovation but it sure isn't worth getting a crippling injury over it. Look forward to seeing more pics as your renovation progresses.
...Bob
OUCH!!!!! /forums/images/graemlins/shocked.gif Be careful there Bob. You're doing a fine job with this building renovation but it sure isn't worth getting a crippling injury over it. Look forward to seeing more pics as your renovation progresses.
...Bob
Thanks Bob
The finger's getting better as the day goes on. Not even severe enough to get out of doing dishes.
The next step is going to be a serious cleaning/disinfecting process. After that, I should be able to run the wiring and begin the insulating process.
I'm also considering what (if anything) I should put on the cement floor. Anyone know of the pros/cons regarding sealing a floor?
Bob
rancar
Veteran Member
- Joined
- Jan 26, 2002
- Messages
- 1,719
- Location
- Cambridge, New York
- Tractor
- JD425 lawn tractor; JD4710 CUT; JD JX75 Walk Behind
Bob...
Attic looks like it has real potential for storage for those things you're running out of space for in the house. Roof looks intact, space seems dry....perfect space for storage.
...Bob
Attic looks like it has real potential for storage for those things you're running out of space for in the house. Roof looks intact, space seems dry....perfect space for storage.
...Bob
Bob,
You're right about the roof--I replaced the shingles last year. Removed the old and put down tar paper then 25 year asphalt shingles. I did the garage at the same time. My pole barn is starting to fill up so the storage idea is a good one.
The garage is interesting--next time I'm taking pics I'll include one. When we first moved in, the garage was covered in the fake brick exterior--not real pleasing to the eye. When I removed this covering, the original wood pattern suggested the garage was made big enough to fit a wagon. Looks like the garage was given an addition when the family got their first automobile. I'm just guessing, but it's the only explanation I can come up with.
Not sure how much I will get done next weekend. I'm having a bunch of guys up to shoot trap in the back yard. Country living is great.
Bob