building a dirt buggy

   / building a dirt buggy #51  
So long as the sacrificial anode is the least noble metal in the system(look at the electromotive serioes which lists the metals in order of potential) you will get some protection. Zinc works good for bronze, brass, steel, stainless, and a host of others.

Aluminum anode will not protect aluminum. You have to go further in the electromotive series with your selection to protect aluminum. If you aren't careful, aluminum or magnesium (or an alloy of both) can act as an anode to "protect" your iron and steel.

Dissimilar metal (AKA electrolytic) corrosion only requires two dissimilar metals to touch and be wetted by an electrolyte (such as water based radiator coolant or whatever.) I have seen aluminum with stainless bolts used to hold crimp on electrical connectors to it where the aluminum mounts were eaten away till the bolts and washers fell through the holes. This was where the unit was exposed to marine air (some salt content.) The crimp connectors often get eaten off first if they aren't burried in good silicone or similar.

Pat
 
   / building a dirt buggy #52  
patrick_g said:
Yo, Glen! Nice ride dude. I could sure use something like that as a ranch work vehicle, sort of a go anywhere mini-pickup.

Pat

Thanks,

We use it to putter in the hills, but it also works well in the snow.
The rear diff is locked (lincoln locker), the front has cutting brakes allowing
full control on all wheels. You can drive in Fwd, 4wd or 4wd Lo. Have not been stuck yet.
P.M.'d you with the specks--no typo it cost $1,500. to make.

Glenn
 
   / building a dirt buggy
  • Thread Starter
#53  
I know about the sacrifical anode used on boats (did anyone know that the sister ship of the Titanic lost its brass screw because of galvanic corrosion ??) but its not really the way i want to go... the zinc anode will spread itself through the cooling system.

Anyway, my problem is solved: My friend works at a big trucking and logistics company. He got 6 meters of rubber hose from their workshop, for free !
This way we only have to add non-conducting material to the cooling system.


Patrick,

I dont think i'm going to race soft fields anyways. Mostly bush with some slippery pine needles on top. Or a corn field, but farmers dont want us on their corn stubble anymore after they have cultivated it.

On a previous Volvo i used for parts, we ripped 2 tires. To be able to continue racing the mud pool behind the farm (it was so muddy that we could only get to the bale stack or the manure pile with a 4wd tractor) i took away teh rubber, and welded 1" pipes on the rims.

In deep mud where a 2wd tractor had trouble to pass through, the cage wheels gave superb traction, better than a 2wd tractor.
A week or so later, in loose sand, i got stuck every time, because it would have already dug in to the floor pan before the wheels fully turned around.
 
   / building a dirt buggy #54  
Renze, Often piers and docks are found to be wired backwards (hot and neutral reversed) and often no third wire ground connection and sometimes neutral and ground reversed. Anyway hooking up your boat's shore power connection to a poorly maintained dock power distribution sistem can result in significant electrolysis damage to submerged metal parts.

In one severe case in San Diego a guy parked his new twin diesel at one such dock and a couple days later when he fired her up he couldn't back out of his slip even applying massive bursts of power in reverse. A diver confirmed the problem. Both his expensive bronze 3 blade props were nearly gone due to the extreme electrolysis rate.

Congratulations on your creative materials acquisition. How long before we see action pix of you (hopefully without police in pursuit) blasting through a turn in your new buggy?

I have a few too many projects going on simultaneously right now to mess with my buggy so I am really envious of you and of 855idiot too. A little overlapping canvas snapped on his roll cage and his buggy would be nearly water/snow proof. My VW buggy is not plumbed for hot air from the engine whereas both of you guys can easily have a good heater.

Pat
 
   / building a dirt buggy #55  
Before I built my buggy I talked with friends who had built Rock Crawlers.
Everyone of them said they wished they had heaters on board.
Even in competition buggies.

With this in mind, I built in a heater.
When its night time and 20 degrees, I turn the heater all the way up to "extra crispy",
I can almost stay warm.

I've considered side curtains but I'm not sure how to make them.

My advice is if you can put a heater in, put it in!!!
 
   / building a dirt buggy #56  
I consulted with an upholstery shop that had experience with boat canvas and together we came up with removable cloth doors like you see on jeeps, removable sun cover on top and removable side (back?) curtains of just flexible plastic to maximize visibility. It isn't nearly a hermetic seal.

At speed in heavy rain it will let water in and it is drafty/cold in winter (no heater) but it is way better than not having any options.

None of the parts depends on other parts so yo can mix and match, i.e. just sun cover and no doors or back curtains or doors (for weed/branch protection) but open everywhere else, or whatever combination you want up to no doors or covers at all. My windshield is fixed position and can;t be lowered like the old Jeeps. I'd rather have the type that lay out on the hood but oh well, What I have is good enough.

From what I can see in your pix, designing a set of covers/doors for your buggy shouln't be all that tough. You need to consider where the water goes when you are parked and in motion, both with various wind directions. You can sew on little gutter things to prevent water from coming in the doors at the top and or where the different pieces fit together. I can transition between any two configurations in no more than about 3 minutes, some in just seconds.

Even my professional production model soft top I had on my 1943 Military Jeep leaked enough in hard rain to make me glad to have the floor drains.

Oh, by the way... I didn't get the PM with the specs

Pat
 
   / building a dirt buggy #57  
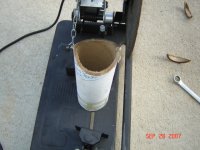
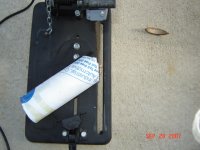
How to fishmouth a tube with a chop saw:

To make a 90 degree tube to tube fishmouth set your chop saw around 35-40 degrees. Align the end of the tube so your cut ends at, or just shy of, the center of the tube, & cut. Rotate your tube 180 degrees, align so the end of the cut is again at, or just shy of, the end of the tube, & cut (see pic #1). This will give you the rough fishmouth (see pic #2). Some minor grinding of the inside of the "points" may be necessary for a tighter fit. When finished, your tubes should fit together as shown in pic #3.

To make a fishmouth at other than a 90 degree angle, the inside angle will need to be increased & outside angle decreased.

Note: A 4" shipping tube was used for illustrative purposes.
 

Attachments

  • fishmouth1.jpg
    fishmouth1.jpg
    144.7 KB · Views: 454
  • fishmouth2.jpg
    fishmouth2.jpg
    153.2 KB · Views: 395
  • fishmouth3.jpg
    fishmouth3.jpg
    139.9 KB · Views: 368
   / building a dirt buggy
  • Thread Starter
#58  
dbdartman said:
How to fishmouth a tube with a chop saw:

To make a 90 degree tube to tube fishmouth set your chop saw around 35-40 degrees. Align the end of the tube so your cut ends at, or just shy of, the center of the tube, & cut. Rotate your tube 180 degrees, align so the end of the cut is again at, or just shy of, the end of the tube, & cut (see pic #1). This will give you the rough fishmouth (see pic #2). Some minor grinding of the inside of the "points" may be necessary for a tighter fit. When finished, your tubes should fit together as shown in pic #3.

To make a fishmouth at other than a 90 degree angle, the inside angle will need to be increased & outside angle decreased.

Note: A 4" shipping tube was used for illustrative purposes.

I have worked at a company where they produced a lot of fencing, for construction projects as well as cow stable fences and gates.
The most useful notcher is this:
Almi
We used to drill a hole in top of this hand powered notcher, to be able to actuate the notcher by a mechanical flywheel press.
For miter notches, they bought a belt grinder with exchangeable rollers to match the pipe diameter:Almi
This is a little slower than the punch notcher, but still way quicker and better than using a saw or grinder.
 
   / building a dirt buggy
  • Thread Starter
#59  
Patrick, The eaten brass propellers tale must be an urban legend.. Electrolysis only works with DC, because the material is drawn with the current, from the positive to the negative pole.... with alternating current, there is no noticeable movement of material from one pole to the other... ;) :p

The main reason for wanting the radiator in the front is heating the passengers: During workable weather there are plenty of other things to do at home. But when it gets chilly in the autumn, and the corn fields in the area are cleared, its the best time to have fun with a buggy.

I'm going to tilt it backwards, and control the air flow with a curtain: In the summer i direct it down, under the buggy, and in the winter i direct it into the passenger cage.


I hope to get along quick, as the corn harvest has broken loose here. A lot of fields are done yet, and it will not take long before they are seeded with winter rye for cover crop or green fertiliser for the winter.
 
   / building a dirt buggy #60  
I fish mouthed every tube on my buggy with an angle grinder...by hand:(

It's not as hard or time consuming as it sounds.
 

Tractor & Equipment Auctions

2007 INTERNATIONAL 7400 DT466 SFA 4X4X CHASSIS TRK (A51406)
2007 INTERNATIONAL...
2025 K4230T UNUSED Metal Storage Shed (A50860)
2025 K4230T UNUSED...
UNUSED 2-Pack Yellow Ratchet Strap Set (A50860)
UNUSED 2-Pack...
2011 Land Rover Range Rover Sport AWD SUV (A48082)
2011 Land Rover...
2022 Spartan SRT-XD Zero Turn Mower (A50860)
2022 Spartan...
Apache 8800E Gasoline Generator (A50860)
Apache 8800E...
 
Top