Clutch Repair Kama 554

   / Clutch Repair Kama 554
  • Thread Starter
#11  
Well, you guys are very supportive and I appreciate the help.
No way could I have split the tractor at my camp, especially now that it's pouring here and forecast is snow. My blocks would have sunk into the mud and I doubt I could've moved either side away from each other.
Let alone get it back together.

I told you I was going to "go for it" today.
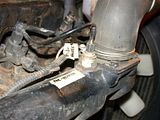
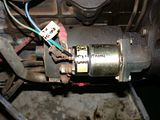
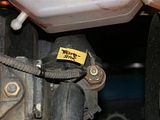
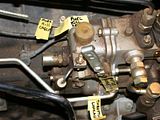
But first, I made a detailed list of everything I could think of that needed to be disconnected so it could go one way or the other. Besides the hydraulic lines and fel brackets, there are a bunch of other electrical and linkage connections that need to come apart. I had to asses which was the easier disconnect. Besides the notes, I took the time to label just about everything on the tractor itself, even the obvious ones. I used yellow tape as a marker to write on so a connection could easily be found later when re-assembling.
Here are a few pics of that, (you asked Larry) but there were way more than shown here.

 
   / Clutch Repair Kama 554 #12  
Make sure the pen you wrote on the tags with doesn't loose it's ink when subjected to the oils of a tractor. Had that happen to a friend who labeled everything because he had to earn the money to buy the parts he found broken after he pulled it completely down. By the time he got around to putting it back together, the tags were all blank. It was a nightmare, because he didn't try to remember anything since it was all written down.
Good luck with it, and when you get done, you can come help me split my Ford 7710!
David from jax

Do a search for splitting stands!!
 
   / Clutch Repair Kama 554
  • Thread Starter
#13  
One of the connections is the return to the fuel tank coming from the fuel injectors. I was going to disconnect it but realized I might start having diesel leak all over. I had to drain my tank to get it below the level. Just before I did that I cleaned the sediment bowl and screen and also made a new gasket for it.


I forgot to mention I also had to drain a lot of the hydraulic fluid when I disconnected the hydraulic lines and finally drain the middle box because the 4wd shaft needed to be disconnected.
Speaking about that, I had a heck of a time trying to remove the front drive shaft. I loosened both front and rear bolts and then tried to slide the protective tube together.
Here's what it looks like underneath.


I could only slide the front towards the rear a little bit so I worked on the rear, sliding it to the front. This finally exposed the splined shaft coupling bushing. I found the roll pin and knocked it out and slid the coupling farther onto the shaft to disconnect the front shaft from the rear drive unit.


There's supposed to be a "spacer" between the shafts and mine did not have one there, but there was a little space about 1/4" or so. There was not enough play in the front splined connection to allow enough room to slide the shaft off the front drive. I couldn't get it away enough from the rear drive unit. I didn't want to force it down and bend or break it, so I left it on as long as it was now disconnected from the rear half. It will slide and stay with the front half for the split.
I will remove it completely later to figure it out.
But what's the trick to removing it and then re-assembling it?
I need to know that from you guys.
 
   / Clutch Repair Kama 554
  • Thread Starter
#14  
So far so good and I was pretty sure I had everything disconnected for the split. Some things would remain on the front half and some on the rear half. I'd spent about 4 or 5 hours screwing around and worrying about that so I double and triple checked.
I cut heavy wood blocks to size to support the two halves and position the two hydraulic car jacks I had. I will use the wood as a safety factor and the jacks to roll the two halves apart. Then I got in there and removed all the bolts around the bell housing.
Loretta came to help roll the tractor apart at this point. We decided to roll the rear end away from the front.
We blocked the front wheels and split the tractor in half!!!


Whew, what relief that was. We adjusted both jacks to take the pressure off the dowel pins and carefully rolled the rear away from the front a little at a time. Each time moving the safety blocks after a small move. It split nicely.
After getting the two halves a good distance apart, I was able to take these shots. In the rear half is the throw out bearing. It slides back and forth but was a little "sticky" for my linking. There is scoring on the face and the OD of it.
On the front half is the mighty clutch attached to the flywheel. It is Huge. You can see the 3 "fingers" completely worn off at the tips.


This is where I stopped for the day.
I had about 6 or 7 hours in getting this part done. A lot of it was marking, labeling, disconnecting, and worrying, but a lot of it was struggling with that front drive shaft.
The actual split was the easiest part!
We will be driving back down South tomorrow so I won't get any further until we come back on Wednesday. At that time I'll do further dis-assembly of the clutch and throw out bearing and components. After I take photos and post them, I will determine what needs to be replaced.
Any tips and suggestions from you guys are welcome.
Rob-
 
   / Clutch Repair Kama 554
  • Thread Starter
#15  
David, not only did I label the physical parts, but I also wrote down every connection in a notepad just for that reason. I pretty much know where everything connects, but will use the notepad as a "re-connect" check list. The list includes re-filling the hydraulics, oils, fuel etc.
Like I said, I was really worrying about it all so I made good notes and I have all these photos and more to show me.
 
   / Clutch Repair Kama 554 #16  
Rob, sorry to hear about the clutch. Looks like when it rains it pours. I think I'll grease my throwout bearing again tomorrow. I don't rest my foot on the clutch but I do work it plenty when I'm moving dirt. I'm at 199 hrs.

You are doing a great job documenting and performing the split.

On the front drive shaft -
"There's supposed to be a "spacer" between the shafts and mine did not have one there, but there was a little space about 1/4" or so. There was not enough play in the front splined connection to allow enough room to slide the shaft off the front drive. I couldn't get it away enough from the rear drive unit. I didn't want to force it down and bend or break it, so I left it on as long as it was now disconnected from the rear half. It will slide and stay with the front half for the split.
I will remove it completely later to figure it out.
But what's the trick to removing it and then re-assembling it?
I need to know that from you guys."

When I removed my front drive shaft I jacked up the front of the tractor (using the loader and jack stands) and loosened up the front axle pivot mount until the axle dropped enough to let me slide the shaft out clear of the gear housing. I think your best bet is to make sure the shaft and covers are in place before you re-assemble the halves.

That stub shaft should turn freely in 2wd. Make sure it rolls smoothly and doesn't have any wiggle i.e. make sure those bearings are good. It will be easy to change them now if they need it. It looks like some oil was dripping from the shaft cover - a sign that there may be a problem with the seal/bearings.

Good luck - I'm sure you'll have it back together in no time. Let's hope that's it for a while.

Brad

Brad
 
   / Clutch Repair Kama 554 #17  
I will remove it completely later to figure it out.
But what's the trick to removing it and then re-assembling it?
Like I said, let me know when you start to split it, and I'll offer some suggestions from my own lessons-learned. The drive shaft housing tube did not need to be loosened at the front differential. All that is necessary is to remove the bolts bolts that hold the rear housing to the transfer case. That's on the short section of larger diameter housing tube. Slide that section forward over the main tube to expose the actual driveshaft collar. Remove the roll pin, slide (or tap) the collar forward till you see the air gap between the driveshaft and the transfer case output shaft.

There was no "spacer" in mine either. If they get some of those components from different suppliers, the shafts and/or stubs may be of inconsistent lengths - hence the need for an occasional spacer.

Anyway, that's the end. There's no need to actually remove either the housing or the driveshaft from the front half. Let it just hang off the front differential until it's time to reassemble.

//greg//

Edit: I see in a subsequent photo that you've apparently already added this to your own lessons learned list.
 
Last edited:
   / Clutch Repair Kama 554 #18  
You can see the 3 "fingers" completely worn off at the tips.
Yours are in even worse condition than were mine. Over time, you clearly pushed the TOB clean through the fingers. I'm guessing you must have compensated quite a bit with the external linkage. When viewing your earlier photos (before the split) I was wondering why the bearing looked blue around the circumference. Now I know why.

When you get your new bearings, they'll be almost dry. Pack both well before installation. If you don't have a bearing packer, now's the time to consider one. One of the nylon universal types should give you change back from a $10 bill.

When you get your new clutchpack - if you ordered one - find out if Chip adjusted the stack height, or just shipped it without taking it outa the factory box. And if you're only disassembling your clutchpack for inspection and reassembly, make sure you readjust stack height yourself. I used straight edges and a 6" caliper with a depth probe. In either case, you're going to have to level the fingers. I found that easiest done with the clutchpack on a level work bench - fingers up. I then set a 4"x4" piece of 3/8" plexiglass on the fingers, and fine tuned with a bubble balance.

On a different photo, I noticed an oil track on TOB. And there's oil staining on the clutchpack housing. I'm guessing they're from the the same source. You might want to investigate where that came from.

There wasn't a photo of the front end, so I can't tell if you blocked the pivot point. At first glance one assumes three point support on the front half. Not true. It's balancing on the blocks - and on the pivot bolt. To prevent the front half from overbalancing and simply falling over, you should insert right and left shims between the front axle housing and the engine mount - to temporarily prevent any pivoting at all.

//greg//
 
Last edited:
   / Clutch Repair Kama 554 #19  
Once you get the FEL off, you can then remove the tower on the right side of the tractor to expose the inspection window for the clutch. In order to adjust the clutch, you would have to do this anyway. I had never done this nor adjusted the clutch since I purchased the tractor 3-1/2 years ago, so I recommend you consider at least checking the clutch, to be sure it's adjusted correctly.
That is so weird. Seeing all the wear you have on those pressure plate actuator fingers it would seem you would have had to adjust the clutch. Maybe the finger wear was just enuf to prevent the clutch pedal play from decreasing as normally happens with clutch wear. In this case the wears apparently cancelled the effect at the pedal, and not seeing external evidence of clutch wear turns into bad news.

:confused:Have you found anything yet that would account for that much wear on the fingers? I seems that the bearing must either not be turning correctly or the finger rotation is not concentric with the bearing.
larry
 
   / Clutch Repair Kama 554 #20  
Rob that pressure plate fingers looks like one I had wear off my chevy when the throwout bearing froze up does the bearing still spin free front to back?
Im sure you will replace it any way

tom
 

Tractor & Equipment Auctions

New/Unused Forklift Jib (A51573)
New/Unused...
Set of Ag R4 Wheels and Tires (A53472)
Set of Ag R4...
2010 Ford Edge SE SUV (A51694)
2010 Ford Edge SE...
2014 Chevrolet Tahoe SUV (A51694)
2014 Chevrolet...
Fuel Tank (A51573)
Fuel Tank (A51573)
2025 New/Unused Wolverine 48in Skid Steer Trencher (A51573)
2025 New/Unused...
 
Top