Clutch Repair Kama 554

   / Clutch Repair Kama 554
  • Thread Starter
#21  
Rob that pressure plate fingers looks like one I had wear off my chevy when the throwout bearing froze up does the bearing still spin free front to back?
Im sure you will replace it any way

tom

Haven't checked it completely yet Tom, but you're right, I'll probably replace it.
 
   / Clutch Repair Kama 554
  • Thread Starter
#22  
Larry,
I haven't inspected the throwout bearing yet so I don't know the exact cause. There was plenty of play in the clutch before, maybe a little too much, but your observation might be correct? I won't know until next week when I get back up to work on it again.

Brad and Greg,
Thanks for adding that information about the drive shaft.
For some reason I was thinking there had to be a way to get it in there when the tractor was assembled. It's going to be tricky lining EVERYTHING up when sliding it back together then, shees. You'd think the shaft would be designed with 2 couplers or whatever to collapse enough to remove and install it from the tractor without having to split or loosen the front end? Brad, I remember your post about removing it but couldn't find the darn post.
BTW, there are no oil leaks. That oil you see are drips from when I removed the tube covers from each end and oil came out from the rear connection BEFORE I fully drained the middle case. I saw the drain plug and was wondering how much would come out if I just took the tube connection off ... well, a lot did.:)
The front connection had grease from the grease zerk all packed around it so I took a rag to smear it out of the way. It may look like mess because of that.

Also, I appreciate both you guys giving me information.
I think I have your private emails from when we used to talk before, but I will send you guys a PM with my email (new) and my phone number. If you don't mind sending your either email or phone back so I can call you guys in a pinch. I only get on the computer once a day because of my slow connection up here. I could've really used some guidance on that front drive shaft. I'll bet I spent at least 2 hours or more on my back trying to figure it out, only to find out what I did is all I could. How much engagement is on the front spline? How much would I need to move the shaft back to get it off that spline? I'm seriously thinking about cutting the shaft and making another bushing to allow enough compression for removal and installation on the tractor with only removing the rear tube cover.
 
   / Clutch Repair Kama 554 #23  
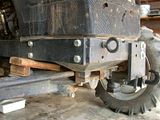
..............There wasn't a photo of the front end, so I can't tell if you blocked the pivot point. At first glance one assumes three point support on the front half. Not true. It's balancing on the blocks - and on the pivot bolt. To prevent the front half from overbalancing and simply falling over, you should insert right and left shims between the front axle housing and the engine mount - to temporarily prevent any pivoting at all.
//greg//

Perhaps if you Look on page 1, reply #2 Rob DID blocked the front axle to keep it from pivoting, good thinking Rob. Greg - you must have missed that pic? Just in case you did this is it:


Rob,
Amazing getting it split so quickly. Good job marking everything you took off, plus with all the pictures you should have no trouble getting it back together. Man those fork fingers sure are worn down to nothing. Did you have time to check the condition of the clutch disc's?
Before you take the clutch pack off, maybe a good idea for you to measure for making or purchasing a clutch pilot bearing alignment tool?
As long as you got it apart, perhaps it be a good idea to replace both the Main and PTO clutch disc's?


Larry
 
   / Clutch Repair Kama 554
  • Thread Starter
#24  
Greg, it's good to hear that your shaft didn't have that space in there either.
I though I'd lost mine or it was stuck inside the coupler or I was losing my mind.

About the blocking of the tractor:
There wasn't a photo of the front end, so I can't tell if you blocked the pivot point. At first glance one assumes three point support on the front half. Not true. It's balancing on the blocks - and on the pivot bolt. To prevent the front half from overbalancing and simply falling over, you should insert right and left shims between the front axle housing and the engine mount - to temporarily prevent any pivoting at all.
Those blocks I just posted are so the tractor won't fall in case the car jack fails. Look at my 2nd post on this thread. Look in the bottom row of photos the very first one shows I've "wedged" the front axle with a sledge hammer and wood wedges to keep the axle from pivoting. I think this is what you're referring to and maybe missed it?

When you get your new clutchpack - if you ordered one - find out if Chip adjusted the stack height, or just shipped it without taking it outa the factory box. And if you're only disassembling your clutchpack for inspection and reassembly, make sure you readjust stack height yourself. I used straight edges and a 6" caliper with a depth probe. In either case, you're going to have to level the fingers. I found that easiest done with the clutchpack on a level work bench - fingers up. I then set a 4"x4" piece of 3/8" plexiglass on the fingers, and fine tuned with a bubble balance.
I am very interested in what you said. Chip said I'll have to adjust the clutch myself and they don't do that.
-1 Can I do all the adjustments on the bench or will I have to install the clutch and do it through the inspection window with the tractor bolted together?
-2 What you describe here, is this different from adjusting the clutch once it's mounted onto the flywheel?
-3 If I adjust the stack height and fingers on the bench, will I need to do anything to it once the tractor is bolted together again?
-4 Chip mentioned using a concentric tool to line up the plates.

For measurement and level I will most likely use indicators and gauge blocks to set it.
I should be able to get it right on, or at least get an average if the plates are not parallel.
Will talk more On Wednesday...
 
   / Clutch Repair Kama 554 #25  
How much engagement is on the front spline? How much would I need to move the shaft back to get it off that spline? I'm seriously thinking about cutting the shaft and making another bushing to allow enough compression for removal and installation on the tractor with only removing the rear tube cover.
The bearing doesn't appear to have seized, or a lot more blue discoloration would be evident. I'll bet it's pretty dry though. Regardless of the condition of the bearings, it's a lost opportunity NOT to replace both - when a tractor is split at the bellhousing.

If you're talking about the forward end of the front drive shaft, it should terminate in an unpinned flange that mates with the male input spline of the front diff. You should be able to remove that little M8x16 bolt that's holding the front sleeve in place, then pull the whole thing - shaft, housing, sleeve, and all - right off the front diff. That's assuming you already have the transfer case end free. No modifications should be necessary.

//greg//
 
Last edited:
   / Clutch Repair Kama 554 #26  
-1 Can I do all the adjustments on the bench or will I have to install the clutch and do it through the inspection window with the tractor bolted together?
-2 What you describe here, is this different from adjusting the clutch once it's mounted onto the flywheel?
-3 If I adjust the stack height and fingers on the bench, will I need to do anything to it once the tractor is bolted together again?
-4 Chip mentioned using a concentric tool to line up the plates..
Missed the earlier photo showing that you'd already shimmed the front pivot, sorry.

1. Definitely on the bench. I wouldn't even want to consider trying to adjust stack height through the inspection window.
2. Well, you could do it on the flywheel instead of on the bench, but I think you'll find working horizontally on the bench - instead of vertically on the flywheel - will be easier on your back. To simulate the flywheel (on the bench), I used a 3/4" piece of plywood with a hole cut out of the center. That's necessary to accommodate the PTO friction disc flange. By the way, that flange is not the same depth on either side of the disc. So it's important to note which direction your OE friction disc dismounts.
3. No. If done correctly, that will set it up perfectly for the normal gap and play adjustments at the external linkage
4. Maybe if you adjust stack height on the flywheel. I just used a straight edge on the bench.

Oh, and you said there's no leak. It might not hurt to take a second look at that. Because - unless you actually did grease the TOB since you bought the tractor - I find it hard to otherwise explain the oil staining on your clutchpack housing.

//greg//
 
   / Clutch Repair Kama 554 #27  
Chip said I'll have to adjust the clutch myself and they don't do that.
-1 Can I do all the adjustments on the bench or will I have to install the clutch and do it through the inspection window with the tractor bolted together?
-2 What you describe here, is this different from adjusting the clutch once it's mounted onto the flywheel?
-3 If I adjust the stack height and fingers on the bench, will I need to do anything to it once the tractor is bolted together again?
-4 Chip mentioned using a concentric tool to line up the plates.

For measurement and level I will most likely use indicators and gauge blocks to set it.
I should be able to get it right on, or at least get an average if the plates are not parallel.
Will talk more On Wednesday...
Rob, in order to even up the fingers you must bolt the pressure plate, with clutch under it, to the flywheel. You can do this on the bench if you take the flywheel off. I think I would leave the flywheel mounted and just do it on the engine, making all finger to flywheel distances equal.

What would really bother me is not having a good idea of the fault that made this happen. This is not something to be repeated every 1Khrs.:(
larry
 
   / Clutch Repair Kama 554 #28  
I was wondering Rob, if you have you RPMs set by the hand throttle, and then operate the tractor, or allow the tractor to idle and just use the foot throttle to control the RPMs. That is a nasty wear through on the fork fingers. Like the T.O. bearing seized, or was dragging a bit. If the clutch is being used at a set operating PRM around 1500, then could the engauging of the T.O. bearing to the fingers just cause the rapid wear? A bit of a puzzle. All the components are very heavy duty looking, and over sized by what I see. I did replace my T.O. bearing in the IH3444 when I did the clutch. It was the same as some heavy tractor trailer rigs. Same number.....and was $18 each. I bought 2 just to have a spare. Thanks for the great documentation, and pictures. Is it possible to just relace the fingers, or fabricate new ones and install them? I would think some 4340 steel would work fine, even without heat treatment. :)
 
   / Clutch Repair Kama 554
  • Thread Starter
#29  
The bearing doesn't appear to have seized, or a lot more blue discoloration would be evident. I'll bet it's pretty dry though. Regardless of the condition of the bearings, it's a lost opportunity NOT to replace both - when a tractor is split at the bellhousing.

If you're talking about the forward end of the front drive shaft, it should terminate in an unpinned flange that mates with the male input spline of the front diff. You should be able to remove that little M8x16 bolt that's holding the front sleeve in place, then pull the whole thing - shaft, housing, sleeve, and all - right off the front diff. That's assuming you already have the transfer case end free. No modifications should be necessary.

//greg//

I think that bearing is dry.
When I pulled the throw out bearing forward, it moved away very slowly. I was under the impression it would move away from the clutch at the same rate my clutch pedal was moving?
About the 4wdrive shaft, I was talking about making something that would allow installation or removal of the 4wd shaft when the tractor is already together. It seems like a stupid design that you have to either split the tractor or do like Brad did and loosen the front axle to tilt it enough to get the shaft in or out. I may not do that after all if I run out of time. It's not like I don't have my plate full or anything.:)
 
   / Clutch Repair Kama 554
  • Thread Starter
#30  
Missed the earlier photo showing that you'd already shimmed the front pivot, sorry.

1. Definitely on the bench. I wouldn't even want to consider trying to adjust stack height through the inspection window.
2. Well, you could do it on the flywheel instead of on the bench, but I think you'll find working horizontally on the bench - instead of vertically on the flywheel - will be easier on your back. To simulate the flywheel (on the bench), I used a 3/4" piece of plywood with a hole cut out of the center. That's necessary to accommodate the PTO friction disc flange. By the way, that flange is not the same depth on either side of the disc. So it's important to note which direction your OE friction disc dismounts.
3. No. If done correctly, that will set it up perfectly for the normal gap and play adjustments at the external linkage
4. Maybe if you adjust stack height on the flywheel. I just used a straight edge on the bench.

Oh, and you said there's no leak. It might not hurt to take a second look at that. Because - unless you actually did grease the TOB since you bought the tractor - I find it hard to otherwise explain the oil staining on your clutchpack housing.

//greg//

Thanks for this information Greg.
Especially the part about the PTO friction disc flange not being the same on either side. I will use your post as a guide line to set up the clutch and probably do all this on the bench. Saving my back is a prime concern for me at my age and shape. I got your email and Brad's too ... thanks.

I'll check the oil staining again too. There was a small pile of grease on the bottom of the bell housing on the TB side right where the grease hole is. I've greased that regularly over the last 3-1/2 years with a squirt or two every week.
 

Tractor & Equipment Auctions

Pull-Behind Smooth Drum Ballast Roller (A51691)
Pull-Behind Smooth...
2011 Kia Sportage SUV (A51694)
2011 Kia Sportage...
2022 COSEN INTERNATIONAL INC V-1822 BAND SAW (A51248)
2022 COSEN...
TMA (A49461)
TMA (A49461)
2009 Pontiac G6 Sedan (A51694)
2009 Pontiac G6...
SPEECO SPLIT MASTER 15 TON PORTABLE WOOD SPLITTER (A51248)
SPEECO SPLIT...
 
Top