Well, it's been over two years since my last post but I see that Eddie and company are still at it. Fun to catch up. I've just been busy with work and haven't made time for many projects. Just saying hi again.
You are using an out of date browser. It may not display this or other websites correctly.
You should upgrade or use an alternative browser.
You should upgrade or use an alternative browser.
Creating a Lake
- Thread starter EddieWalker
- Start date
- Views: 1045588
More options
Who Replied?
/ Creating a Lake
#1,621
OP
EddieWalker
Epic Contributor
Hey Rick,
Good to see you and thanks for stoping by.
I just noticed that this thread broke 300,000 views. That's COOL !!!!!!!!!!!
Eddie
Good to see you and thanks for stoping by.
I just noticed that this thread broke 300,000 views. That's COOL !!!!!!!!!!!
Eddie
jenkinsph
Super Star Member
Eddie,
Thats because it is to my knowledge the best and most informative thread on TBN.
Keep up the good work.:thumbsup:
Thats because it is to my knowledge the best and most informative thread on TBN.
Keep up the good work.:thumbsup:
patrick_g
Elite Member
Does this thread have an end????
HOPEFULLY NEVER!!!
OP
EddieWalker
Epic Contributor
Does this thread have an end????
It's still evolving and turning into a trophy bass lake. I have a few friends that come over to fish it and they have been doing pretty good. The bass seem to be around 2 to 3 pounds with a few smaller ones, and the catfish are are that big to about 6 pounds. The bluegill are half a pound on average, but only the smaller kids are fishing for them.
I haven't even started on any of the work that I have planned for around it. Gazebo's, Docks, a bridge, picnic and benches will all be added to it, plus a path going around it.
While the actual digging is done, what will make it uniqe is still waiting on me to get started. I'm wanting to do some of those things right now, but have to finish off some other projects that are more pressing. Being responsible and doing what has to be done before what I want to do is killing me.

Eddie
jimmyj
Elite Member
- Joined
- Aug 28, 2007
- Messages
- 4,126
- Location
- Ontario Canada
- Tractor
- Allis Chalmers 616 (Two) and a Kioti CK30 HST with loader and backhoe
Bass fishing is a blast. It's neat how you have a mini ecosystem there Eddie. Have you ever considered adding other types of fish? I don't really know much about that sort of thing but was wondering considering you have multiple types already.
patrick_g
Elite Member
I haven't even started on any of the work that I have planned for around it. Gazebo's, Docks, a bridge, picnic and benches will all be added to it, plus a path going around it.
Eddie
Eddie, I have developed a set of reusable forms for casting DIY concrete picnic tables and benches. It makes replicating concrete tables and benches pretty easy. You do it once and that is that for a loooooong time. No rot, no splinters, no scraping and painting. If you want color put it in the concrete mix and avoid periodic repainting.
The forms are cheap and easy to make and can be reused indefinitely when you use a little used motor oil (or similar) for mold release and water proofer for the lumber forms. I auger into the ground for the supports of the benches and table but you can cast "feet" to rest on the surface if you think mobility is a big issue. I prefer mine firmly attached to the world. They also make great shooting benches.
Let me know if you are interested and I'll give you my "secret design."
If you insist on mobility than take a hint from a WW II Navy vet friend of mine who decades ago designed concrete patio and pool furniture that floats! His secret was to replace most of the aggregate and sand with Styrofoam of similar size granularity. The result looks and feels like concrete but floats.
Being the frugal sort, I use recycled cardboard waterproofed with used motor oil in place of sonotube. Just oil the inside, wrap it up, and secure it with the universal product... duct tape.d
Pat
OP
EddieWalker
Epic Contributor
Pat
I'd love to see how your tables look. My thought on picnic tables is to keep it simple and easy to maintain or replace. I've gone back and forth about making them portable or permanent. I know that people like to move them around, and I'm including myself on that list. Unfortunately, they can move all over the place and I would prefer they stay where I want them.
I like the idea of concrete beause you can't carve your initials into them, but of course, some idiot will just paint or write something on them too.
This is something that I've been consdering. 6' Commercial Picnic Table Galvanized Frame Kit - eBay (item 290427948705 end time May-22-10 11:01:34 PDT) Just buy the frames online and then get the wood localy. There are several suppliers with prices being pretty close to each other. Galvanized metal and round tubes for sliding in the grass seem to be a winning combination that's used all over the place.
Then there is this style with the plastic tops that look nice and should be more vandal resistant. Leisure Time Poly Picnic Table with Steel Frame — 72in.L, Gren, Model# 25067 | Picnic Tables + Lawn Furniture | Northern Tool + Equipment
We're getting a Northern Tool here in Tyler and when it opens, I want to go see if they have any of those picnic tables. I hate to buy and not know what I'm getting until it gets here, so I'm in a waiting game on those right now.
I hate the wood tables, and thoght about making my own frames with pipe and angle iron that I set in concrete, but I doubt they wil look very nice and for the amount of work that goes into it and buying the material, I think it's cheaper to just buy them already done.
Thanks,
Eddie
bindian
Super Member
Quote:
Originally Posted by how to build a pond View Post
Does this thread have an end????
The post above and the others seem to be deleted. I was reading them at 2 this morning. He was asking abrasive questions on another pond thread here also. He even started his own thread asking for pond tips. His user name and his website were the same, so I think he was trying to drum up business. I can't find that thread either. So I think he was deleted all around.
Anyway, Eddie I am glad to read of more projects for your Lake.:thumbsup: We saw a water mocassin in my pond a week ago and late last Friday night, my son took his 22 and I took my flashlight out to look for it. We found the slinking predator hunting toads that were breeding near the water line. One shot and that cotton mouth was down. Second shot was next to the first shot. I call my son dead eye. That snake is pushing up daisys now. It was over 2 feet long.
Originally Posted by how to build a pond View Post
Does this thread have an end????
The post above and the others seem to be deleted. I was reading them at 2 this morning. He was asking abrasive questions on another pond thread here also. He even started his own thread asking for pond tips. His user name and his website were the same, so I think he was trying to drum up business. I can't find that thread either. So I think he was deleted all around.
Anyway, Eddie I am glad to read of more projects for your Lake.:thumbsup: We saw a water mocassin in my pond a week ago and late last Friday night, my son took his 22 and I took my flashlight out to look for it. We found the slinking predator hunting toads that were breeding near the water line. One shot and that cotton mouth was down. Second shot was next to the first shot. I call my son dead eye.
That snake is pushing up daisys now. It was over 2 feet long.dcyrilc
Super Member
I hate the wood tables, and thoght about making my own frames with pipe and angle iron that I set in concrete, but I doubt they wil look very nice and for the amount of work that goes into it and buying the material, I think it's cheaper to just buy them already done.
Thanks,
Eddie
Eddie,
From what I've seen of your work, I simply cannot believe that they wouldn't look fantastic. Everything you make reeks of elegance and taste!:thumbsup:
Tororider
Veteran Member
Pat,
Add me to the list of people who would like to at least see the finished product if not the secret recipe and forms.
Add me to the list of people who would like to at least see the finished product if not the secret recipe and forms.
patrick_g
Elite Member
Eddie, Tororider, et al, You know the old chestnut about the shoemaker's kids going barefoot and the cabinet maker's wife keeping her kitchen stuff in apple crates... Well I don't have any of "MY" concrete tables here at our "new" place but I have freely shared the plans for the forms so I have no clue how wide spread they may have become. I didn't take pix of any. Oh well...
I hope to pour some on my place one of these days.
Anyway as hands-on kinda guys we have here I'm sure nearly anyone could easily replicate my forms from a verbal description.
The table top form is OSB, ply, or whatever with 2x4 (some prefer 2x6 or custom thickness) edges. The "floor" of the form for the top is in two pieces with half circle cutouts which mate together to be circles where the sonatube (I use cardboard waterproofed with used motor oil and banded with duct tape) connects
Here is the process: auger (or dig if you are a glutton for punishment) two holes for the support columns. I used 12 inch auger because that was what was mounted but smaler should work fine or even pipe if you transition from pipe to rebar properly (haven't trie the pipe thing.) Into these holes you put your cardboard tubes. Stick some rebar in the holes. This rebar has 90 degree bends and the horizontal part is inside the cast top. You use a couple sawhorse style supports to hold the form for the top. The top form, in two pieces, is held together with drywall screws through the floor into the 2x edges. I promote larger than standard tables. I go for 4x8 ft. I put the center of the column cutouts in 20% from the ends of the table top (the little black diamond mark on your tape measure or 19.2 inches)
The top will be heavy when you pour the mud into it so you want to run some 2x lengthwise of the top from sawhorse to sawhorse so the form doesn't sag. This is not screwed to anything , just laying there.
With the sawhorse like supports (shoring?) supporting the two top pieces (each 2x8 ft) you screw the 2x around the edges and then turn it over so the 2x will hold mud. A little used motor oil brushed on the forms makes getting it apart easier but put duct tape down the center seam before you use the oil. I like two layers overlapped and offset a little to make a strip about 1 1/2 times the duct tape width. This maintains an oil free zone so duct tape will stick on subsequent use of the forms.
Your home brew sonotube is rolled up and put through the holes in the top and down into the holes in the ground a bit. A utility knife is good for trimming the cardboard where it sticks up too far into the table top. Seal the joint between your "sonotube" and the holes in the form for the top with duct tape if you have left some oil free surface on the cardboard and top form. Otherwise cut several slots in the cardboard tube and bend the sections over and stapel them to the plywood floor of the form for the table top.
Drop in your bent rebar to connect the columns to the top and install and tie the rebar you want in the top. You can use welded wire mesh too in the top instead of rebar if you want but do add steel as unreinforced concrete is disapointing.
Of course you leveled the top form, right? Now you pour concrete onto the table top letting it run down into the columns and into the ground. Oh yeah, hole depth depends on your frost line of course. Just keep adding mud till everything is full and then screed off the top. After the water that floats to the surface has "flashed off" trowel the surface to your desired finish. Really slick is easier to clean.
Forming and pouring the benches is a repeat of the table top job with shorter support columns and narrower forms. As the forms are reusable you don't need two bench forms if you are willing to wait to pour the second bench. I don't personally know anyone with that patience and to my knowledge (limited) everyone has made two bench forms to be able to do the whole job all at once.
Variations on a theme... you can put a slight curve to the 2x lumber used for the sides of the forms (actually the end pieces, i.e. short dimension) for the table top and the benches and they will shed water better so they dry faster after a dew or rain. At my level of skill with a trowel I can't avoid concave flaws in the surface so a slight crown compensates for that and the tops don't hold puddles.
More variations... you can put concrete dye in the mix and get just about any color you want. Red Brick or terra cota is nice and adding colorant to the mixer and then shutting the mixer off after just a rev or two gives a neat marbled look.
Oh, I almost forgot... you want to put a piece of trim around the top of the side boards of the top and bench forms. to get a finished edge instead of a sharp square edge. A triangular cross section about 3/4 inch gives a nice beveled edge but you can use a router to make just about any shape you want to the edge of the finished product. You need to go all around the top edge of the poured surface with a pointed trowel or other implement to make sure you don't have voids under the trim I mentioned as an afterthought. This will make for a nicer top with less chance of flaws in that top edge.
You also want to put trim in the bottom corners (horizontal) to not have a sharp edge to the table top or benches. If you don't then someone will probably cut their legs (especially in shorts or a swim suit) on the sharp edge. Similarly you want to put a piece of trim vertically in all four corners of the top and each bench to eliminate sharp edges to the finished product.
Yet more variations on a theme... I have not done it or seen it but got feedback where someone says they evolved my design to accommodate a round table with one central column and made three curved benches. I may try something similar but modified yet again to allow an umbrella pole in the center of the table. If you cast a couple PVC pipes in the rectangular table top described above they will accept supports for a sun shade. Possibilities for variations are endless and limited only by your imagination. If I were artistic and could do decent wood carving I'd carve a design in relief on the 2x edges of the forms and get decorated edges on the table and benches. You'd have to maintain "draft" to be able to get the forms to release from the concrete. I suppose you could carve designs in boards to use to stamp a border around the edges of the top surface of the table and maybe the benches too but nothing very deep in relief as it would be uncomfortable to sit on and make the top harder to clean.
I have a mixer that goes on my 3PH and is run by the PTO. It raises by hydraulics and dumps by gravity. If I get caught up with enough of my projects I want to make picnic tables near 4-5 of my 12 ponds. Of course there is the basement's secondary kitchen's cabinets to build and install, shelves in the main (ground floor) kitchen cabinets that need to be converted to drawers (love that 20-20 hindsight), trees to fell and cut up, trenches to dig, ice storm damaged limbs to remove and dispose of, a dirt floor of a 35x70 metal bld to level and prep for paving, and on and on and on. Did I mention having 36 black Angus to deal with, a couple miles of cross fencing to install, a 14x14 barn door to fabricate and install and gee, I get tired just thinking about my projects. I hope to take a break and just make some tables irrespective of other projects.
A few parting remarks: Put big pads under the feet of the sawhorses so they don't sink into the ground under the weight of the concrete. If you crown the top or benches I recommend form edges to give greater depth than a 2x4 which is only 3 1/2 inches before you curve it. A 2x6 is 5 1/2 and may be a little excessive but 4 1/2 works for the edges and about 5 in the middle.
I haven't tried the following yet or seen it tried for a table and or benches but I have done it for suspended slab floors, i.e. a slab floor with a basement under it. Essentially you form up concrete beams with a flat cap on top. This takes less concrete but is really strong for the amount of material used. As applied to the table you would need to have edges for the forms made from about 2x8 and you will make the cross section corrugated by the following method. Rip 2x4 stock twice to get a tapered cross section. The cross section will be a truncated triangle. The wide edge is screwed to the bottom of the form for the table top. You need to use pretty good quality for these or take the time to fill any imperfections. A well dried coat of paint and then a coating of used motor oil will help these pieces release from the concrete when you pull the forms. You will get a top that is strong for the weight and amount of concrete used. Put rebar near the bottom of the beams formed up by these tapered inserts. Arrange the location of the inserts so that there is an insert at the edge of the top to give leg clearance for the table users. Otherwise larger persons will not fit comfortably and if you raise the table column height to compensate the table is too tall for smaller people. The top of the bench should be about 19 inches above grade and I forget what the table height was. (So measure a table you like.)
Pat
OP
EddieWalker
Epic Contributor
No decisions on picnic tables yet. Northern Tool just opened their store here in Tyler and I'm wanting to go there and look at their picnic tables. Plus a couple dozen other things, maybe more. LOL
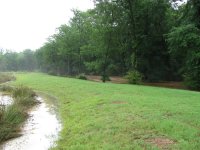
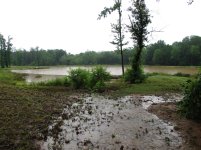
The big news is that to I've received well over 8 inches of rain so far, and it's still coming down. Add yesterdays rain to it, and I'm over ten inches in a day and a half. Everything around her is flooding and there are several dozens of roads that are closed.
Lake Marabou went from being a foot low, to being a foot above full. The reeds grow right at waters edge when full, and I when I mowed last week, the water was below the reeds. I even mowed some of them down in places.
I walked through the spillway, and its amazing to see all that water coming out!!!! I'm hoping my fish have enough sense to swim up streem, but there's no telling how many I'll lose. I don't even know if that's a good thing or a bad thing. I'm worried that I'm over populated and not taking enough out, but since I can't change it, I'll just live with whatever happens.
In one of the spillway pics, you can see the brown water coming out of Lake Marabou, and the clear water coming out of the woods. There is another picture showing water going into Lake Marabou, and it's clear too. My problem with brown water is coming from the areas that I moved alot of dirt, and it hasn't grown back again. In the last picture, you can see part of that pasture, and how it's gotten alot better. Of course, there are still other areas of exposed dirt that are carrying that silt down to the pond.
Wiggins Creek is my property line, and it's normally at the bottom of a four foot deep ditch. Twice before in the past five years I've seen it flood like this. This time, the water is at the same height, but seems to moving alot faster then I remember. I have enough grass on the dam to keep it safe, and the dam is so much bigger then it needs to be, that I'm not worried.
The biggest news is just how well the spillway is working. I'm very please and so happy that I don't have pipes in there. Of course, even with pipes, I'd have to have an emergancy spillway. The spillway is 24 feet wide and it's doing a fantastic job of letting the water out without causing any erosion. It's so nice to see a plan work out!!!
Thanks,
Eddie
OP
EddieWalker
Epic Contributor
No decisions on picnic tables yet. Northern Tool just opened their store here in Tyler and I'm wanting to go there and look at their picnic tables. Plus a couple dozen other things, maybe more. LOL
The big news is that to I've received well over 8 inches of rain so far, and it's still coming down. Add yesterdays rain to it, and I'm over ten inches in a day and a half. Everything around her is flooding and there are several dozens of roads that are closed.
Lake Marabou went from being a foot low, to being a foot above full. The reeds grow right at waters edge when full, and I when I mowed last week, the water was below the reeds. I even mowed some of them down in places.
I walked through the spillway, and its amazing to see all that water coming out!!!! I'm hoping my fish have enough sense to swim up streem, but there's no telling how many I'll lose. I don't even know if that's a good thing or a bad thing. I'm worried that I'm over populated and not taking enough out, but since I can't change it, I'll just live with whatever happens.
In one of the spillway pics, you can see the brown water coming out of Lake Marabou, and the clear water coming out of the woods. There is another picture showing water going into Lake Marabou, and it's clear too. My problem with brown water is coming from the areas that I moved alot of dirt, and it hasn't grown back again. In the last picture, you can see part of that pasture, and how it's gotten alot better. Of course, there are still other areas of exposed dirt that are carrying that silt down to the pond.
Wiggins Creek is my property line, and it's normally at the bottom of a four foot deep ditch. Twice before in the past five years I've seen it flood like this. This time, the water is at the same height, but seems to moving alot faster then I remember. I have enough grass on the dam to keep it safe, and the dam is so much bigger then it needs to be, that I'm not worried.
The biggest news is just how well the spillway is working. I'm very please and so happy that I don't have pipes in there. Of course, even with pipes, I'd have to have an emergancy spillway. The spillway is 24 feet wide and it's doing a fantastic job of letting the water out without causing any erosion.
I also saw that my wide, shallow ditches in my big pasture where doing a good job of catching runoff and sending it to Lake Marabou. That was alot of work, and it's nice to see it doing what I had hoped it would.
It's so nice to see a plan work out!!!
Thanks,
Eddie
Attachments


lakngulf
Veteran Member
That's a lot of rain. But looks like your spillway it handling it. Did I see the Lock ness monster in one of those pictures?
patrick_g
Elite Member
During a similar "WET EVENT" I had fish wash out of ponds, across hundreds of feet of pasture, and into a downstream pond. This happened in three different ponds of mine that I know of and maybe more.
I used to have just channel cat and fathead minnows in one pond but thanks to overflow down a seasonal creek connecting some ponds I have green sunfish in there now. Little bait stealers... Oh well, the cats probably eat a bunch of them.
Pat
I used to have just channel cat and fathead minnows in one pond but thanks to overflow down a seasonal creek connecting some ponds I have green sunfish in there now. Little bait stealers... Oh well, the cats probably eat a bunch of them.
Pat
jinman
Rest in Peace
- Joined
- Feb 23, 2001
- Messages
- 21,059
- Location
- Texas - Wise County - Sunset
- Tractor
- NHTC45D, NH LB75B, Ford Jubilee
Eddie, how did your roads work out around the place? How about your trails back up in the wood? Any washed out spots? After a hard rain, you can normally easily see where you need a culvert or improved ditching along roadways. The lake looks terrific with only the same problems mine have, muddy water.
tractorshopper
Veteran Member
Wow Eddie and all other contributors. Came accross this thread looking for a project on topic of seeding grass search. Liked the title because I'd like to build a small pond on my property at some point. Started reading about a week ago to finally get through it all.
Excellent project and great encouragement for anyone. It's beautiful and now I know that while I'm slowly working my property, I can see in time, the results of my project will be what I intended.
Excellent project and great encouragement for anyone. It's beautiful and now I know that while I'm slowly working my property, I can see in time, the results of my project will be what I intended.
Here are some similar links:
- Replies
- 21
- Views
- 8K