Culvert Installation Basics

   / Culvert Installation Basics #1  

rdam

Gold Member
Joined
Jul 9, 2003
Messages
456
Location
North Florida
Tractor
Kubota 3240 DT
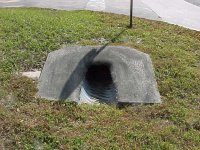
I need to install a driveway culvert according to county specs. Specifications call for a 32' x 18" mitred, steel culvert. Pitch for drainage is not critical according to the building inspector.

A designed swale exists. The low point is roughly 12" below the paved edge of the road. The low point in the swale is roughly 6' from the edge of the road. These are rough geussstimates.

With the tractor, FEL, shovels and time, I believe I can handle this on my own. However, I do not know the proper procedure; Such as...

1. Is a prepared "foundation" required, or does the culvert lay in the swale and you fill around it? How is the swale prepared to receive the culvert?

2. What type of material makes the foundation or base if any?

3. What is used to fill in, around and on top of the culvert to accomodate vehicle traffic?

Note to OkeeDon: I have read "How not to install a culvert". It was helpful. But I need the basics from the beginning.

Dollar estimates for materials including the culvert would be appreciated.
 
   / Culvert Installation Basics #2  
wroughtn Harv may have your answers
 
   / Culvert Installation Basics #3  
You might look for Harv's web site. Seems like he had detailed pictures of what to do and what not to do. /forums/images/graemlins/wink.gif
 
   / Culvert Installation Basics #4  
doing many of these when I was on the highway dep't, we had one quarter inch drop per foot, and it was mandatory to build buffer walls from large stones at each end. Check your frost line wherever you live. Sometimes one just can't sink an 18" pipe low enough to work properly and still leave a foot or more gravel road bed over the pipe.
 
   / Culvert Installation Basics #5  
</font><font color="blue" class="small">( 3. What is used to fill in, around and on top of the culvert to accomodate vehicle traffic?)</font>

I have no experience at all on how to do this, but in my area there are several culverts that are covered with what appears the be the remains of an old brick house. There are tons of old red bricks, cinder blocks, field stone and even what looks like a long lead pipe sticking out the side of the fill.

Dave
 
   / Culvert Installation Basics #6  
Go to, www.unitedconcrete.com , on left click on other products. when this page comes up, on right, half way down, it shows the pipe retaining walls. In your case being an 18" pipe, we used large rocks from the immediate area, built the retaining walls at 45 degress (18") pipe, this directs water to the pipe, it also stops water form undermining the pipe.. By code here, and I would do it anyway, build the same on each pipe's end. A lot of times water becomes stagnant on the drain end which creates back pressure and this pressure can undermine a pipe, so build retaining walls both ends, Here code dictates an 8" drop for 32 feet. 1/4 inch every foot, 1 inch every 4 ft means 4 X 8= 32.. If the water in your neighborhood isn't that much of a problem, in other words, heavy rains or snow melt is the only time water flows, then I would bring the setting to 5 inch drop between entrance and exit end. 10 inches of crushed gravel, or gravel and old house bricks busted up to 1 - 1/2 size mixed in and tamped down hard, gravel and small stone can be used also.. Don't forget to add in any blacktop drive if that is your goal. This means, top center of pipe as set, plus 10" gravel, plus 3" for the final blacktop..
 
   / Culvert Installation Basics #7  
</font><font color="blue" class="small">( wroughtn Harv may have your answers)</font>

Pricing is something that is totally local. I don't know why but six dollars a foot comes to mind for the eighteen inch culvert plus the horns.

The first thing I'd do in your situation would be to get some local bids after I'd looked at some recent installations. It might just be cheaper to have it done no matter how much fun you think you'd have doing it yourself.

In some areas the bonds between the wholesale supply and the contractors are strong enough that the do it yourselfer can't compete. By that I mean the contractor buys for sixty to seventy percent of what the walk ins pay.

The installations I've done have been for friends and didn't involve inspections. Two of them were replacements and one was a new driveway.

Besides matching the existing fall or grade I was concerned about building the ends where there wouldn't be an erosion problem. My model I used was some new horns the highway department was installing when they replaced culverts on a local highway widening.

I dug down about a foot below the grade of the culvert on the ends and installed a concrete footer that was deeper and wider than the swale so that there wasn't a potential new path for the water to take over time.

I have a concrete mixer I use so I mixed up a couple of batches for the ends and then dumped some in the middle in areas I'd cleaned out. It wasn't necessary I'm sure. But I'd hate to have a friend casually mention in conversation some years later that their culvert was sinking or had been washed out.

I tackle most any kind of project because I've looked at the folks who do that kind of work successfully. By and large they aren't much different from me and the only advantage they seem to have is experience. I can get that.
 
   / Culvert Installation Basics #8  
I didn't go back to read my previous thread, and I kinda forget what I said there, so some of this might be repeating itself.

I was required to use a 15" diameter pipe. It could have been 30' with square ends or 40' with mitered ends. I wanted the mitered ends. I could have gotten the pipe in sections, either 2 halves, or a center with mitered ends, but I chose to go with a single pipe that had the miters cut in it. What actually arrived was a 16" diameter pipe. The miters were cut at a 2:1 slope. It cost me around $400 delivered. Because it was 40' long, it took a flat bed semi trailer to deliver it.

I happened to have purchased a surveyor's automatic level, tripod and rod from EBay (~$270, Nikon) just because I anticipated this kind of work, so I used it to shoot the existing elevations in the swale. My instructions from the county were to "make the Northern end a little lower than the Southern end". I forget what we actually used, but I accomplished what the county wanted.

I used the FEL and box blade to clean out the swale and lower the level about 1", then rolled the pipe into it. The county required 12" of shell rock on top of the pipe, so I had a couple of loads delivered, used the FEL to spread it and the box blade to level it. We ended up with a "hump" over the pipe about 2" above road level in order to get the full 12" of shell rock (Rick knows what it is, but for my Northern friends, shell rock is like crushed limestone mixed with sea shells, comes from pits about 40' deep or more here in Florida, and packs like concrete).

I only covered the center 24' of pipe with the shell rock, then later covered the ends with dirt. That part will be landscaped and no one will drive there.

I haven't finished the ends, yet, but I will be making forms for concrete ends. The attached picture shows a similar end constructed about 15 years ago at my commercial property.

All in all, it wasn't really a difficult job (except for having to do it twice /forums/images/graemlins/crazy.gif).
 

Attachments

  • 357724-MVC-001S.JPG
    357724-MVC-001S.JPG
    64.9 KB · Views: 1,445
   / Culvert Installation Basics
  • Thread Starter
#9  
Thanks Don, that helps.

How much shell rock did you need and what was the cost?
 
   / Culvert Installation Basics #10  
I used about 3 - 18 yard truck loads for the culvert cover and the fist part of the driveway. My gate is about 60' from the road, and the driveway at that point is about 16' wide. I could still use another load or two to grade it properly all the way to the gate. Cost was $130/load.

The attached picture is before I added the dirt over the ends of the culvert and dressed it up.

Since I bought my dump trailer, and because the shell pit is only about 3 miles from my property, I'll be bringing in the rest of the shell rock myself, about 4 yards at a time -- I need about 300 more yards to do the driveway -- it will be a long project. /forums/images/graemlins/shocked.gif
 

Attachments

  • 357813-driveway1.sized.jpg
    357813-driveway1.sized.jpg
    94.5 KB · Views: 933

Tractor & Equipment Auctions

2025 AllMetal K0720 UNUSED 20 ft. Bi-Parting Metal (A47484)
2025 AllMetal...
2016 GMC Acadia SLE2 SUV (A44572)
2016 GMC Acadia...
Barreto 20RTK 36'' Ride On Trencher (A45336)
Barreto 20RTK 36''...
2025 Swict 66in Bucket Skid Steer Attachment (A44571)
2025 Swict 66in...
2017 Ford Explorer AWD SUV (A44572)
2017 Ford Explorer...
2018 Toro 30672 32in Walk-Behind Mower (A44572)
2018 Toro 30672...
 
Top