Dirt/Gravel Driveway Major Maintenance

   / Dirt/Gravel Driveway Major Maintenance #31  
Flyer:

I improved and maintained over 1/2 mile of gravel roads with a Ford NH 1320 (similar size as your rig) and a 60" box blade that I purchased new in 1994. There were level and very steep sections of the road and it did everyting I wanted with manual adjustments of the blade and no added weights (but loaded tires).

I recently moved to a new place with 3 times the length of gravel roads and purchased a larger tractor (JD 3320) with a Top-and-tilt for the new 72" box blade. I agree with everything Patrick said, the ability to dynamically adjust the blade while working makes a major difference to my productivity and greatly reduces my irritability factor. I wish I had purchased the extra hydraulics for the Ford. Considering the overall cost of the tractor the extra expense is a big productivity bargain.

One feature that Patrick didn't mention is that if you don't get the extra hydraulics to lower and raise the scarifiers, you can set them to just touch when the blade is level and lower them by tilting the blade forward with the top cylinder for ripping up a section without having to get off the tractor. Raising and lowering scarifiers manually is a pain. Whether or not you get a pro to fix your road, a box blade with hydraulics will make maintenance much easier.

Steve
 
Last edited:
   / Dirt/Gravel Driveway Major Maintenance #32  
STORMTRQQPER said:
If you are only doing your own driveway, don't bother installing the TNT. It's a lot of figuring out & expense for one project. Just use the manual top & side links. As far as a box blad vs a rear blade, the box blade will be far more useful. First of all, you will need to drop the scarifiers down & score up the driveway 3"-5" deep in order to reclaim the gravel that is hard packed & redistributed to start out with. Don't turn up too much of the base rock, though. That's a sign that you are deep enough. After loosening it all up, drop one side of the grader about 4" lower than the other side & be sure to get about a 3" crown in the middle. That will at least force the water to run to the sides of the driveway. If your driveway is as low as you say it is below the land around it, you most likely will need quite a bit of gravel to build it up. Water will always find the lowest point. This is what we do for a living. For more info, read the complete process of driveway restoration on index

Does the DR grader work pretty well? You'd need to have a crown built up already wouldn't you? I can't see those working to build a crown, that's what the box blade or rear blade are used for I would think.

Monte
 
   / Dirt/Gravel Driveway Major Maintenance #33  
For the 900 feet that runs across the natural grade, you'll be best served by cutting down the shoulder on the right side of your drawing to fill in that ditch. The entire drive needs to slope from the high side to the low. That will get the water to drain out of the drive. If necessary, you can ditch the left side. instead of the "crown in the middle" which works well on the level, you'll want the crown on the right and the ditch on the left. You'll need roughly 1/2" per foot of slope.
My drive is 10' wide so I needed one side to be 5" lower than the other. I have heavy clay for soil, and sand stone just a few inches underneath, so it took a LOT of passes with my Mitsubishi D1800, which has 18 pto horsepower. I used a heavy grader blade, that I can angle fore and aft, and my right side adjustable link to get the grade I want. Then I put down a base of 1"- crushed gravel, and let it sink into the clay. I'd imagine you'd need geotextile for the base as you don't seem to have any clay. I then topped out with 1/2" minus crusher run, unrinsed. This set up quite well, and stays on top, due to the hard packed clay, and larger gravel below.
The tough part is going to be at the turn and fork you have. You may need a culvert or two to handle the water in that case, but it won't need to meet county standards as it's going to be quite a way from their road. I don't see any use for a box blade as windrowing the grader spoils will fill in your pot holes, quite handily and the box blade won't ditch worth a darn. If you need to loosen any of the hard pack you now have a tool bar holds chisels a lot cheaper than a box blade does.
When plowing snow, I use the position control to keep the blade just above the surface of the drive. I don't push, but do all my evolutions pulling. Sometimes a snow melt in the day, followed by a freeze at night, especially on the packed snow I drove on creates black ice, and I have to salt that to cause a melt, as I have an off camber 90 degree turn.
Good luck, and happy seat time, this summer.
 
   / Dirt/Gravel Driveway Major Maintenance #34  
I am not an expert on grading. I purchased a grader similar to the
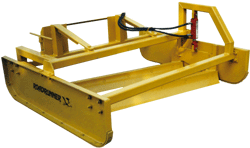
" Road Boss" Mine is called the " Road Runner " It can be pulled by a tractor or used with a skid steer. I have a skid steer style tractor. IT has two blades mounted on an angle and a hydraulic cylinder to raise and lower blades on one side and a manual screw to raise the other side. I Believe I spent $ 3,000 plus shipping for it. I am sure it would grade well but my yard is full of
soft ball, football size rocks and it just rolls over them, or drags them. I need to remove the rocks to do any grading with it. I know there is a member who made his own road grader on this site. David
 

Attachments

  • road runner grader.gif
    road runner grader.gif
    17.5 KB · Views: 571
Last edited:
   / Dirt/Gravel Driveway Major Maintenance #35  
Just today got a roadrunner, a 7 footer with twin manual screw jacks, but a hydraulically controlled roller on the rear (CJR-7) ...only had it on the driveway for an hour or so but it looks like the cat's meow.

The roller appears to be a very worthwhile addition--when it is "up" it adds its considerable weight to the grader blades, and when it is full down it elevates the blades for use as a simple roller but with all the weight of the grader on the roller. In between it acts like gauge wheels to lengthen the "baseline" and makes levelling much easier (just as gauge wheels would on a back blade or landscape rake).

Mine also has a serrrated cutting blade as the frontmost of the two blades--hardened steel, toothed and it cuts well. I could use the screw jacks to achieve a crown, but I have "Top and Tilt" and the tilt control works well from the driver's seat. The "top" (hydraulically adjustable top link) allows fine control of how aggressive the serrated blade cuts, as does the hydraulically controlled roller, as described above.

The good news, as I mentioned, is that its heavy duty construction coupled with the roller means it's HEAVY ...the less good news is that it's "heavy". My Kubota L4330 just manages, 4wd, hydrostatic Low range goin' up my considerable grade ...and, liftin' it comes close to maxin' the 3ph.
 
   / Dirt/Gravel Driveway Major Maintenance
  • Thread Starter
#36  
Well, got my first quote today for subbing it out: $9436 for 18,228 sq. ft. Includes scarifying and rough grading, plus 3-4" of limestone crusher run, grade and compact.

Another $1185 for another 2280 sq. ft. (driveway up to the barn, although i don't think it really needs it).

What do you think?

(What do I think? I think sell my tractor, get a little more hefty tractor with the backhoe I want, box blade, rear blade, the crusher run, do it myself, and maybe take a little vacation trip! :D)
 
   / Dirt/Gravel Driveway Major Maintenance #37  
Flyer:

Go for it. The worst thing that can happen is that you will spend a lot of time on a new rig learning new techniques. I recommend that you do some research about road building on the order of what Slamfire talked about. The basic principle is to keep water flowing as much like it did before the road was built. For example: Water running down a broad hillside should flow directly across a road. The flow will not be enough to damage the road. If you collect the water in a ditch and run it elsewhere you have created a damaging flow. Similarly, if water on the hill runs down a cut (seasonal stream), you need a culvert to keep the water in its natural path down the hill.

To find road building information try Googling "rolling dip." This is a structure built into roads that is an important part of the current theory of building gravel roads. I went to a workshop that went over a book called- Handbook for Forest and Ranch Roads (A guide for planning, designing, constructing, reconstructing, and maintaining and closing wildland roads), by Weaver and Hagans, 1994, The mendocino County (California) Resource Conservation District. There was also a DVD. At the end of the workshop we drove around and looked at a lot of different gravel roads and driveways, and I was very impressed with how simple techniques greatly reduced maintenance.

Steve
 
   / Dirt/Gravel Driveway Major Maintenance #38  
flyer said:
Well, got my first quote today for subbing it out: $9436 for 18,228 sq. ft. Includes scarifying and rough grading, plus 3-4" of limestone crusher run, grade and compact.

Another $1185 for another 2280 sq. ft. (driveway up to the barn, although i don't think it really needs it).

What do you think?

(What do I think? I think sell my tractor, get a little more hefty tractor with the backhoe I want, box blade, rear blade, the crusher run, do it myself, and maybe take a little vacation trip! :D)


Well doing the math, that's 50 cent a sq ft. There would also be 250 yards of stone. Maybe a bit steep.

A used Ford 555 loader hoe would be about 10k. Box blade + rear blade would be 4k for good ones. How much is 250 yards of stone? If you sell your 855 and small attachments for 8,000, buy a TLB and large attachments you will be about $ neutral by doing the job yourself - but you will have a large TLB and attachments...

jb
 
   / Dirt/Gravel Driveway Major Maintenance #39  
Joel would you post a picture of your road runner with the scarafier and roller thanks David.
 
   / Dirt/Gravel Driveway Major Maintenance #40  
I have always been led into things by doing the MATH and finding that if I don't mind unskilled labor (mine), a learning curve, and some risk that I can buy a tool, tool set, or equipment and do many jobs for about the same or less (working cheap or free) than hiring a pro. The trick is knowing when to NOT DIY. Examples of when not to DIY abound: brain surgery, bypass, jobs requiring large expensive machines that require lots of experience to get acceptable results, patently unsafe (at least for armatures) type operations.

I think the road building project is one of those that falls into the DIY realm if you don't mind the hard work, low pay, some monetary risk, and a longer and less definite schedule. So long as you are buying equipment you can use for other tasks when finished or items that will definitely resell (with low probability of expensive repairs while you have them [that pesky risk thing again]) then it looks like you are in for a character building experience.

Faced with the cost of R&R of cam and lifters in a HiPo Ford Mustang engine in a Sunbeam Tiger roadster, I bought a Craftsman socket set and did it myself. In fact I did it several times as the use of the car alternated between wife commuting in traffic (hydraulic lifters and mild cam) to my driving it (solid lifters and racing cam, 165MPH top end.)

I still have (most) of the socket set purchased in about 1968-9 and I can R&R a cam and lifters like a NASCAR pit stop!

Go for it dude, learn and enjoy!!!!

Pat
 

Tractor & Equipment Auctions

1997 Dynapac CC142 14 Series Double Drum Roller (A52384)
1997 Dynapac CC142...
2024 CATERPILLAR 255 SKID STEER (A51246)
2024 CATERPILLAR...
LOAD OUT AND SHIPPING (A51572)
LOAD OUT AND...
CAT Skid Steer Grapple (A51573)
CAT Skid Steer...
2018 HAMM H7 SMOOTH DRUM ROLLER (A51246)
2018 HAMM H7...
2016 WESTERN STAR 5700XE TANDEM AXLE SLEEPER (A52577)
2016 WESTERN STAR...
 
Top