Disaster down below

   / Disaster down below #1  

Rick_Taylor

Silver Member
Joined
Mar 8, 2003
Messages
109
Location
Decatur, TX
Tractor
Power Trac PT-425, Kubota L4330HSTC Kubota RTV
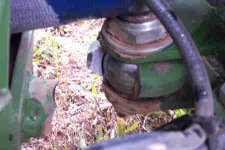
/forums/images/graemlins/frown.gifI have suffered a small disaster. My 425 has broken the lower front mount for the ball bushing, the main connection from the front to the rear section.

This happened while mowing a berm, around some trees, letting the PT swivel and articulate and generally 'do it's thing'. Just before it broke I'm thinking "Cool, I'd like to see your JD or Kubota do this". I had no warning, it just felt like I'd dropped a rear wheel into a hole so it took a few yards of travel to realize I had a problem. What I felt was the bottom of the seat ripping the oil tank cap to shreds.

I called PT and talked to Don. He said they'ed had a few ball bushings break before but always on older models, never on one only 1 1/2 years old, with 450 hrs. Of course it is out of warranty.

Don said the entire piece would be sent and that the old one would need to be cut off the front frame and replaced. The only crevat was to carefully measure the location before cutting. Unfortunatly he only sent the inner part so I'll have to call back Monday.

I'll try to attach a photo.
 

Attachments

  • 260382-BrokenPT6.JPG
    260382-BrokenPT6.JPG
    12.2 KB · Views: 667
   / Disaster down below #2  
Wow! That's ugly. What's the recomended way to deal with it? Is it still under warranty? If so, what do you do to fix it since there is no dealer netwwork?
 
   / Disaster down below #3  
Rick,
Sorry to hear of your tractor problem. Keep us posted as to how this turns out and what you end up doing.
PJ
 
   / Disaster down below
  • Thread Starter
#4  
Thanks for your concern. Tommorrow (Monday) will tell alot. I'm trying to be nice about this but it seems to me that when a piece of equipment breaks it's frame, and renders itself unusable, with only 450 hrs. it should have some backing from the manufacturer. We shall see. Those wondering about buying a PT without any dealer network might want to watch this space.
 
   / Disaster down below #5  
Rick. That looks really nasty! Did you ever find the part thats missing? I wonder how they get the ball in the socket? It looks very shiny, does it need to be lubed? Keep us informed. Robert
 
   / Disaster down below #6  
Ouch! /forums/images/graemlins/frown.gif

Sorry to see your situation. Is the broken half on the front half of the tractor, not the side with the oil tank? If so, it shouldn't be that hard to repair. The stub will have to be cut or ground off. The bolt will have to be removed and the joint taken out of the bracket. Then, I don't know how you would choose to weld the new joint on. Should they install it with the bolt, then level both halves of the tractor and weld it on maybe? As long as you have a good welding shop around, you should be OK. Let us know how it goes, please.
 
   / Disaster down below #7  
Unbelievable! Man, I've had my old 1418's rear end sticking up in the air from trying to lift too much weight in the bucket many times...I'm amazed this happened. I think I had asked on TBN once when I first got the PT if it were possible to break it in half, given the articulated joint. The general concensus was "probably possible, but highly unlikely". Looks like you've definitely proven it is indeed possible! And it doesn't sound like you were doing anything all that stressful on the machine either. I'd position this as a manufacturing defect when you talk with Power-trac, especially since the machine only has 450 hours.

Good luck!
Dave
 
   / Disaster down below #8  
Rick:
Can you get it to Tazewell? Although it looks like a fairly simple cutoff and weld job, certainly Terry or one of the others at Power Trac already knows exactly how it is mounted and can do it faster and you know it'll be right.
 
   / Disaster down below #9  
Charlie, do you think it is that critical on the alignment, as it is a flexible joint? It seems that if you were off a few hundreths either way, it might not make a difference. Am I missing something? Many of you have much more experience with repair and fabrication than I, so feel free to edjumcate me in public... /forums/images/graemlins/tongue.gif
 
   / Disaster down below #10  
David: I actually don't think it's critical at all. It's just that Terry can probably do the whole job in a couple of hours because he already knows exactly how it fits and works, where a welding/ fabricating shop would be learning the machine as well as repairing it and would have to spend more time making sure the bolt went through and the machine would oscillate and articulate properly. PT would also know what needed to be detached and moved aside to avoid damage from the welding process, since they would know where the hoses and wires run, etc. (Maybe nothing needs to be moved, but certainly a close look and some thought is in order before applying heat.)
 
   / Disaster down below
  • Thread Starter
#11  
Getting the PT to Tazwell will the remedy of last resort. Right now the Green machine is located in a position that will require an almost 50 yd. drive to even get it to a trailer. Don said the broken piece could be welded right there enough to move the machine since the entire piece would be replaced anyway. I need to get a local welder out to look at it. I've also concidered removing the seat that drags on the oil cap, starting up and lifting the mower deck to let it's weight remove some of the strain on the lower coupling then use a broomstick etc. to slowly drive to an accessable area. Any thoughts?
 
   / Disaster down below #12  
<font color="blue"> but certainly a close look and some thought is in order before applying heat </font>

That would be my main concern... cooking the machine while welding. With some proper shielding I think it could be done without removing any hoses, wires, etc... it looks pretty open in there. I would be worried about cooking the joint. Is this a conceren? Also, two pieces were mentioned. I thought the piece would be one, with the donut pressed inside of it already. Is it two pieces that have to be assmbled? I can't tell and don't have my machine in front of me.
 
   / Disaster down below #13  
Rick:
For a temporary short move, I don't see trying to weld the heim end back together. (It looks cast, but may not be.) Better just a chunk of plate with a big hole in it could be welded to the stub and the bolt taken out and reinstalled through the hole. Then the temp rig would be discarded when it was cut free from the front box.
Any kind of ring that the bolt goes trough could also be welded to the stub. It's mostly in tension unless you're picking up something heavy.
 
   / Disaster down below #14  
I'd agree with Charlie that welding anything on it without some very careful examination is asking for trouble. Steel has to be 3200 degrees to melt, and that will cook wiring and hydraulic hoses that aren't even that close as the heat conducts away through the metal. Also, keep in mind that gasoline vapors will explode and hydraulic oil will burn. Be very, very careful! (And make sure the welder has insurance to cover any mishap or worse.)

I'd suggest keeping this as simple as you possibly can. Could you strap some 4x4's underneath it to support it horizontally (but still allow it to turn slightly), and tow or drive it back to a better repair location? Or, open your tow port and put the obligatory hose on the hydrostatic drive pump, and hire a tow truck w/ a several hundred foot winch (or a friend with another tractor) to help you tow it up onto a trailer. (See my post from the winter about putting my no-cranking tractor on a dolly and hauling it to a local shop!)

Good luck!
Dave
 
   / Disaster down below #15  
Rick_Taylor, nice occupation..... /forums/images/graemlins/smile.gif
 
   / Disaster down below #16  
Rick,

I'm sorry to see that happen. It's the one thing on the tractor that is most difficult to service. I wish that it was bolted into place to facilitate replacement.

From your post, it sounds like PT was aware of some broken heim joints on earlier models, but made a change? It does appear to be a cast piece from your picture.

I wish we know who the manuf of this heim joint is. I wonder if the manuf had intended for it to receive the lateral loads that the PT puts on them vs a tension/compression force. (I assume so, but it would be nice to know the specs)

I assume the bigger PT models use a similiar joint, but just bigger (Charlie).

Rick, please keep us posted on all the details of the repair. This one concerns me. /forums/images/graemlins/frown.gif

Duane
 
   / Disaster down below #17  
<font color="red">
I assume the bigger PT models use a similiar joint, but just bigger (Charlie).

</font>
Bigger and different, but I'm not sure of details since I haven't had mine apart. My understanding is that my 1845 has a removable bearing insert.
 
   / Disaster down below #18  
Rick: Something maybe worth a try.

Start the engine and lift the deck, as you suggested and see if it moves the joint back together a bit. If not, jack the middle until it's close or touching. Then, pull the pins on one side steering cylinder and replace it with a piece of chain. Then when you start the engine and turn the wheel toward the remaining cylinder, it will pull the machine together. Then replace that one with chain and release the hydro to drag it around. (You could also drive straight forward or straight back) Maybe with some jacking and prying you can get it ponted in the right direction.
Keep us posted.
 
   / Disaster down below
  • Thread Starter
#19  
I finally got some good info from Terry this afternoon. The complete ball bushing WITH welded-on stem and flat mounting plate is on it's way. Terry said to cut the old one off flush with the rear plate with a torch. Also should pour some water into the cavity just foward to keep down any chance of any grass etc. from firing off. He said welding the new one on with a torch should keep the temp down to a relitively safe level. I now have several days to locate a 1 13/16" wrench to R&R the big bolt and nut.

He said he'd be happy to fix it for me if I was a little closer. Said he could do it in about 10 minutes. If this doesn't work he may still get the chance. I'll give him credit for really wanting to help my situation. Watch this space.
 
   / Disaster down below #20  
what i see in the pic is a slight dark spot where it broke. if that is there, it's an old crack? all i would do to move it , jack it back in to place, get a welder with a portable welder and weld it. use a piece of metal to shield the hoses from heat.take nut off or get an other one when you get the new joint.
an welder (good) welder can do the job in the field.when a million dollar machine brakes they fix it there, rain or shine.
if they need to take it to the shop,at least they will have a better idea of how it should look,tacking it together you will not make a lot of heat,take your time, use a heat sink, or the the crayon to stop the heat. you will only be welding on half of it. your not that bad off /forums/images/graemlins/laugh.gif
 

Tractor & Equipment Auctions

2021 CATERPILLAR 926M WHEEL LOADER (A60429)
2021 CATERPILLAR...
2020 BOBCAT T590 SKID STEER (A60429)
2020 BOBCAT T590...
2008 MACK CHU613 TRI AXLE 16FT DUMP TRUCK (A58018)
2008 MACK CHU613...
2015 CATERPILLAR 953D CRAWLER LOADER (A60429)
2015 CATERPILLAR...
2001 CATERPILLAR D400E 6X6 OFF ROAD DUMP TRUCK (A60429)
2001 CATERPILLAR...
2020 DRAGON 150BBL ALUMINUM (A58214)
2020 DRAGON 150BBL...
 
Top