Dump Trailer

   / Dump Trailer #161  
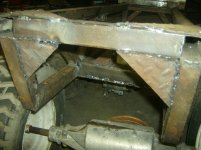
Yo, Play, I can remember when my welds looked like yours or worse. Unfortunately, in certain circumstances they still do but not generally.

Given your signature, I suspect you are in favor of learning from your mistakes in an attempt at constant process improvement. It is sad but lots of folks quit learning shortly after they stick two pieces of steel together and they stay stuck a while.

I started out with an AC-DC Lincoln "TOMBSTONE", some 6011 & 6013 and some scraps of steel. weld 'em together and put 'em in a vice and break the weld with a sledge hammer. That gave me feedback as to the strength of the weld and what worked and what didn't (no matter how pretty it was.) After some reading I started trying other rods like 7018 and DC + and - instead of AC all the time.

Without feedback and an open mind you get trapped at a very low beginners level. I don't think yoiu will have that problem.

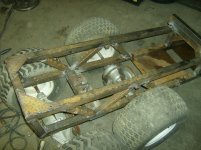
Best of luck to you with your project. I too want a dump trailer, probably 10-12,000 lbs gross weight with electric over hydraulic but as much fun building it could be I just have too many other time consuming projects and may be forced to buy one if I want it in the next few years (I wanted it last year.)

Pat
 
   / Dump Trailer
  • Thread Starter
#162  
Thanks, Pat, for the words of confidence and encouragement. I hope to keep learning and improving. That's the fun of it, really.

I actually learned something new again last night while I was welding. I learned that I can push the puddle. I'd always just been putting it down and taking it as gospel that where it landed is where it had to be. I had some gaps to fill as I was putting in cross bracing (I know, my prep needs to get better), and I learned how to build a puddle and push it into the gap.

I still went back over the edges of the bead on either side to make sure I got real penetration into the work.
 
   / Dump Trailer #163  
IPlayFarmer, The same three words apply equally to welding as they do to painting:

1. Preparation
2. Preparation
3. Preparation

A good welder can probably make do with poorly fitted pieces. I have to try to get my pieces to fit fairly well.

Decades ago when folk music was all the rage I heard it expressed that for the "folk" sound ( with just a little dissonance) you had to tune your guitar a little off key when singing on key to get that folksy sound. I had to tune my guitar PERFECTLY!!!

Likewise with welding... At my skill level I need a pretty good fit!

Pat
 
   / Dump Trailer
  • Thread Starter
#164  
I bought paint today! $79.

I may have made a huge mistake...I let the lady at the paint store talk me into a water based direct to metal paint for my rusty metal. I asked her a few different ways if this was the best way to paint a trailer that would be used outdoors in rough conditions, and she said that is was as good as anything out there and would be less work. Even after I told her I'd rather do a little more work if it meant having a better paint job, she still recommended this product.

I guess I own it now. I'll use it and try to report back how it works. I'll just be sure to follow Pat's advice...Preparation, Preparation, Preparation.

She did give me a primer for the wood. I'll read the directions on the paint can really well and follow them the best I can. If it even hints at a primer, I'm going to use the primer with the wood and with the metal. She said I'd need two quarts, but that a gallon is cheaper, So I bought a gallon. That should be plenty.

1 Gallon primer
1 gallon black paint
1 3" roller with two sponges
2 paint brushes
1 gallon paint thinner (to prep the surface before painting)

$79.27

The plan is to roll and brush the metal of the frame and then spray the wood of the bed.
 
   / Dump Trailer
  • Thread Starter
#165  
I'm posting some pics of progress I made last night.

I put some angle braces into the subframe.

I had some braces all cut out to weld accross the subframe from side to side, but as I was getting ready to put them in place I realized that there was no place to put them that wouldn't interfere with the axles or the ram. So, I cut some triangles out of diamond plate and put them on the back to stiffen it up a bit.

The last picture is just one of the whole thing done for the night.
 

Attachments

  • Open frame.JPG
    Open frame.JPG
    352.4 KB · Views: 576
  • Rear braces.JPG
    Rear braces.JPG
    332.8 KB · Views: 469
  • Subframe Bracing done.JPG
    Subframe Bracing done.JPG
    322.6 KB · Views: 530
   / Dump Trailer #166  
Iplayfarmer said:
I let the lady at the paint store talk me into a water based direct to metal paint for my rusty metal.

The plan is to roll and brush the metal of the frame and then spray the wood of the bed.


Several years ago I used to use a water based primer designed to go on over rusty metal. It went on kind of milky white and it turned sort of a dark purple/black where it went on over rust. I used it on rusty bolts and nuts that would be intermittently submerged in salt water which sort of INVITES corrosion. Years later when a professional marine surveyor (professional boat condition inspector) went over the boat with a fine tooth comb for an insurance company the guy was really impressed at the great condition of the keel bolts where I had used the primer. He had never seen bolts like this stay in such good condition for so long without needing replacement.

Hopefully the water based coating you bought is even better after all these years of possible improved chemistries.

Just curious why you aren't going to spray the metal. It seems with all the little nooks and crannies around welds and where various pieces of metal come together at angles that it would be harder to try to get good coverage with a roller than with a spray rig.

In addition to many other fields of endeavor, I am also not a professional painter but I seem to have done significantly more than my share. Given the choice of method I'd probably want to go with HVLP or at least one of the guns with the gravity pot on top which have small amounts of overspray and waste.

The last paint-over-rust coating I bought was Rustoleum brand "Hammertone" paint (Lowe's) which comes in black or silver and is comparable in cost to your paint but is NOT water based and requires solvents for thinning and for clean up. It is working well out in the weather after being painted on over considerable rust. 3 years or so and looks like new.

Be sure to let us know how the water based goes on and the name of the paint. I might like to try some if it goes well with you. I have some painting for metal to be out in the weather and haven't bought the Rustoleum yet and water based sounds like easier clean up. What prep does it call for coating previously painted surfaces?

Pat
 
   / Dump Trailer
  • Thread Starter
#167  
patrick_g said:
Just curious why you aren't going to spray the metal. It seems with all the little nooks and crannies around welds and where various pieces of metal come together at angles that it would be harder to try to get good coverage with a roller than with a spray rig.

All of my metal is 1 1/2" tubing. I was thinking that there would be considerable overspray and therefore, waste. I've painted the subframe, and I may actually go back over it with my touch up sprayer to fill in the cracks and crevices.

I spent quite a bit of time prepping this morning. I wire brushed the whole subframe, then I went over it with a rag wetted with paint thinner. We let the paint thinner all dry while we ate lunch and then painted.

I hung the subframe to paint it. It was nice because I could get to everything at once, but it tended to swing and spin. It made for some fun painting at times.

The paint is a Columbia product. It's called "Industrial Coatings, Acrylic DTM Polyurethane". I chose a semi gloss black premix, once again on the advice of the lady at the store. She said that a pre-mix would go on smoother.

The paint went on pretty smooth. It went on a lot easier with the roller than with the brush. I found that I had to keep the roller pretty wet too. It seems like it will be a pretty good finish though. It went on pretty thick, and the can pitches that it's a "Plastic-like Coating". I guess the real proof comes in ten years when the paint is still holding.

With it being water based, I invited my six-year-old to come help me. She took the brush to do the niches where the roller wouldn't fit. You can tell where she could reach and where she couldn't. There are quite a few drips on the bottom half of the subframe.

The nice thing about having her help was that at the end she had paint all over her fingers and decided to "paint" inside all of the bolt holes for mounting the bearings. I wouldn't have had a way to paint these holes without her little fingers.
 

Attachments

  • Subframe hanging ready.JPG
    Subframe hanging ready.JPG
    402.5 KB · Views: 471
  • Subframe hanging done.JPG
    Subframe hanging done.JPG
    368.2 KB · Views: 509
   / Dump Trailer #168  
Stick and TIG are best used when dragging the puddle, while MIG is better when pushing the puddle. There are different ways to make all three work in the opposite direction, but that is the norm. A cutting torch is best used cutting from left to right for a right handed person, but as with the welder, can be operated differently to fit the need.
David from jax
 
   / Dump Trailer
  • Thread Starter
#169  
I hung the rest of the peices and sprayed them.

Spraying is way better!

I think I did use more paint, but it was a lot easier, and a lot faster.

Pic 1 below is of the pieces prepped and ready to paint. I used a flap wheel on most of the metal this morning. I used a wire brush to get into some of the corners and hard to reach areas.

Pic 2 is of the pieces after the first go round of painting. I painted them as shown, and waited the requisite 4 hours for a recoat. Then I flipped the pieces all over to get at the surfaces that were on the undersides.

The can says to to wait 7 days before washing, so I'm going to leave the pieces hanging as long as I can.
 

Attachments

  • Mother of all Wind Chimes.JPG
    Mother of all Wind Chimes.JPG
    113.2 KB · Views: 456
  • Pieces painted.JPG
    Pieces painted.JPG
    111.3 KB · Views: 424
   / Dump Trailer #170  
Looking Good!! Can't wait to see it "Dumpin Dirt" :D :D

Mike
 

Tractor & Equipment Auctions

UNUSED FUTURE SKID STEER MOUNTING PLATE (A51244)
UNUSED FUTURE SKID...
E-Z Flow Auger Wagon (A50514)
E-Z Flow Auger...
2019 Western Star SF4700 Dump Truck (A47384)
2019 Western Star...
2021 John Deere 333G Two-Speed Hi Flow Compact Track Loader Skid Steer (A50322)
2021 John Deere...
2016 CATERPILLAR D6K2 LGP CRAWLER DOZER (A51242)
2016 CATERPILLAR...
2015 Chevrolet Express (A50323)
2015 Chevrolet...
 
Top