Morning guys,
Here's the way I did that eleven hundred foot line.
1. After I had the old fence out of the way and the temporary fence in I put a marker post inside each property pin on that side. I wanted the fence to be inside the property line four inches. Since Gary is paying for the fence then it's his fence. His neighbor gets all the advantages of the fence except ownership. It's his property, on his property, and the neighbor has no right to attach, damage, or modify the fence.
2. I painted the marker posts to make them visible from the opposite ends. The one on the front got painted red because I had the blue horizon behind it. A silver or white post would disappear. The one down by the creek was painted white so it would stand out in the shadows.
3. I came up about three hundred feet and put another marking post in what I thought was the fence line. I went back to the corner post and checked it. It was off a little bit so I adjusted it. I did this until I had the in between marking post in a perfect line with the two ends. I did this two more times so I had three marking posts in between the two ends.
4. I used four (4) cans of Rustoleum white marking paint putting down first slash marks across the fence line every eight feet. And then following it with another slash mark in line with the fence line.
The way I get the in line mark is I carry a post and plumb it up in line using the marking posts. I sight down the edge of the marking post keeping it perfectly plumb until the edges of the marking posts and the plumb post become one. I put a slash mark with the paint where the plumb post was.
5. I dug the fence holes three and a half to four feet deep with the skid steer's auger with a twelve inch wide bit.
6. I put a day laborer with Gary and had them feeding the concrete mixer. My custom concrete bucket enables the skid steer to carry one full mixer load at a time. They mixed eight cubic yards the first afternoon and seven the next morning by lunch.
7. The first load went to the far end posts. I get three posts per load. After three loads were in I stoppped and sighted in the corner post and removed that marker post. I set that post for grade and line.
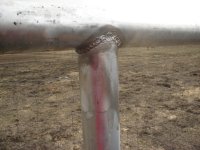
8. I went to the first inline marking post and using a Sharpie marked a line for height. I wanted the height to be about sixty inches at that point. The fabric (V Mesh) we're using is fifty eight and a half inches wide. I also had a Sharpie mark on the end post at three and a quarter inches down. These two marks are what I used to sight in for the height of the line posts.
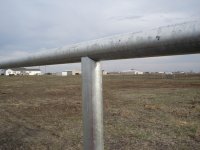
9. There was some grade variations and I had to allow for that. But what I usually go for is keeping the top of the fence as straight as possible from end to end. Horses and normal acitivity will usually bring the grade to the fence over time. The fence is designed to be permanent while the grade is always in a state of flux.
Down by the creek bottom the fence line is in a flood plain. So I intentionally kept the bottom of the fence off the ground to enable minor flooding to happen without affecting the fence. If the gap off the ground is unacceptable to the homeowner I come back with single nine gauge wire strands across the low areas. This keeps my fence looking good and still provides the security the client expects. It also gives a breakaway barrier you might say if there's debris flowing without bothering the fence.
10. Gary and the day laborer never came down to help me with setting the posts. They had their hands full dancing with the mixer. /forums/images/graemlins/grin.gif
I have them mix the concrete stiff. But even with it stiff leaving the mixer we still get it pretty wet because of the ride over rough terrain down to the posts. But once they had the mix just right I was able to start setting posts about two loads behind the one I just delivered.
It went like this. Deliver the concrete to the next holes in line. Then I'd get out of the tractor and go to the next post that needed to be set. First I pull the post up almost out of the concrete. Then I use a hand plumb and see where it's setting for line. I push it down at whatever angle I need to get the bottom of the post in line with the posts already set. This might take a couple of tries.
What I'm looking for is the edge (always the same edge!) of the post I'm setting to disappear into the fence line with the post being perfectly plumb in line. When that happens I look for grade.
I'm looking for the notched end to be in line and exactly, again, looking for the disappearing of the edges with the existing posts. When I have that I check the post for plumb in line. I want it plumb from any direction.
When it's where I want it I go back to the post behind it and look back over the newly set post to the end post verifying it's in line for line and height.
Then it starts all over again.
Two men working together is the most common sighting method used by fence men. It's the way my father taught me. One does the sighting and the other holds the post be set plumb while moving it where the sighter wants.
However one time we hired a fence foreman that could back sight. I took to it like a duck to water for a couple of reasons. Probably mostly because we had a typical male competition. And it was faster, much faster. Once I get into the groove it goes quick.
We once set a line a half mile long with each of us starting at one end. When we were done even we had a tough time telling where we met.
One job we did had five hundred posts. It was an own your own mobile home park in Hemet California, four feet chainlink, three sides, eight inch by two foot footers, lots fifty by seventy. So we had a couple of long lines with all of these short divider lines seventy feet long.
We did them all in one day. Everything was set for line and height for chainlink with a top rail. We almost killed each other not to mention what we did to the helpers. A couple of twenty something males competing is a horrible thing to watch. /forums/images/graemlins/grin.gif /forums/images/graemlins/grin.gif
It's good to be fifty seven and having a skid steer and not needing to compete anymore. /forums/images/graemlins/blush.gif