gary's pole barn project(not Spencer's)

   / gary's pole barn project(not Spencer's) #21  
Gary,

Looking at your latest two pictures I can't determine how your scissors trusses are braced? Surely there's some sort of cross-bracing to keep them from collapsing but I couldn't make it out. I've never used that type truss before, so was interested in looking.
 
   / gary's pole barn project(not Spencer's) #22  
cross braceing?

with the use of the tension webs (that require no permant braceing)

his perlin spaceing on the roof looks good.

based on span and basic load, virtually no permant braceing is required
 
   / gary's pole barn project(not Spencer's) #23  
gmason said:
Hello, can anyone provide me with some ideas for installing my ribbed metal roofing?

I've always bought brand new sneakers when starting a metal roof.

I also use a fall-arrest harness anchored to the peak. The anchor point is a bent square of 3/8" plate with a ring attached to it's center. It is anchored in place with 4 ropes anchored at ground level. Sounds more complicated than it is.
 
   / gary's pole barn project(not Spencer's) #24  
schmism said:
cross braceing?

with the use of the tension webs (that require no permant braceing)

his perlin spaceing on the roof looks good.

based on span and basic load, virtually no permant braceing is required

Please tell me a little more Defective.
The idea that trusses don't require any permanent bracing to keep them in a vertical and parallel plane is interesting and up to now unheard of by me, but as I said above, I've had no experience with a scissors truss. I did try a google search and everything I could find indicated a requirement for lateral and diagonal bracing when installing the trusses.
 
   / gary's pole barn project(not Spencer's)
  • Thread Starter
#25  
Glenn9643 said:
Gary,

Looking at your latest two pictures I can't determine how your scissors trusses are braced? Surely there's some sort of cross-bracing to keep them from collapsing but I couldn't make it out. I've never used that type truss before, so was interested in looking.


well, that was an interesting problem with putting them up on the wall. It took the better part of a day to put just one up with 4 of us working on it.
We could get it up, but had no real way to brace it well enough. Because of the scissor trusses inherent top heavyness they alway wanted to "flip" on us. They only weighed 120lbs each, but were just plane awkward without a crane.

After sitting and astaring at the problem for a while I came up with this method of building these 2x4 boxes to sit on top of the wall. this way they gave me something to nail the truss to and also to help square it up and space them properly.

hope this pic helps

gary
 

Attachments

  • trusses1.jpg
    trusses1.jpg
    872.7 KB · Views: 838
   / gary's pole barn project(not Spencer's)
  • Thread Starter
#26  
Purlins are ture 2x4 pine wood I sawed on my sawmill a year ago. and are 24"OC up the pitch. There are a total of 7 right now and the last one I'll put and use at the bottom for the facia board.

Oh, and I've been up on the purlins putting the metal roof up this week and there is absolutly no movment, no bouncing or swaying. And I'm ~230lbs.

here's another truss and purlin pic
 

Attachments

  • truss2.jpg
    truss2.jpg
    939.7 KB · Views: 639
   / gary's pole barn project(not Spencer's) #27  
I can see where the knee-walls you built helped in erection and keeping things upright and aligned.
The second picture also shows a 2x4 within the trusses just below the peak of the roof. I expected to see some diagonal bracing through the trusses as well to strengthen so they can't all collapse like a house of cards if you get a strong wind. Hopefully your knee-walls will provide that strength. Everything looks good; you'll really enjoy it after you finish.
 
   / gary's pole barn project(not Spencer's) #28  
That barn is just gourgeous! Did you draw up the plans yourself or did you purchase them?

I'm not sure where one would even start to find poles of that girth. Given that you milled your own timber for the purlins, did you also cut the poles yourself?
 
   / gary's pole barn project(not Spencer's) #29  
Glenn9643 said:
everything I could find indicated a requirement for lateral and diagonal bracing when installing the trusses.


yes when installing trusses, but once your permant braceing (in this case purlins at 2' OC) are installed (or sheathing) then much of your temorary braceing may be removed.

again based on the span, and use of tension webs (which have a much larger L/D requirement for out of plane buckleing) other than the roof and a 1 or 2 on the BC, no addtional permant braceing is required on a truss of that size.

BCSI (Buliding componet safty information) can supply all the neccary information based on temorary lateral and diagonal braceing, essepecial for long clear span (60'+) trusses.
 
   / gary's pole barn project(not Spencer's)
  • Thread Starter
#30  
lopezian said:
That barn is just gourgeous! Did you draw up the plans yourself or did you purchase them?

I'm not sure where one would even start to find poles of that girth. Given that you milled your own timber for the purlins, did you also cut the poles yourself?


Hello, and thanks...
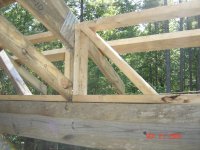
The plans are all done on a piece of scratch paper and by ear... Brother-in-law is an Engineer and confirmed my 11"x10"x20' Oak beams would be suficiant and that the one pine beam would go best at the far end.

The poles have been a little difficult to get onsite. They are widening a bunch of roads in my area and they take down power poles all the time. I tried to get the green ones, not the older creosote kind. One of the companies doing this work were glad for someone to come take them, but you had to catch the right person at the right time to get the OK. I was persistant. I've got a 14' dump trailer and would take my tractor to the site and load/drag the poles with chains and the bucket. Some of the poles in the 32'+ range. Now for getting them into the holes was a different story and unfortunatly don't have any pictures from that.

After the first one or two, I got really good at it and by the time I got to the really big ones, I had the method down pretty solid. Basically chain the pole so that the butt end has just a little more weight than the other side and loop one chain around the pole and secure it pretty tight to the bucket. Then it's a matter of picking the pole up, someone would hang on to the top end to help position the butt end in the hole, then buy lifting and subtil movements of the bucket and tractor, I could get the pole to slide right in. I could then use the tractor to postion the pole plumb and in the right location. If I was carefull, I could even lift the pole off the bottom of the hole just a bit, to help located it just right. Sometimes adding another chain for good measure and some safety.

In the end, it pays to have everything as square and located in the right spot. I had one pole that developed a pretty good curve to it, that I had to force it back a little to get it to line up right.

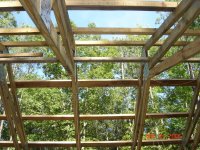
From outside to outside beams that the joists rest on was 20' +- 1/4" and that is 18' off the ground.
 

Tractor & Equipment Auctions

New Skid Steer Attachment Plate (A53002)
New Skid Steer...
Ford Super Duty Pickup Truck Bed (A51691)
Ford Super Duty...
2014 INTERNATIONAL DURASTAR 4400 SERVICE TRUCK (A51406)
2014 INTERNATIONAL...
2011 Ford Crown Victoria Sedan (A51694)
2011 Ford Crown...
2012 Ram 3500 Chassis Pickup Truck, VIN # 3C7WDTAL9CG134341 (A51572)
2012 Ram 3500...
16FT Flatbed Trailer (A51573)
16FT Flatbed...
 
Top